
Related Manuals for Acrosser Technology ANR-C246E1


Summary of Contents for Acrosser Technology ANR-C246E1
- Page 1 ANR-C246E1 ANR-C246E1 1U Rackmount Network Platform ® ® • Intel Xeon E-2100 family (C246 Chipset) ® ® Intel Core Celeron ® • Intel C426 User Manual Acrosser Technology Co., Ltd. www.acrosser.com...
- Page 2 Acrosser Technology Co., Ltd. In no event will Acrosser Technology Co., Ltd. be liable for direct, indirect, special, incidental, or consequential damages arising out of the use or inability to use the product or documentation, even if advised of the possibility of such damages.
-
Page 3: Table Of Contents
ANR-C246E1 Table of Contents 1. Product Specifications ..............5 1.1. Specifications ......................5 1.2. Package Contents ...................... 7 2. Hardware Information ..............8 2.1. Dimensions ......................... 8 2.2. Jumpers and Connectors ..................11 2.3. List of Jumpers ......................13 2.3.1. RTC Reset (JP1) ................... 13 2.3.2. - Page 4 3.6.1.1. Secure Boot: Key Management ............. 46 3.7. Setup submenu: Boot ....................47 3.8. Setup submenu: Save & Exit ..................48 4. FAQ ....................49 Q 1. Where is the serial number located on my system? ..........49 Acrosser Technology Co., Ltd.
-
Page 5: Product Specifications
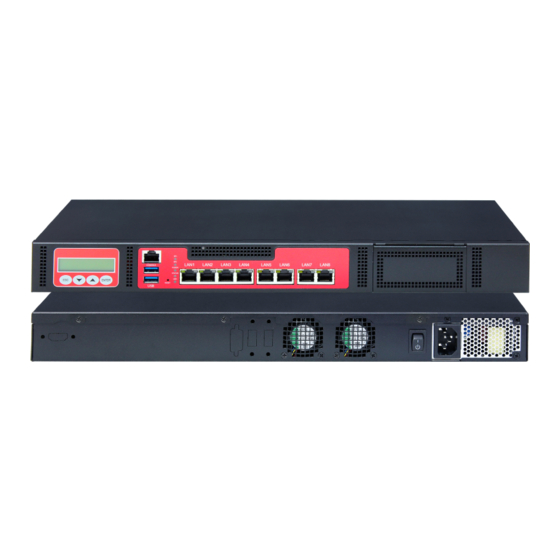
ANR-C246E1 Product Specifications ANR-C246E1 rackmount network appliances provides flexible network solutions with the power of the 8th Generation Intel Core and Xeon processors, formerly Coffee Lake. With a range of processors to choose from, from the i3 up to Xeon E-2 processors, this network appliance is built for UTM, SD-WAN, web monitoring, load balancing, and Network Virtualization. - Page 6 • HDD Active LED x 1 • USB 3.0 Ports x 2 • RJ-45 Console x 1 Rear Panel • AC Power Input x 1 • Power Switch x 1 • Rear Expansion Slot x 1 (Optional) Acrosser Technology Co., Ltd.
-
Page 7: Package Contents
ANR-C246E1 1.2. Package Contents Check if the following items are included in the package. Item Q’ty Remark ANR-C246E1 System � SATA Cable � SATA Power Cable � Console Cable � Ear Bracket Kit � CPU Heatsink � www.acrosser.com... -
Page 8: Hardware Information
ANR-C246E1 Hardware Information Dimensions 2.1. Dimensions (Unit: mm) System System: Acrosser Technology Co., Ltd. - Page 9 ANR-C246E1 omponent Side Component Side: www.acrosser.com...
- Page 10 ANR-C246E1 Solder Side Solder Side: Acrosser Technology Co., Ltd.
-
Page 11: Jumpers And Connectors
ANR-C246E1 Jumpers and Connectors 2.2. Jumpers and Connectors ponent Side Component Side: www.acrosser.com... - Page 12 ANR-C246E1 Solder Side Solder Side: Acrosser Technology Co., Ltd.
-
Page 13: List Of Jumpers
ANR-C246E1 2.3. List of Jumpers The ANR-C246E1 system board is configured with a number of jumpers which can be configured for your application. This section details those jumpers and their settings. Label Function RTC Reset Auto Power Button 2.3.1. RTC Reset (JP1) -
Page 14: Hdd Power Connector (Cn4 & Cn5)
DIO6 Input / Output DIO7 Input / Output +3.3V 2.4.3. LCM Connector (CN18) Signal Signal Type LCMGND LCMVCC SLIN# Output INIT# Output AFD# Output DATA0 Input / Output DATA1 Input / Output DATA2 Input / Output Acrosser Technology Co., Ltd. -
Page 15: Key Pad Connector (Cn19)
ANR-C246E1 DATA3 Input / Output DATA4 Input / Output DATA5 Input / Output DATA6 Input / Output DATA7 Input / Output LCD# Output 2.4.4. Key PAD Connector (CN19) Signal Signal Type KEY PAD Down Input KEY PAD Up Input KEY PAD Right... -
Page 16: Usb 3.0 Port (Usb1)
HDD LED (-) Output 2.4.7. USB 3.0 Port (USB1) Signal Signal Type +5V_USB USB3_RX1_DN DIFF USB3_RX1_DP DIFF USB3_TX1_DN DIFF USB3_TX1_DP DIFF USBP_0N DIFF USBP_0P DIFF USBP_1P DIFF USBP_1N DIFF USB3_TX2_DP DIFF USB3_TX2_DN DIFF USB3_RX2_DP DIFF USB3_RX2_DN DIFF +5V_USB Acrosser Technology Co., Ltd. -
Page 17: Hard Drive Installation
ANR-C246E1 2.5. 2.5” Hard Drive Installation This section details the steps of how to install a 2.5” hard drive for the ANR-C246E1. This section includes steps for installing one or two 2.5” hard drives. Step 1: Remove the screws securing the top cover, then remove the cover. - Page 18 Attach SATA and power cables to system board as shown for the first hard drive. Step 5: Attach SATA and power cables to system board as shown for the second hard drive (skip this step if only installing one hard drive). Acrosser Technology Co., Ltd.
- Page 19 ANR-C246E1 Step 6: Place first hard drive assembly onto installation brackets as shown. Note: Make sure that SATA and power cables are under the hard drive. Step 7: Connect SATA and power cable to first hard drive as shown. www.acrosser.com...
- Page 20 Place the second hard drive onto installation brackets as shown. Note: Make sure that SATA and power cables are under the hard drive. Step 9: Connect SATA and power cable to the second hard drive as shown. Acrosser Technology Co., Ltd.
-
Page 21: Cpu And Heat Sink Installation
ANR-C246E1 2.6. CPU and Heat Sink Installation This section details the steps of how to install the CPU and heat sink for the ANR- C246E1. Step 1: Remove the screws securing the top cover, then remove the cover. Step 2: Remove the highlighted screw, then remove the fan duct. - Page 22 ANR-C246E1 Step 3: Open the CPU bracket. Acrosser Technology Co., Ltd.
- Page 23 ANR-C246E1 Step 4: Remove the pin cover and place the CPU into the socket. Use the notches to ensure proper alignment. Note: The CPU should fit into the socket easily. DO NOT force the CPU into the socket. Pushing on the CPU can cause damage to the CPU pins or socket.
- Page 24 Step 6: Place the heatsink onto the CPU and fasten the heatsink screws. Make sure the heatsink is aligned with the airflow of the fan. Step 7: Replace the fan cover and secure with the fastening screw. Acrosser Technology Co., Ltd.
-
Page 25: Ami Bios Setup
ANR-C246E1 AMI BIOS Setup 3.1. System Test and Initialization The system uses certain routines to perform testing and initialization during the boot up sequence. If an error, fatal or non-fatal, is encountered, the system will output a few short beeps or an error message. The board can usually continue the boot up sequence with non-fatal errors. -
Page 26: Setup Submenu: Main
ANR-C246E1 3.3. Setup Submenu: Main 3.4. Setup Submenu: Advanced Acrosser Technology Co., Ltd. -
Page 27: Advanced: Cpu Configuration
ANR-C246E1 3.4.1. Advanced: CPU Configuration • Active Processor Cores Number of cores to enable in each processor package. • Hyper-Threading Enabled for Windows XP and Linux (OS optimized for Hyper-Threading Technology) and Disabled for other OS (OS not optimized for Hyper-Threading Technology). -
Page 28: Advanced: Pch-Fw Configuration
ANR-C246E1 3.4.2. Advanced: PCH-FW Configuration 3.4.2.1. Firmware Update Configuration Acrosser Technology Co., Ltd. -
Page 29: Advanced: Trusted Computing
ANR-C246E1 • Me FW Image Re-Flash Enable/Disable Me FW Image Re-Flash function. • Local FW Update Options for Local FW Update function. 3.4.3. Advanced: Trusted Computing • Security Device Support Enables or Disables BIOS support for security device. O.S. will not show Security Device. -
Page 30: Advanced: Sata And Rst Configuration
ANR-C246E1 3.4.4. Advanced: SATA And RST Configuration • SATA Controller(s) Enable/Disable SATA Device. • SATA Mode Selection Determines how SATA controller(s) operate. • Hot Plug Designates this port as Hot Pluggable. Acrosser Technology Co., Ltd. -
Page 31: Advanced: Hardware Monitor
ANR-C246E1 3.4.5. Advanced: Hardware Monitor 3.4.5.1. Smart Fan Function www.acrosser.com... - Page 32 Temperature Value for FAN Start. • Full Speed Temperature Temperature Value for FAN Full Speed. • PWM Slope Slope PWM value/Degree C for FAN Speed Control. Range:[1-15] • PWM Duty Manual Mode PWM Duty value. Range:[0 - 255] Acrosser Technology Co., Ltd.
-
Page 33: Advanced: Sio Configuration
ANR-C246E1 3.4.6. Advanced: SIO Configuration 3.4.6.1. Serial Port Configuration www.acrosser.com... - Page 34 ANR-C246E1 • Use This Device Enable/Disable this Logical Device • Possible Allow user to change Device’s Resource settings. New settings will be reflected on This Setup Page after System restarts. Acrosser Technology Co., Ltd.
-
Page 35: Parallel Port Configuration
ANR-C246E1 3.4.6.2. Parallel Port Configuration • Use This Device Enable/Disable this Logical Device Enable/Disable this Logical Device Enable/Disable this Logical Device • Mode Change Parallel Port mode. Some of the Modes required a DMA resource. After Mode changing, Reset the System to reflect actual device settings. -
Page 36: Advanced: Serial Port Console Redirection
ANR-C246E1 3.4.7. Advanced: Serial Port Console Redirection • COM0 Console Redirection Enable or Disable Console Redirection • Console Redirection Console Redirection Acrosser Technology Co., Ltd. -
Page 37: Com0 Console Redirection
ANR-C246E1 3.4.7.1. COM0 Console Redirection • Terminal Type Emulation: ANSI: Extended ASCII char set. VT100: ASCII char set. VT100+: Extends VT100 to support color, function keys, etc. VT-UTF8: Uses UTF8 encoding to map Unicode chars onto 1 or more bytes. -
Page 38: Legacy Console Redirection Settings
Enables or disables extended terminal resolution. • Putty KeyPad Select FunctionKey and KeyPad on Putty. 3.4.7.2. Legacy Console Redirection Settings • Redirection COM Port Select a COM port to display redirection of Legacy OS and Legacy OPROM Messages. Acrosser Technology Co., Ltd. -
Page 39: Advanced: Power Management
ANR-C246E1 • Resolution On Legacy OS, the Number of Rows and Columns supported redirection. • Redirection After POST When BootLoader is selected, then Legacy Console Redirection is disabled before booting to legacy OS. When Always Enable is selected, then Legacy Console Redirection is enabled for legacy OS. -
Page 40: Advanced: Digital Io Port Configuration
ANR-C246E1 3.4.9. Advanced: Digital IO Port Configuration • DIO Port1~4 Set DIO as Input or Output • Output Level Set output level when DIO pin is output • DIO Port5~8 Set DIO as Input or Output Acrosser Technology Co., Ltd. -
Page 41: Advanced: Lan Bypass Configuration
ANR-C246E1 3.4.10. Advanced: LAN Bypass Configuration • Configure LAN Bypass Status LED LAN Bypass Status LED • Mode for Power-on Configure LAN kit behavior when system in power-on state. (Bypass/Pass Through) • Mode for Power-off Configure LAN kit behavior when system in power-off state. (Bypass/Pass Through) •... -
Page 42: Advanced: Network Stack Configuration
Wait time in seconds to press ESC key to abort the PXE boot. Use either +/- or numeric keys to set the value. • Media detect count Number of times the presence of media will be checked. Use either +/- or numeric keys to set the value. Acrosser Technology Co., Ltd. -
Page 43: Setup Submenu: Chipset
ANR-C246E1 3.5. Setup submenu: Chipset 3.5.1. Chipset: System Agent (SA) Configuration www.acrosser.com... -
Page 44: Setup Submenu: Security
Press Enter again to set the password. • Removing the Password Select the password you want to remove and enter the current password. At the next dialog box press Enter to disable password protection. Acrosser Technology Co., Ltd. -
Page 45: Security: Secure Boot
ANR-C246E1 3.6.1. Security: Secure Boot • Secure Boot Secure Boot feature is Active if Secure Boot is Enabled, Platform Key (PK) is enrolled, and the System is in User mode. The mode change requires platform reset. • Secure Boot Mode In Custom mode, Secure Boot Policy variables can be configured by a physically present user without full authentication. -
Page 46: Secure Boot: Key Management
Enroll SHA256 Hash certificate of a PE image into Authorized Signature Database (db) • Remove ‘UEFI CA’ from DB Device Guard ready system must not list ‘Microsoft UEFI CA’ Certificate in Authorized Signature database (db). • Restore DB defaults Restore DB variable to factory defaults. Acrosser Technology Co., Ltd. -
Page 47: Setup Submenu: Boot
ANR-C246E1 3.7. Setup submenu: Boot • Quiet Boot Enable / Disable Quiet Boot option. • CSM Support Enable/Disable CSM Support. • Launch PXE ROM Controls the execution of UEFI and Legacy Network OpROM Note: Network Stack should be enabled if select UEFI PXE boot. -
Page 48: Setup Submenu: Save & Exit
ANR-C246E1 3.8. Setup submenu: Save & Exit • Boot Option Priorities This feature allows the user to specify which devices are boot devices and the order of priority from which the systems boots from during startup. Acrosser Technology Co., Ltd. -
Page 49: Faq
ANR-C246E1 Q 1. Where is the serial number located on my system? • The serial number (S/N) is an alpha-numeric character located on the bottom or side chassis. (for reference only) www.acrosser.com... - Page 50 ANR-C246E1 Technical Support Form We deeply appreciate your purchase of Acrosser products. Please find the “tech_form. doc” file in our utility CD. If you have any questions or problems about Acrosser products, please fill in the following information. We will answer your questions in the shortest time possible.
- Page 51 Acrosser Headquarters Acrosser Nanjing Office 欣扬通电子有限公司 南京办事处 241新北市三重區光復路一段61巷26號10樓 江苏省南京市江宁区天元东路228号504室 10F., No.26, Ln. 61, Sec. 1, Guangfu Rd., (邮编: 211100) Sanchong Dist., New Taipei City 241, Taiwan Room 504, No. 228, Tian Yuan East Rd., (R.O.C.) Jiang Ning Dist., Nanjing City, Jiangsu Province, TEL: +886-2-29999000 China (Postal: 211100) FAX: +886-2-29992887 / +886-2-29993960...
Need help?
Do you have a question about the ANR-C246E1 and is the answer not in the manual?
Questions and answers