Table of Contents
Advertisement
Quick Links
Advertisement
Table of Contents

Related Manuals for GEZE ECdrive H


Summary of Contents for GEZE ECdrive H
- Page 1 ECdrive H EN Pre-installation instructions 190486-01...
-
Page 2: Table Of Contents
Overview..................................6 Diagrams ..........................................6 Tools and aids ........................................6 Torques ..........................................6 Components and assembly groups ................................7 Bill of material VP-Kit ECdrive H ..................................7 Pre-mounting ................................8 Machining the track and cover ..................................8 Preparing the track ......................................8 Installing stop buffers .....................................9 Installing the drive components .................................9 Installing cable guides .................................... -
Page 3: Introduction
If there are several actions to be taken, keep to the given order. Revisions and validity Version 01: valid for ECdrive H from date of manufacture 2021. Product liability In compliance with the liability of the manufacturer for his products as defined in the German “Product Liability Act”, compliance with the information contained in this brochure (product information and intended use, misuse,... -
Page 4: Fundamental Safety Notes
à in the installation variants / types of installation documented by GEZE à within the tested/approved area of application (climate / temperature / IP rating) Any other use is considered non-intended and will lead to the exclusion of all liability and warranty claims to GEZE. Safety notes à... -
Page 5: Safety-Conscious Working
ECdrive H Fundamental safety notes Safety-conscious working à Secure workplace against unauthorised entry. à Use only the cables specified on the cable plan provided. Cables must be shielded in compliance with the wiring diagram. à Secure loose, internal drive cables with cable ties. -
Page 6: About This Document
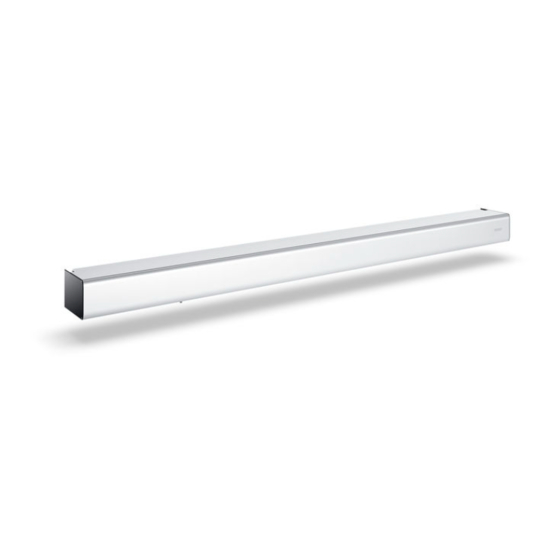
About this document ECdrive H About this document These instructions describe the pre-installation of the ECdrive H automatic sliding door drive. Overview 4. 1 Diagrams Drawing no. Type Name 70517-0-001 Drive drawing Drive ECdrive H 70517-2-0201 Component drawing Track, bespoke, for ECdrive H... -
Page 7: Components And Assembly Groups
2-leaf 1-leaf, right hand slide to open 1-leaf, left hand slide to open Bill of material VP-Kit ECdrive H Side plate Motor gear unit Div. clear adhesive labels... -
Page 8: Pre-Mounting
Pre-mounting ECdrive H Pre-mounting The most up-to-date diagram is applicable for performing the pre-installation work. All components must be identified and installed in accordance with the drive drawing. 5. 1 Machining the track and cover Check profiles for damage. Cut the track and cover to the required length (see machining drawings, Chapter 4.1) -
Page 9: Installing Stop Buffers
ECdrive H Pre-mounting Installing stop buffers Stop buffer: Pos. 13 in assembly group list, Chapter 4.4 Set stop buffers on the track on the left and right (1). Screw in the setscrews M6×6 (2) until they are in contact with the track. -
Page 10: Installing Cable Guides
Pre-mounting ECdrive H Installing cable guides Cables can be cut! Lay cables in such a way that there are no cables near the moving parts. Cable guide spacing approx. 200 mm. Fix the cable guide (1) on the track. Connecting motor gear unit and control unit Route the rotary encoder cable (2) and motor connection cable (1) to the control unit (3). -
Page 11: Connecting Transformer And Control Unit
ECdrive H Pre-mounting Connecting transformer and control unit Make sure that cables are cut to length and routed in such a way that they do not become jammed when the cover is positioned and cannot come into contact with moving components. -
Page 12: Fitting The Transformer Ground
Pre-mounting ECdrive H Fit the transformer cable (1) to terminal (6) of the transformer. Fitting the transformer ground WARNING! The track is not earthed if there is a poor connection between earthing jumper (2) and track. Check whether the setscrews of the earthing jumper (2) penetrate the anodised layer of the track. -
Page 13: Fitting The Cover Earthing
ECdrive H Pre-mounting Fitting the cover earthing Keep the counterbore (5) clear of any coatings. Remove the coating at some points in the dotted area (6) on the inside of the cover, if there are no blank points available for the device safety test. -
Page 14: 5. 1 0 Connecting The Rechargeable Battery And Control Unit
Pre-mounting ECdrive H Screw the safety block (4) to the inside of the side plate (2) using the screws (3). Screw the bolt (5) completely into the safety block (4) from below. 5. 1 0 Connecting the rechargeable battery and control unit... -
Page 15: Device Safety Test And Production Test
ECdrive H Device safety test and production test Device safety test and production test WARNING Risk of fatal injury due to electric shock! The electrical system (230 V/115 V) may only be connected and disconnected by a professional electrician or specialist electrical technician. - Page 16 E-Mail: leonberg.de@geze.com Baltic States – Iberia Scandinavia – Norway Lithuania / Latvia / Estonia GEZE Iberia S.R.L. GEZE Scandinavia AB avd. Norge GEZE GmbH E-Mail: norge.se@geze.com E-Mail: baltic-states@geze.com E-Mail: info.es@geze.com Niederlassung Süd-Ost www.geze.no www.geze.es Tel. +49 (0) 7152 203 6440 E-Mail: muenchen.de@geze.com...
Need help?
Do you have a question about the ECdrive H and is the answer not in the manual?
Questions and answers