dji MATRICE 30 Series User Manual
Hide thumbs
Also See for MATRICE 30 Series:
- Quick start manual ,
- Disclaimer and safety manuallines (109 pages) ,
- User manual (86 pages)
Table of Contents
Advertisement
Quick Links
Advertisement
Table of Contents

Related Manuals for dji MATRICE 30 Series


Summary of Contents for dji MATRICE 30 Series
- Page 1 User Manual v1.0 2022.04...
- Page 2 Materials or any part of the Materials by reproducing, transferring or selling the Materials. Users should only refer to this document and the content thereof as instructions to operate DJI UAV. The document should not be used for other purposes.
-
Page 3: Using This Manual
2 (Enterprise Series) using the link below: https://www.dji.com/matrice-30/downloads Tutorial Videos Go to the address below or scan the QR code to watch the DJI Matrice 30 tutorial videos, which demonstrate how to use the Matrice 30 safely. https://www.dji.com/matrice-30/video The operating temperature of this product is -20° to 50° C. It does not meet the standard operating temperature for military grade application (-55°... -
Page 4: Table Of Contents
Contents Using This Manual Legends Read Before Use Downloading DJI Assistant 2 (Enterprise Series) Tutorial Videos Product Profile Introduction Feature Highlights Flight Safety Flight Environment Requirements Wireless Communications Requirements Vision System and Infrared Sensing System Introduction Detection Range Calibrating the Vision System... - Page 5 Activating the Remote Controller Remote Controller Overview Mounting the WB37 Intelligent Battery Mounting the Dongle Mounting the Strap and Bracket Kit Adjusting the Antennas IP Rating User Interface Home Screen Screen Gestures Shortcut Settings Video Transmission © 2022 DJI All Rights Reserved.
- Page 6 MATRICE 30 SERIES User Manual Remote Controller LEDs and Alert Remote Controller LEDs Remote Controller Alert Charging the Remote Controller and Checking the Battery Level Charging the Remote Controller Checking the Battery Level Linking the Remote Controller and Control Stick Modes...
- Page 7 MATRICE 30 SERIES User Manual FPV Camera View Using FPV Camera View Primary Flight Display (PFD) Navigation Display Top Bar AR Projection Gimbal Camera View Using Gimbal Camera View Wide Camera View Thermal Camera View Laser Rangefinder (RNG) Smart Track...
- Page 8 Product Profile This chapter introduces the major features of the product. © 2022 DJI All Rights Reserved.
-
Page 9: Product Profile
The built-in DJI AirSense system detects nearby aircraft in the surrounding airspace, providing alerts in the DJI Pilot 2 app to ensure safety. Safety during takeoff, flight, and landing are improved with the safety beacons that help to identify the aircraft during flight and the auxiliary lights allow the vision positioning system to achieve an even greater performance at night or when there is low light. -
Page 10: Feature Highlights
Cloud Mapping: When the remote controller is logged in to DJI FlightHub 2, the aircraft can perform a cloud mapping task, which enables viewing of and generates a map on DJI FlightHub 2 simultaneously.* * For more details, refer to the DJI FlightHub 2 User Guide which is available to download from the official DJI website https://www.dji.com/flighthub-2/downloads. - Page 11 Flight Safety This chapter provides information about flight environment requirements, wireless communication requirements, and important flight safety features of the aircraft. © 2022 DJI All Rights Reserved.
-
Page 12: Flight Safety
Make sure to have training and practice before operating any actual flight. Practice with the simulator in DJI Assistant 2 or fly under the guidance of experienced professionals. Pick a suitable area to fly in according to the following flight requirements and restrictions. Fly the aircraft below 120 m (400 ft). Any flight altitude higher than that may violate local laws and regulations. -
Page 13: Vision System And Infrared Sensing System
MATRICE 30 SERIES User Manual Vision System and Infrared Sensing System Introduction Rear View Bottom View The main components of the vision system (cameras with stereo vision sensors) are located on the front, rear, left, right, top and bottom of the aircraft. The infrared sensing system has two infrared sensors on each side of the aircraft (front, rear, left, right, top, and bottom). -
Page 14: Detection Range
Users can set the braking and warning distances in DJI Pilot 2. The aircraft brakes automatically when approaching the braking distance. When the aircraft is in the warning distance, DJI Pilot 2 will display an orange alert in obstacle information. When the aircraft is close to the braking distance, a red alert will appear in obstacle information. -
Page 15: Calibrating The Vision System
The vision systems installed on the aircraft is factory calibrated. If the aircraft experiences a collision or a significant change in the operating temperature, calibration may be required. DJI Pilot 2 will display a prompt when calibration is required. Follow these steps to calibrate the vision system when prompted: 1. -
Page 16: Obstacle Sensing
MATRICE 30 SERIES User Manual Obstacle Sensing Obstacle sensing works best when the lighting is adequate and the obstacle is clearly textured. It does not work well with obstacles that are less dense such as twigs on a tree. The aircraft must fly at a speed below 17 m/s with a maximum tilt angel of 25°... - Page 17 MATRICE 30 SERIES User Manual The infrared sensing systems may NOT detect the distance accurately in the following situations: a. Flying over surfaces that can absorb sound waves (e.g., asphalt road surfaces). b. A large area of strong reflectors situated at a distance of more than 15 m (e.g., multiple traffic signs placed side by side).
-
Page 18: Return To Home (Rth)
Home Point from its current location. A warning prompt will appear in DJI Pilot 2 when the battery level is low and the aircraft can only support Low Battery RTH. The aircraft will automatically fly to the Home Point if no action is taken after a 10-second countdown. Cancel RTH by pressing the RTH button or the Pause button on the remote controller. - Page 19 MATRICE 30 SERIES User Manual Battery Level Warning Description Flight Instructions If RTH is selected, the aircraft will fly to the Home Point automatically and landing protection will be The remaining battery enabled. Regain control of the aircraft and land it...
-
Page 20: Failsafe Rth
Refer to the Landing Protection section for details. * Make sure that the downward vision system is enabled in DJI Pilot 2. The user can also exit RTH by pushing the control stick in the opposite direction of the flight (e.g., pushing the throttle stick down when the aircraft is ascending). -
Page 21: Rth Safety Precautions
Therefore, it is important to set a suitable RTH altitude before each flight. Launch DJI Pilot 2, enter the PreFlight Check view or tap -> -> camera view to set the RTH altitude. -
Page 22: Landing Protection
2. The aircraft will land directly if landing protection determines the ground is suitable for landing. 3. If the ground is determined unsuitable for landing, the aircraft will hover. A prompt will appear in DJI Pilot 2 pending the next action by the user. The aircraft will start descending only when the battery level drops to 0%. -
Page 23: Flight Restrictions And Unlocking
Zones, which are further divided into Restricted Zones, Authorization Zones, Warning Zones, Enhanced Warning Zones, and Altitude Zones. Users can view such information in real time in DJI Pilot 2. GEO Zones are specific flight areas, including but not limited to airports, large event venues, locations where public emergencies have occurred (such as forest fires), nuclear power plants, prisons, government properties, and military facilities. - Page 24 In Flight: When the GNSS signal changes from weak to strong, a 100-second countdown will commence in DJI Pilot 2 if the aircraft exceeds the altitude limit. Altitude The aircraft altitude is limited when When the countdown is finished, the aircraft will Zones (Gray) flying inside an Altitude Zone.
- Page 25 MATRICE 30 SERIES User Manual zone. When approaching the buffer zone from underneath in a vertical direction, the aircraft can ascend and descend in altitude or fly in an opposite direction of the Altitude Zone, but cannot fly toward the Altitude Zone.
-
Page 26: Unlocking Geo Zones
Custom Unlocking is tailored for users with special requirements. It designates user-defined custom flight areas and provides flight permission documents specific to the needs of different users. This unlocking option is available in all countries and regions and can be requested for via the DJI Fly Safe website at https://www.dji.com/flysafe. -
Page 27: Maximum Altitude & Distance Restrictions
Maximum Altitude & Distance Restrictions Maximum flight altitude restricts the aircraft flight altitude, while maximum flight distance restricts the aircraft flight radius around the Home Point. These limits can be set using the DJI Pilot 2 app for improved flight safety. -
Page 28: Calibrating The Compass
MATRICE 30 SERIES User Manual Calibrating the Compass Only calibrate the compass when prompted to do so by the DJI Pilot 2 app or the aircraft rear indicators. Observe the following rules when calibrating the compass: DO NOT calibrate the compass in locations with strong magnetic interference, such as near magnets, parking lots, or construction sites with underground reinforced concrete structures. -
Page 29: Three-Propeller Emergency Landing
Move the aircraft to a different location and try again. A prompt will appear in DJI Pilot 2 if compass calibration is required before takeoff. The prompt will disappear after the calibration is complete. -
Page 30: Dji Airsense
ADS-B Out devices. 2. If there is an obstacle between a manned aircraft and a DJI aircraft, DJI AirSense will not be able to receive ADS-B messages from the aircraft or send warnings to the user. Keenly observe your surroundings and fly with caution. -
Page 31: Pre-Flight Checklist
5 m away from the pilot. The pilot should be facing the rear of the aircraft. 9. To ensure flight safety, enter the flight view of DJI Pilot and check the parameters on the pre-flight checklist such as the control stick mode, RTH height, obstacle distance, and failsafe settings. It is recommended to set the failsafe action to RTH. - Page 32 Aircraft This chapter introduces the major features of the aircraft. © 2022 DJI All Rights Reserved.
-
Page 33: Aircraft
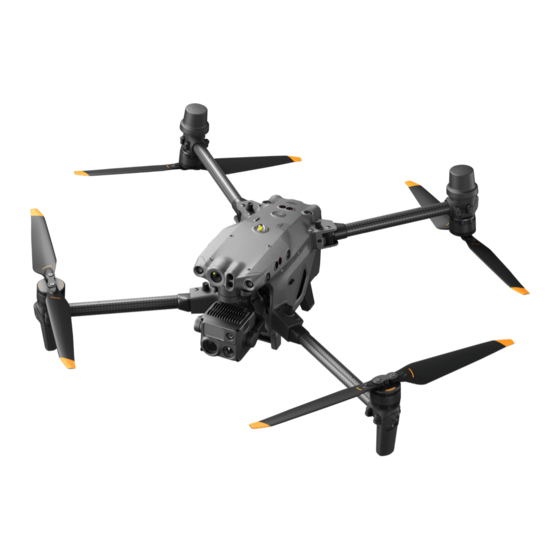
After the aircraft is linked to the remote controller (make sure the remote controller is connected to the internet), the DJI Pilot 2 app will display the prompt: “There’s a DJI device not activated”. Follow the on- screen instructions to activate the aircraft. Contact DJI Support if the activation fails. Refer to the Link the Remote Controller section for detais. - Page 34 32. Downward Beacon 33. Dongle Compartment Bottom View DO NOT disassemble the product without the assistance of a DJI authorized dealer (except for components allowed to be disassembled by users in this guide), otherwise it will not be covered under warranty.
-
Page 35: Fpv Camera
MATRICE 30 SERIES User Manual FPV Camera The M30 Series aircraft is equipped with a starlight FPV camera, which can optimize images in poor lighting conditions at night. It helps the pilot to have better visibility of the flight environment and fly safely. -
Page 36: Storing The Propellers
Use the H2.0 hex key to replace the propellers. It is recommended to replace the propellers only in an emergency situation during operations. After the flight is over, contact DJI Support or an authorized dealer for propeller check and maintenance as soon as possible. -
Page 37: Aircraft Indicators
MATRICE 30 SERIES User Manual Aircraft Indicators The aircraft has front and rear indicators. They can be turned off in DJI Pilot 2 for unobtrusive field operations. 1. Front Indicators: Blink green and red alternately to indicate the nose of the aircraft. -
Page 38: Aircraft Beacons
The auxiliary lights located at the bottom of the aircraft will automatically turn on in poor light conditions to assist the downward vision system. The lights can also be manually turn on or off in DJI Pilot 2. The auxiliary lights will automatically turn on in low-light environments when the flight altitude is under 5 m. -
Page 39: Gimbal Cameras
C3 buttons for quick and easy control of the camera. Controlling the Camera with DJI Pilot 2 For information about how to control the camera in DJI Pilot 2, refer to the Gimbal Camera View section in the DJI Pilot 2 App chapter. ©... -
Page 40: Using The Microsd Card
MATRICE 30 SERIES User Manual Using the microSD Card A 32 GB microSD card is in the microSD card slot when shipped. The aircraft supports microSD cards with a maximum capacity of up to 128 GB. To ensure that the camera can quickly read and write data for HD video recording, use a microSD card with UHS Speed Class 3 or above and a write speed greater than 30 MB/s. -
Page 41: Gimbal
MATRICE 30 SERIES User Manual Gimbal The 3-axis gimbal stabilizes the camera, allowing the aircraft to capture clear and steady images and videos when in flight. Refer to the figure below for the tilt, pan, and roll range of the gimbal. -
Page 42: Gimbal Lock
MATRICE 30 SERIES User Manual Gimbal Lock Rotate the gimbal tilt down to 0° to unlock the gimbal before use. It is recommended to rotate the gimbal tilt up to +90° to lock the gimbal after use. Gimbal Operation Controlling the Gimbal with the Remote Controller 1. -
Page 43: Gimbal Mode
Free Mode the rotation of the aircraft. Users can use the gimbal mode icon in the gimbal camera view in DJI Pilot 2 to quickly control the gimbal and achieve the following: The gimbal pan rotates to the center to be consistent with the aircraft Gimbal Recenter heading, and the gimbal tilt returns to the center (0°) from the current... - Page 44 MATRICE 30 SERIES User Manual The gimbal pan rotates to the center to be consistent with the aircraft Gimbal Down heading, and the gimbal tilt changes to -90° from the current position. The gimbal pan rotates to the center to be consistent with the aircraft Gimbal Pan Recenter heading while the gimbal tilt remains unchanged.
-
Page 45: Aircraft Rtk
RTK service type, then select “Purchase a Network RTK plan” and tap “Purchase a plan”. Follow the on-screen instructions to purchase and activate the plan. DJI has provided a Network RTK plan to you. Follow the above steps to activate the plan within the validity period. If the provided plan has expired, please purchase an additional Network RTK plan. -
Page 46: Custom Network Rtk
1. Make sure that the remote controller is connected to the aircraft and the internet. 2. Go to the camera view in the DJI Pilot 2 app, tap and then select . -
Page 47: Psdk Port
PSDK Port The PSDK port on the top of the aircraft enables developers to connect PSDK payloads and develop more expansion functions. Visit https://developer.dji.com/ for more information about SDK development. Visit https://www.dji.com/matrice-30/downloads to learn more about the PSDK Mounting Bracket. - Page 48 Remote Controller This chapter introduces the features of the remote controller and includes instructions for controlling the aircraft. © 2022 DJI All Rights Reserved.
-
Page 49: Remote Controller
2. Connect to a Wi-Fi network to access the internet. Then set the time zone, date, and time. 3. If you have a DJI account, log in with your password. If you are a new user, create a DJI account and log in. -
Page 50: Remote Controller Overview
14. 5D Button View the default 5D button functions in DJI Pilot L1/L2/L3/R1/R2/R3 Buttons Go to camera view in DJI Pilot 2 to view the 2. Refer to Guide on the home screen for more specific functions of these buttons. - Page 51 Press the button halfway down for autofocus F-mode (Function). F-mode can be set to and all the way down to take a photo. A-mode (Attitude) or T-mode (Tripod) in DJI Pilot 2. 26. Right Dial Controls the pan of the gimbal.
- Page 52 MATRICE 30 SERIES User Manual 21 22 23 24 10 11 31. Reserved Mounting Holes 37. Rear Cover Release Button For mounting external devices. 38. Alarm 32. C1 Button 39. Air Intake Customize functions in DJI Pilot 2. For heat dissipation. DO NOT block the air intake during usage.
-
Page 53: Mounting The Wb37 Intelligent Battery
MATRICE 30 SERIES User Manual Mounting the WB37 Intelligent Battery A WB37 battery (excluded) can be mounted onto the remote controller in the following steps. 1. Push the rear cover release button to the end to open the rear cover. -
Page 54: Mounting The Strap And Bracket Kit
MATRICE 30 SERIES User Manual Mounting the Strap and Bracket Kit A strap and bracket (excluded) can be mounted onto the remote controller in the following steps. 1. Mount the bracket on the remote controller with two screws. 2. Unfold the two handles. -
Page 55: Adjusting The Antennas
IP Rating 1. The DJI RC Plus remote controller has been tested in a lab environment and rated IP54 in accordance with the global IEC 60529 standard. The protection rating is not permanent, however, and may lower over an extended period. - Page 56 MATRICE 30 SERIES User Manual c. The air vent and air intake covers are not installed firmly. d. The dongle compartment cover is not attached firmly. e. The control sticks are not screwed in place securely. f. Antennas are not screwed in place securely.
-
Page 57: User Interface
MATRICE 30 SERIES User Manual User Interface Home Screen 4:53 DJI Fly 2 Gallery Files Firefox Setting Guide Time Displays local time. DJI Pilot 2 Tap to open DJI Pilot 2. Gallery Tap to view stored images and videos. Files Tap to view stored files. -
Page 58: Screen Gestures
MATRICE 30 SERIES User Manual Screen Gestures Slide from the left or right to Slide up from the bottom of Slide up from the bottom of the center of the screen to the screen to return to the the screen and hold to access return to the previous screen. - Page 59 MATRICE 30 SERIES User Manual : Tap to enable DO NOT Disturb mode. In this mode, system prompts will be disabled. : Tap to enable Outdoor mode. The maximum screen brightness increases to 1200 cd/m2 in Outdoor mode. : Tap to start screen recording.
-
Page 60: Video Transmission
Remote Controller Alert The remote controller vibrates or beeps twice to indicate an error or warning. For detailed information, see the real-time prompts on the touchscreen or in DJI Pilot 2. Swipe down from the top of the screen ©... -
Page 61: Charging The Remote Controller And Checking The Battery Level
4. It takes approximately 2 hours to fully charge the remote controller internal battery. It is recommended to use the DJI BS30 Battery Station for charging. Otherwise, use a certified USB-C charger with a maximum rated power of 65 W and maximum voltage of 20 V such as the DJI 65W Portable Charger. -
Page 62: Checking The Battery Level
MATRICE 30 SERIES User Manual B. Duration for fully charging a WB37 battery with 0% power: a. When mounted on the remote controller and the internal battery level is 0%, it takes approximately 2 hours while fully charging the internal battery. -
Page 63: Linking The Remote Controller And Control Stick Modes
Prepare To Fly 1. Power on the aircraft and the remote controller. 2. Run DJI Pilot 2 and tap Link Remote Controller to link. The status LED of the remote controller will blink blue, and the remote controller will beep during linking. -
Page 64: Control Stick Mode
MATRICE 30 SERIES User Manual Control Stick Mode There are three pre-programmed modes as well as custom modes that can be configured in DJI Pilot 2. The modes are Mode 1, Mode 2, and Mode 3. Mode 1 Left Stick... - Page 65 MATRICE 30 SERIES User Manual The default mode is Mode 2. See the figures below to check the function of each control stick in the three pre-programmed modes. Center position: control sticks are centered. Moving the control stick: control sticks are pushed away from the center.
-
Page 66: Buttons Overview
DJI Pilot 2. Button Customization and Combinations Customizable Buttons The C1, C2, C3, and 5D buttons are customizable. Open DJI Pilot 2 and enter camera view. Tap and tap to configure the functions of these buttons. In addition, combination buttons can be customized using the C1, C2, and C3 buttons with the 5D button. - Page 67 MATRICE 30 SERIES User Manual Combination Buttons Some frequently-used features can be activated by using combination buttons. To use combination buttons, hold the back button and operate the other button in the combination. In actual use, enter the home screen of the remote controller, and tap Guide to quickly check all available combination buttons.
-
Page 68: Flight Mode Switch (N/S/F)
S-mode. F-mode (Function) F-mode can be set to T-mode (Tripod mode) or A-mode (Attitude mode) in DJI Pilot 2. T-mode is based on N-mode. The flight speed is limited to allow easier control of the aircraft. Attitude mode must be used with caution. - Page 69 Attitude mode*, leading to potential flight hazards. Land the aircraft in a safe place as soon as possible. 3. When switching the GNSS to the BeiDou satellite positioning system in DJI Pilot 2, the aircraft only uses a single positioning system and the satellite search capability becomes poor. Fly with caution.
-
Page 70: Calibrating The Compass
Tap on the upper right corner of the gimbal camera view in DJI Pilot 2 to gain control of the gimbal camera. Link the two remote controllers one by one. Make sure to link the remote controller A with the aircraft first, and then link the remote controller B. - Page 71 B can only be used to update the firmware of remote controller B. 12. Uploading Logs Using DJI Pilot 2: The pilot can upload the logs of both the aircraft and remote controller A through remote controller A, and can upload the logs of remote controller B through remote controller B.
- Page 72 Intelligent Battery Station This chapter introduces the features of intelligent battery station. © 2022 DJI All Rights Reserved.
-
Page 73: Intelligent Battery Station
10. USB-C Maintenance Port 11. USB-C Charging Port (Recommended for Remote Controller) 12. USB-A Charging Port 13. Charging Mode Switch 13 12 11 14. Padlock Holes 15. Lock Clip 16. Handle 17. Pressure Valve 16 17 © 2022 DJI All Rights Reserved. -
Page 74: Warnings
1. Connect the battery station to a power outlet using the AC power adaptor cable. 2. Press the power button once to power on the battery station. 3. To charge the DJI RC Plus remote controller, connect the USB-C ports of the battery station and remote controller using a USB-C to USB-C cable. - Page 75 MATRICE 30 SERIES User Manual Standard Mode Ready-to-Fly Mode 30 min 12 min 100% Battery Level: 20% 5. Insert the batteries into the battery ports to start charging. A. For WB37 batteries, the battery station will charge the battery with the most power first.
-
Page 76: Battery Station Leds And Alert
Updating battery station firmware Solid red Battery station error* * Connect to the remote controller, run DJI Pilot 2, and tap HMS to diagnose the error. Buzzer Sound Description The buzzer beeps to indicate the following errors: a. When the battery status LED is red and the buzzer is beeping, it means there is an error with the battery. - Page 77 Intelligent Flight Battery This chapter introduces the features of intelligent flight battery. © 2022 DJI All Rights Reserved.
-
Page 78: Intelligent Flight Battery
The TB30 intelligent flight battery is equipped with high-energy battery cells and uses an advanced battery management system to power the aircraft. Only use a DJI-approved charging device to charge the intelligent flight battery. Make sure to fully charge the intelligent flight battery before using it for the first time. -
Page 79: Using Paired Batteries
MATRICE 30 SERIES User Manual Using Paired Batteries Label the two batteries with paired battery stickers before use. Charge and discharge the two batteries together to optimize flight performance and maximize battery life. After the batteries are inserted and the aircraft is powered on, if there is a huge difference between their battery life, the app will display a prompt alerting the user to such condition of the batteries. -
Page 80: Hot Battery Replacement
4.4 V before use. 2. When the aircraft is in flight after the above conditions are satisfied, and the DJI Pilot 2 app shows a critically low battery level warning, it is recommended to stop flying immediately and land the aircraft in an appropriate place. -
Page 81: Battery Storage
1. Battery performance will be affected if the battery is not used for an extended period. 2. Perform battery maintenance once every 50 cycles or 3 months or when prompted to do so by DJI Pilot 2, in the following steps:... - Page 82 In addition to the above, we recommend conducting the following checks for battery maintenance: a. Insert the battery into the aircraft and power it on to view the battery information in DJI Pilot 2. Make sure the difference in cell voltage is less than 0.1 V and the battery firmware is updated to the latest version.
- Page 83 DJI Pilot 2 App This chapter introduces the main functions of the DJI Pilot 2 app. © 2022 DJI All Rights Reserved.
-
Page 84: Dji Pilot 2 App
DJI Pilot 2 App The DJI Pilot 2 app is specifically developed for enterprise users. Manual flight integrates a variety of professional features that make flying simple and intuitive. Mission flight supports flight planning and autonomous operation of the aircraft, making your workflow much simpler and more efficient. - Page 85 If the DJI account logged in by the user has the DJI FlightHub 2 license, tap the cloud service on the app homepage to automatically log in to DJI FlightHub 2. DJI FlightHub 2 is a cloud-based integrated online management platform for aircraft, providing users with real-time aircraft monitoring and equipment and member management.
- Page 86 MATRICE 30 SERIES User Manual storage device. If DJI FlightHub 2 is connected, you can also view all mission flights sent from or upload local tasks to the cloud. Refer to the Mission Flight section for more details. 6. Album Tap to view your masterpieces all in one place.
- Page 87 MATRICE 30 SERIES User Manual Care, its validity period will also be shown. Tap to view the device information, including cycle count, flight duration, flight history, activation time, and flight mileage. 9. Firmware Update Shortcut If an update is necessary, a prompt will appear notifying the user that new firmware is available or a consistent firmware update is needed for the aircraft and remote controller.
-
Page 88: Preflight Check View
MATRICE 30 SERIES User Manual Preflight Check View Tap Enter Camera View on the homepage of DJI Pilot 2 to enter Preflight Check view. 1. View the aircraft's health information, flight mode, intelligent flight battery level, remote controller role, remote controller internal and external battery levels, Home Point status, RTK status, and camera microSD card storage information. -
Page 89: Fpv Camera View
FPV Camera View Using FPV Camera View After tapping Enter Camera View on the homepage of DJI Pilot 2 and finishing the preflight check, you will be directed to FPV camera view by default. 1. Top Bar: displays the aircraft status, flight mode, signal quality, etc. Refer to the Top Bar section for more details. -
Page 90: Primary Flight Display (Pfd)
MATRICE 30 SERIES User Manual Primary Flight Display (PFD) Primary Flight Display (PFD) makes flying easier and more intuitive, enabling users to see and avoid obstacles around the aircraft, as well as stop and adjust the flight trajectory if necessary. -
Page 91: Navigation Display
MATRICE 30 SERIES User Manual 13. RTH Altitude (RTH): displays the RTH altitude configured by the flight controller setting. 14. Absolute Altitude (ASL): displays the absolute altitude of the aircraft. 15. Navigation Display: shows the aircraft and gimbal orientation, and obstacle avoidance information from a top-down perspective. - Page 92 Both the obstacle braking distance and the warning distance can be set in DJI Pilot 2. Follow the prompted instructions in the app to set them.
-
Page 93: Top Bar
NA will be displayed. Top Bar 1. Back: Tap to return to the homepage of the DJI Pilot 2 app. 2. System Status Bar: indicates the aircraft flight status and displays various warning messages. If a new alert appears during flight, it will also be displayed here and continue flashing. - Page 94 MATRICE 30 SERIES User Manual b. When the aircraft is in vision positioning, standby, or manual flight status, the current flight mode will be displayed, including: N-mode, S-mode, A-mode, and T-mode. c. Tap to enter Preflight Check view. 4. Intelligent Flight Battery Level Indicator: The battery level indicator bar provides a dynamic display of the remaining power of the current intelligent flight battery and the flying time.
-
Page 95: Ar Projection
MATRICE 30 SERIES User Manual AR Projection DJI Pilot 2 App supports AR projection, including: a. Home Point: When the Home Point is beyond the current view, it will be displayed on the edge of the view. The aircraft can be turned towards the Home Point by following the arrow. -
Page 96: Gimbal Camera View
MATRICE 30 SERIES User Manual Gimbal Camera View Using Gimbal Camera View Gimbal camera view will appear when you switch the main view to the gimbal camera. Below is an illustration using the zoom camera of the M30T as the main view. - Page 97 25. Status of Photo/Video Upload to Cloud: displays the status of a photo/video upload from DJI Pilot 2 to DJI FlightHub 2 or the connection status of a live stream; tap to view the details. If you are using the DJI FlightHub 2 cloud service, you can quickly configure its media file upload settings.
- Page 98 MATRICE 30 SERIES User Manual 26. Mission Flight Control/Status: displays the progress of a mission flight in gimbal camera view. Tap the Pause/Resume button to pause/resume the task, and tap the panel to view the mission flight name and actions.
-
Page 99: Wide Camera View
MATRICE 30 SERIES User Manual Wide Camera View This section mainly sets out the differences with zoom camera. Refer to the Gimbal Camera View section for more details. Zoom Frame: After switching to a wide-angle camera as the main view, the zoom frame will display the field of view and camera zoom rate. -
Page 100: Laser Rangefinder (Rng)
MATRICE 30 SERIES User Manual 1. Palette/Isotherm: displays the highest and lowest temperature measurement values of the current view. Tap to choose between different infrared temperature measurement palettes, or enable the isotherm to set temperature measurement intervals. Note that if the measured area exceeds the maximum or minimum temperature measurement values of the current view, the setting will not take effect. -
Page 101: Smart Track
MATRICE 30 SERIES User Manual RNG positioning is limited by factors such as the GNSS positioning accuracy and gimbal attitude accuracy. The GNSS position, horizontal distance, Navigation Display, and AR projection are provided for reference only. When the zoom camera is aiming, the cross hairs will be an upright cross, while with the wide-angle camera or thermal camera it will turn into an X. - Page 102 MATRICE 30 SERIES User Manual When Smart Track is enabled, a tracking frame will appear and select the target, and the cross hairs in the center of the zoom lens will turn green, indicating that tracking is in progress. If no target is confirmed, the tracking frame will not appear and the app will display the message "Searching for targets ..."...
- Page 103 MATRICE 30 SERIES User Manual Roll stick The aircraft circles the target When it is close to the target horizontally. The maximum flight horizontally, the aircraft’s orbiting speed speed is less than 17 m/s. will be limited. Throttle stick Controls the aircraft altitude...
-
Page 104: Map View
Tap to draw an area on the map. Tap to clear all points, lines and annotations on the current view. If the user is logged in on DJI FlightHub 2, performing this action will not clear the annotations distributed by DJI FlightHub 2. -
Page 105: Annotation Management And Synchronization
MATRICE 30 SERIES User Manual Annotation Management and Synchronization PinPoint Introduction to PinPoint PinPoint can be used to set the location point of a target in gimbal camera view or map view, for quick observation and information synchronization. 1. Steps to Create a PinPoint: Adjust the attitude of the aircraft and the gimbal to move the target to the center of the current view. - Page 106 MATRICE 30 SERIES User Manual PinPoint, or select the previous or next PinPoint. Users can quickly generate and select PinPoints by using the buttons. 5. Tap to switch to map view: a. The PinPoint and its name will be displayed on the map accordingly.
- Page 107 MATRICE 30 SERIES User Manual 1. Tap to export all PinPoints to the local folder of the remote controller. 2. Tap to close the current panel. 3. Filter the PinPoints by color. After a color is selected, it is displaying PinPoints of this color.
-
Page 108: Line And Area Annotation Management
MATRICE 30 SERIES User Manual Line and Area Annotation Management Users can draw lines and areas on the map for synchronizing key information of roads and land. 1. Tap to display the Edit Line view. 2. Tap to display the Edit Area view. -
Page 109: Annotation Sharing
In Advanced Dual Operator mode, all point, line and area annotations can be synchronized with another remote controller. When connected to DJI Flighthub 2, the DJI Pilot 2 app and the point, line and area annotations of DJI Flighthub 2 can be synchronized with each other. They can be viewed on the remote controller and other devices logged into DJI Flighthub 2 for real-time sharing of locations and annotations. -
Page 110: Mission Flight
MATRICE 30 SERIES User Manual Mission Flight Tap on the homepage of DJI Pilot 2 to enter the mission library. The user can view created mission flight routes, or newly created Waypoint, Mapping, Oblique, or Linear Flight missions. The above four types of missions are generated by the app;... -
Page 111: Mission Flight - Setting Waypoints
MATRICE 30 SERIES User Manual Mission Flight - Setting Waypoints Tap Create a Route, Waypoint flight, and then Set Waypoints to create a new flight route. Tap on the map to add waypoints, then configure route and waypoint settings. Point of Interest (POI): Tap to enable the POI function and a POI will be displayed on the map. Drag to adjust its position. -
Page 112: Mission Flight - Live Mission Recording
MATRICE 30 SERIES User Manual Mission Flight - Live Mission Recording Tap Create a Route, Waypoint Flight, and then Live Mission Recording to record information on the photos captured or aircraft position for the waypoint. 1. Control the gimbal, adjust the camera zoom and aim at the target, and tap to capture a photo directly or press the C1 on the remote controller to set a waypoint. -
Page 113: In-Flight Editing
MATRICE 30 SERIES User Manual In-Flight Editing Enter the mission library, select a created flight route for editing or viewing. 1. Tap to perform the current mission. 2. Tap to enter the In-Flight Editing view. The edits will be merged into the original route after they are saved. -
Page 114: Health Management System (Hms)
5. Manage Logs: displays the remote controller and aircraft log data of recent sorties. The user can assist by extracting the relevant logs to local storage or upload them directly to the DJI Support cloud, to facilitate troubleshooting by DJI Support. -
Page 115: Intelligent Battery Station Status And Log Management
Checking the Battery Station Status Run DJI Pilot 2, tap HMS to check the status of the battery station and batteries. If a warning appears, tap it for more detailed information and follow the prompted instructions to resolve the issue. - Page 116 Firmware Update This chapter introduces the methods of updating the firmware of the device. © 2022 DJI All Rights Reserved.
-
Page 117: Firmware Update
Battery Station and TB30 Batteries Use the DJI Pilot 2 app to update the firmware of the battery station as well as up to eight TB30 flight batteries at the same time. 1. Insert the TB30 batteries into the battery port and power on the battery station. -
Page 118: Offiline Update
1. Connect the remote controller or aircraft to the PC one by one, as the assistant software does not support the updating of multiple DJI devices at the same time. 2. Make sure the PC is connected to the internet and the DJI device is powered on with a battery level higher than 25%. - Page 119 Appendix This chapter provides the specifications. © 2022 DJI All Rights Reserved.
-
Page 120: Appendix
Appendix Introduction to the Carrying Case 1. Cables and Screws 2. TB30 Intelligent Flight Battery 3. Reserved 4. Aircraft body 5. Propellers 6. Remote controller and manuals © 2022 DJI All Rights Reserved. -
Page 121: Specifications
MATRICE 30 SERIES User Manual Specifications Aircraft General Dimensions 470×585×215 mm (L×W×H) (unfolded, excl. propellers) Dimensions (folded) 365×215×195 mm (L×W×H) Diagonal Wheelbase 668 mm Weight (incl. two batteries) 3770 ± 10 g Max Takeoff Weight 3998 g Operating Frequency 2.4000-2.4835 GHz, 5.725-5.850 GHz 2.4 GHz: <33 dBm (FCC);... - Page 122 MATRICE 30 SERIES User Manual Zoom Camera Sensor 1/2" CMOS, Effective pixels: 48M Focal length: 21-75 mm (equivalent: 113-405 mm) Lens Aperture: f/2.8-f/4.2 Focus: 5 m to ∞ Exposure Compensation ±3 ev (using 1/3 ev as step length) Auto Mode:...
- Page 123 MATRICE 30 SERIES User Manual Temperature Measurement Method Spot Meter, Area Measurement High Gain Mode: -20° to 150° C (-4° to 302° F) Temperature Measurement Range Low Gain Mode: 0° to 500° C (32° to 932° F) Temperature Alert Supported...
- Page 124 MATRICE 30 SERIES User Manual Auxiliary Lights Effective Illumination Distance Illumination Type 60 Hz, solid glow Remote Controller General 7.02 inch LCD touchscreen, with a resolution of 1920×1200 Screen pixels, and high brightness of 1200 cd/m Type: Li-ion (6500 mAh @ 7.2 V)
- Page 125 MATRICE 30 SERIES User Manual Bluetooth Protocol Bluetooth 5.1 Operating Frequency 2.4000-2.4835 GHz Transmitter Power (EIRP) <10 dBm Intelligent Flight Battery Model CSX320-550 Dimensions 353×267×148 mm Net Weight 3.95 kg TB30 Intelligent Flight Battery Compatible Battery Type WB37 Intelligent Battery...
- Page 126 This content is subject to change without notice. Download the latest version from https://www.dji.com/matrice-30/downloads If you have any questions about this document, please contact DJI by sending a message to DocSupport@dji.com. and MATRICE are trademarks of DJI. Copyright © 2022 DJI All Rights Reserved.
Need help?
Do you have a question about the MATRICE 30 Series and is the answer not in the manual?
Questions and answers