Advertisement
Quick Links
Dear Users,
Thank you for purchasing our Bishamon 4 posts lift. Before using the lift, read through
and be familiar with this manual. Fully understand the precautions, directions, and
other information contained in this manual to ensure correct use. Failure to do so may
result not only in insufficient performance of the lift but also in falling of the vehicle,
serious injury and death, and damage to properties.
Keep this manual in a safe place for future reference. In case of loss, immediately
request a new copy.
If the product is supplied with a wrong manual, contact your lift supplier for a correct
copy.
Perform periodic maintenance inspection of the lift to ensure safe work
with the lift and keep the lift fully functional.
Sugiyasu Corporation
Sept. 2019
Advertisement

Subscribe to Our Youtube Channel
Related Manuals for Bishamon FP3500


Summary of Contents for Bishamon FP3500
- Page 1 Dear Users, Thank you for purchasing our Bishamon 4 posts lift. Before using the lift, read through and be familiar with this manual. Fully understand the precautions, directions, and other information contained in this manual to ensure correct use. Failure to do so may result not only in insufficient performance of the lift but also in falling of the vehicle, serious injury and death, and damage to properties.
- Page 2 Thank you for purchasing our Bishamon 4 posts lift. Before using the lift, read through and be familiar with this manual. Fully understand the precautions, directions, and other information contained in this manual to ensure correct use. Failure to do so may result not only in insufficient performance of the lift but also in falling of the vehicle, serious injury and death, and damage to properties.
- Page 3 3) ~ 5) 7) ~ 8) 23) ~ 24) - 2 -...
-
Page 4: Caution For Safety
This product is a lift to be used for oil and parts replacement, general maintenance, motor vehicles inspection and maintenance etc. of mini-to ordinary sized passenger cars, small sized trucks, and the like. Caution for Safety As there are very important to protect operators from accidents which may result in injury and death,and damage to cars and properties, make sure to understand fully before operating lift. - Page 5 DO NOT use lift unless DO NOT lower the lift DO NOT swing, shake or you have been trained in while any stand or push the raised vehicle. it's operation. support is in position *Incorrect operation may under vehicle. result in an accident. DO NOT use "Down"...
-
Page 6: Pre-Operation Check
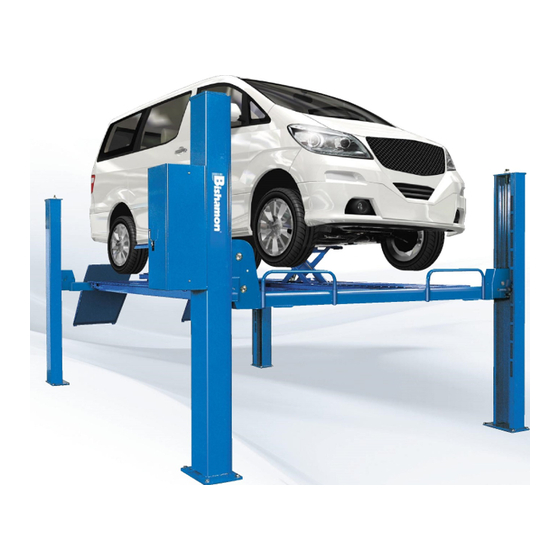
Make sure to ground the unit (Take earth). Make sure to install the power supply with an earth leakage breaker (Magnet Contactor) Carefully read and fully understand this manual before use. < > Pre-Operation Check 1. This lift is designed for motor vehicle servicing. DO NOT Use for other purpose. 2. - Page 7 ② "UP" & "DOWN" Label ① Capacity Label ③ Warning Label (Opposite side Hyd. Unit) ④ Caution Label(FP3500X & FP4000X) ⑤ ⑥ Operation Danger Instruction & Label Warning Label ⑤ Danger & Warning Label ⑦ Warning Label ⑧ Caution Label ③...
- Page 8 No.1 Main Post No.10 Main Cover (D. Beam Cover) No.2 Sub Post A No.11 Sub Cover (End Beam Cover) No.3 Sub Post B No.12 Beam Plate No.4 Sub Post C No.13 Pulley No.5 End Beam A No.14 Wire(Cable) End (Adjust) Nut No.6 End Beam B No.15...
- Page 9 When lift (Drive-On Beams) are lowered to lowest position, Carriage Safety Lock device is automatically turned into "Lock" position so that Safety Hook would engage in Lifting mode. If the Safety Hooks can not be disengaged(released) in Lowering mode, raise Drive-On Beams slightly so that the hooks would be free from ratcheted (engaged).
- Page 10 There is the Safety Hook on Main Post (End Beam A) to prevent the lowering from the leakage in hydraulic circuit. The Safety Hook would be turned to lock position automatically when Beams are lowered to lowest position. This Safety Hook must be in Lock position at all times except when Beams are being lowered.
- Page 11 (For Model FP3500X and FP4000X only) Four Safety Hooks are installed in Wheel Free (Upper Scissors) lift to prevent the lift lowering in the event of hydraulic leakage. This safety devices work only when Support Plate is raised to the highest position. Safety Hook Height Caution...
- Page 12 Lift Cylinder Oil Tank Shut Off Valve Check Valve Relief Lowering Valve Valve Motor (Manual) Gear Pump Oil Tank Lift Cylinder Cylinders for Upper Scissor Lift Oil Tank Shut Off Valve Flow Dividing Valve Switching Valve (Manual) Check Relief Valve Valve Lowering Valve (Manual)
- Page 13 This product uses a motor-driven hydraulic pump to activate a hydraulic cylinder installed at Main Post that raises an End Beam A via driving chain. All Sub Posts are connected via synchronizing Wire Ropes (Cables) to the Main Pulley at End Beam A so that both End Beam A nd B will move up and down togehther.
- Page 14 Perform Pre-Operation Checks before operation everyday. The check must be done without load. Caution If any possible abnormality is detected, prohibit the use of the lift until abonormality is fully repaired. Then contact your lift supplier immediately. If the lift is used with abnormality left unsolved, damage to the lift or serious accident may occur.
- Page 15 Turn the Lever of Select Valve to "Hoist" mode (FP3500X and FP4000X only) Push down Carriage Safety Lock Handle and release Safety Hook. Move Control Lever to "Down" position and lower Drive-On Beams to the lowest positon. If Safety Hooks can not be disengaged, raise Drive-On Beams slightly so that Hooks will be free from ratchet.
- Page 16 Warning ・DO NOT get under vehicle when operating the lift ・Pay close attention for any vehicle tilt during lifting and lowering of the lift Caution ・When operating lift, pay constant attention to the area around the vehicle and the lift. NEVER look aside during operation.
- Page 17 Danger If the vehicle is falling from the lift, move away quickly. DO NOT attempt to support the vehicle. Warning ・Keep anyone but the operator out from around the lift area. ・Before start servicing vehicle, make sure Safety Hooks are "engaged". ・DO NOT swing, shake, or push the raised vehicle.
-
Page 18: Important Safety Instructions
Contact your lift supplier immediately for repair. If the lift is used with the abnormality left unsolved, damage to the lift or serious accident may result. Always use Bishamon genuine parts for repair. Point to be checked Check Items... - Page 19 L1 is the length of pin outer side, and L2 is the length of pin inner side. And calculate the judgement index, L = (L1 + L2)/2. 1 Link Length 6 Links Length Limit Length allowed to be used Leaf Chain for FP3500(X) 25.4 mm 152.4 mm 155.5 mm AL866-53L Leaf Chain for FP4000(X) 25.4 mm...
- Page 20 1. Weekly Clean Up Clean up Wire Rope (Cable) every week with cloths soaked in oil, and remove dirt and sands etc. 2. Inspection and Replacing Follow the below procedures for inspection. ① Within one year after installation, inspect the Wire Rope (Cable) every month. After one year after installation, inspect the Wire rope (cable) every week.
- Page 21 1) Remove any load or vehicle from Drive-On Beams 2) Raise Drive-On Beams about 50cm and put a wooden block under End Beam A. 3) Lower Drive-On Beams and stop lowering operation when End Beam A is blocked by wooden block. After End Beam A hit the (Rack) (Rack) wooden block, chain become slacking and...
- Page 22 1. Replace the hydraulic oil after 1 year of use. From the 2nd time and on, replace full amount of oil every 3 years. 1. Remove the hydraulic unit cover 2. Remove the drain plug from the bottom of oil tank to drain the old hydraulic oil.
- Page 23 Replace the following parts periodically to maintain the safety of the lift and to prevent faults and other problems. Note : The replacement intervals do not show the Warranty period of the parts. The listed parts may have to be replaced before the specified interval timings and even the parts not listed belowe may have to be replaced depending on the operating conditions and environment where the lift is installed.
- Page 24 Model No. FP3500 Installation Above Ground Capacity 3,500 kgs. 1,695mm Vertical Travel Control Lever Type Power 3 Phase Motor 1.5KW 50 Sec.(60Hz) Rising Speed (Approx.) 60 Sec.(50Hz) Oil Volume 8L (ISO VG32) Model No. FP3500X Installation Above Ground Capacity 3,500 kgs.
- Page 25 Model No. FP4000 Installation Above Ground Capacity 4,000 kgs. Vertical Travel 1,695mm Control Lever Type Power 3 Phase Motor 2.2KW 50 Sec.(60Hz) Rising Speed (Approx.) 60 Sec.(50Hz) Oil Volume 8L (ISO VG32) Model No. FP4000X Installation Above Ground Capacity 4,000 kgs. (Lower Lift) Capacity 1,500 kg x 2...
- Page 26 Something is wrong Check in accordance with this manual Something is still wrong Contact your lift supplier Repair under Warranty period will be repaired in accordance with Warranty rules Repair after Warranty period Contact your lift supplier The spare parts are available for 8 years after Availability of spare parts discontinuing manufacturing Contact your lift supplier for any information regarding after service.
- Page 27 3-21, 4-Chome, Hongo-Cho, Takahama City, Aichi, Japan 444-1394 Tel. 81-566-53-1126, Fax. 81-566-53-1844 http//www.bishamon.co.jp/...
Need help?
Do you have a question about the FP3500 and is the answer not in the manual?
Questions and answers