
Subscribe to Our Youtube Channel
Related Manuals for Smeg HOBD482D


Summary of Contents for Smeg HOBD482D
- Page 1 MANUALE D’USO USER MANUAL MANUEL D’UTILISATION BEDIENUNGSANLEITUNG GEBRUIKSHANDLEIDING MANUAL DEL USUARIO MANUAL DO UTILIZADOR HOBD482D...
- Page 2 ...............................3 .............................25 .............................47 .............................70 .............................94 ............................117 ............................141...
- Page 3 earth wire in the event of the cable coming out of its anchor. 1. SAFETY INSTRUCTIONS The manufacturer will not • For your own safety and to be liable for any damage guarantee proper use of the resulting from incorrect or appliance, please read this inadequate installation.
- Page 4 necessary to guarantee a WARNING: failure to sufficient level of ventilation install the screws or fixing in the room, to prevent any elements as described in exhaust backflow. When the these instructions may cooking appliance is used result in a risk of electric together with other appliances shocks.
- Page 5 turn the cooker hob off after WARNING: The appliance use, do not rely on the pan and its accessible parts sensors. become extremely hot WARNING: Unsupervised • during use. cooking on a hob using Take great care not to touch the oil and grease may be heating elements.
-
Page 6: Cleaning And Maintenance
designed solely to eliminate c o o k i n g f u m e s d u r i n g domestic use. Never use the appliance for • purposes other than those for which it has been designed. Deepfryers must be kept •... - Page 7 5. ELECTRICAL may damage the vitreous ceramic surface. • Remove any melted plastic using a scraper pad CONNECTION suitable for vitreous ceramic, while the cooker hob is still hot. If you do not, the residue may • Electrical connections must be carried out by damage the vitreous ceramic surface.
- Page 8 7. CONTROLS Press and hold the On/Off button for 2 seconds to turn the hob on and activate its functions. All the Digits show and the Timer digits show “ C L “. At this point the hob is on but all the cooking areas and the hood are at zero power. The Hob will switch off automatically after 20 seconds if it is not used.
-
Page 9: Types Of Control
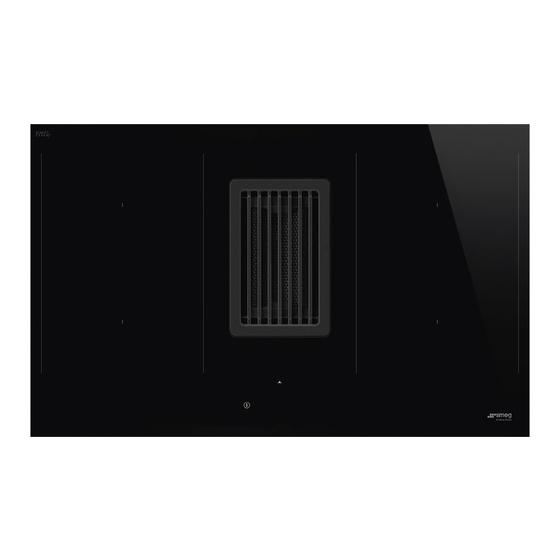
7.1 Types of control Timer controls area Left back cooking Right back cooking area controls area controls Left front cooking Right front cooking area controls area controls Suction hood controls area Power bar The controls for the cooking areas, suction hood and timer can be activated by pressing on the reference Digit The Digit lights up more intensely to confirm the operation. - Page 10 7.2 Controls Controls Description Selecting cooking area controls Press and hold the On/Off button for 2 seconds. The cooking areas are activated by pressing on the Digit for the reference area. The corresponding Digit lights up brightly to confirm the operation. The symbol indicates that the timer corresponding to the selected area is active (see the function “Cooking area...
- Page 11 Selecting Timer controls Press and hold the On/Off button for 2 seconds. Select the controls areas used to manage the cooking area Timers and the suction hood, which normally display “ C L “ (see the Timer functions). The symbol indicates the safety functions button (see “Keyboard Lock (cleaning)”.
-
Page 12: Function Description
7.3 Functions Function Description Used to lock the cooker hob settings to prevent accidental modifications. To activate: when no pans are present, press and hold for 3 seconds one of the 4 digits for the cooking areas. Release and slide your finger from 0 to 9 along the power bar following the Keyboard Lock animation. - Page 13 Countdown with alarm for generic use. To activate: with the hob turned on and with no pans present, press the Digits in the Timer controls area one at a time, setting the values individually by selecting them on the power bar (Minimum 1 minute ...
- Page 14 This function freezes all the hob settings for approximately 10 minutes if the person using the hob needs to go away for a short time. During the pause: No energy is being used in any of the cooking areas. ...
- Page 15 7.4 Suction hood controls Timer symbol After selecting the suction hood Digit, press the Timer Management Digit to set the countdown. Grease filter maintenance symbol The grease filter cleaning signal is displayed by LED and it is always enabled. Charcoal filter maintenance symbol The hood is set by default to ducting mode.
- Page 16 7.5 User Menu (custom settings) The User menu enables the user to customise at will both the audio (tone and volume) and visual signals sent by the hob. Press Press again within 3 seconds. The symbol will appear. Continuing to hold , press the 4 Digits for the cooking areas ( ) one at a time in a clockwise direction, starting from the one on the left.
- Page 17 7.6 Installer Menu (Hob power settings) When first connecting to the domestic power supply, the installer must set the power of the hob cooking areas based on the actual abilities and capacity of the power supply itself. If this is not necessary, the hob can be turned on directly using , otherwise, follow the operations below to access the menu.
-
Page 18: Unsuitable Pans
Power management function This product has an electronically controlled power management function. The Power management function detects when the maximum power level of 3.7 kW/16 A is being delivered for the combined cooking elements (right and left hand side phases), optimising power distribution and avoiding any overloading of the induction system. - Page 19 Energy saving information display shows the symbol , the pan is not The diameter of the pan bottom must suitable. correspond with the diameter of the cooking area. ENERGY ENERGY ENERGY SAVING SAVING SAVING Caution: only use pans with a perfectly flat - When purchasing a pan, check whether the bottom that are suitable for induction cooking.
- Page 20 Normal working noises in the hob Fan noises Induction technology is based on the creation of For the electronic system to operate correctly, the electromagnetic fields. These electromagnetic temperature of the cooker hob must be regulated. fields generate heat directly on the bottom of To do this, the hob is equipped with a cooling the pan.
- Page 21 Select one of the areas and press twice on “ 9 “ on the power bar. The corresponding Digit MODEL HOBD482D displays 7.62 Kw Total maximum power (hob + hood)
- Page 22 Error codes Possible cause of the Error code Description Solution error "Buzzer sounds on LIN cable damaged or badly switching on. The hood command check connection/replace connected to the hood No error code does not work the LIN cable electronic board displayed"...
- Page 23 The power supply voltage The power supply does not fall within the voltage does not fall Check the mains voltage. range (see technical data for within the range (voltage details). and/or frequency). The cooking area cannot be Internal error in generator Replace the module.
-
Page 24: Maintenance And Repairs
Further information on technical data can be Type of fault found on the website: www.smeg.it Device model (Art./Cod.) Serial number (S.N.) This information can be found on the identification plate. The identification plate is affixed to the bottom of the device. - Page 25 991.602.200_03 201006 D00006269_02...
Need help?
Do you have a question about the HOBD482D and is the answer not in the manual?
Questions and answers