
Related Manuals for Smeg HOBD472D


Summary of Contents for Smeg HOBD472D
- Page 1 LIBRETTO DI USO USER MANUAL MANUEL D’UTILISATION GEBRAUCHSANLEITUNG GEBRUIKSAANWIJZING MANUAL DE USO LIVRO DE INSTRUÇÕES PARA UTILIZAÇÃO РУКОВОДСТВО ПО ЭКСПЛУАТАЦИИ HOBD472D...
- Page 2 ..........................3 ..........................20 ..........................36 ..........................53 ..........................71 ..........................88 ..........................105 ..........................122...
-
Page 3: Safety Information
minals must be laid out that they 1. SAFETY INFORMATION allow the live wire to be extrac- ted before the earth wire, if it For your own safety and comes loose. correct operation of the • The manufacturer cannot be appliance, please read held responsible for any dam- this manual carefully be-... - Page 4 to guarantee a sufficient level WARNING: Failure to in- of ventilation in the room, to stall the screws or fixing prevent any exhaust back- devices as described in flow. When the cooking appli- these instructions may ance is used together with lead to a risk of electric other appliances using non- shocks.
- Page 5 ance, unless they are under WARNING: The cooking pro- constant supervision. cess must be supervised. A short cooking process must be • Clean and/or replace the fil- constantly monitored. ters after the period indicated (danger of fire). See the para- •...
-
Page 6: Cleaning And Maintenance
is no backflow of combustion intensive use it is recommended that you do not exceed 5 cycles). To order gases. a new “U” filter, please contact the as- sistance service. 2. USE • The suction hood has been designed solely to eliminate cooking fumes dur- ing domestic use. -
Page 7: Installation Requirements
Follow the manufacturer’s recom- wood) must be mounted with heat- mendations regarding detergents to resistant adhesives (min.100°C): the be used. The use of protective deter- use of unsuitable materials and ad- gents is recommended. hesives can cause deformation and detachment. •... -
Page 8: Environmental Aspects
• The connection terminals can be ac- • When you heat water, only use the cessed by removing the junction box quantity you require. cover. • If it is possible, always put the lids on • Check that the domestic power sup- the cookware. -
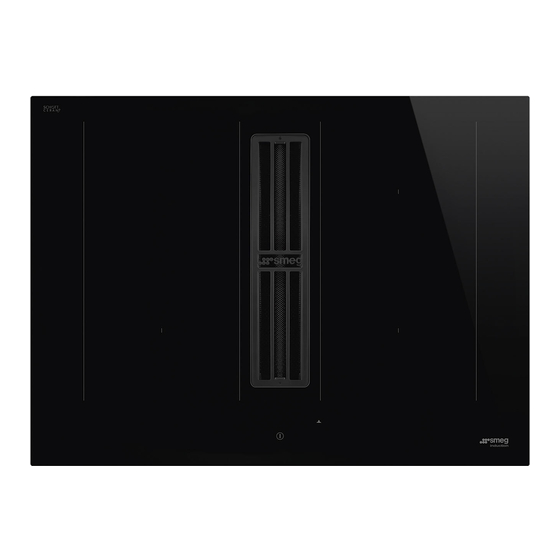
Page 9: Control Panel
a type suitable for use on induction If there are no pans or other objects on hobs. the hob, the digits are not visible. If the pan is removed during operation The functions which can be selected are or an unsuitable pan is used, the symbol always visible on the control panel, but with a dimmed light. - Page 10 3. While holding down , start press- Select the digit with and press “8” in ing the zone digits, proceeding anti- the power bar. clockwise. Select the front left digit and select the correct setting. See the following table for the specifica- tions: Value on the KW Notes...
- Page 11 Cooking zone The timer allows a specific cooking area to be switched off when the set time expires. timer The cooking areas can be programmed individually because each one has its own timer. To enable: With the cooking area in operation, press to access the timer management controls for that zone.
-
Page 12: Cooking Table
Pause function This function allows you to pause/restart any active function on the hob, by reducing the power available in the cooking zone and resetting all the functions. If the Pause function is not disabled with 10 minutes, the hob automatically switches off. To enable: With a pan on the hob and the cooking zone selected, press and hold the Pause func- tion key for at least 1 second. - Page 13 12. SUCTION HOOD 13. USER MENU FUNCTIONS CUSTOMISATION Before carrying out the procedure it is advisable to read the entire paragraph. – Press – Press and hold again for 3 seconds. – The key starts flashing. The controls for the cooking areas, suction hood and timer –...
-
Page 14: Power Management Function
– Once the correct value has been entered, confirm by touching and holding for 2 seconds. – To exit the menu without saving, press If no operation is carried out the user menu will close after 1 minute. 14. POWER MANAGEMENT FUNCTION This product has an electronically con- trolled power management function. - Page 15 15. GUIDE TO PAN USE If this occurs, do not touch anything and wait for all components to cool down. What pans to use If an error message appears, refer to Only use pots and pans with the bottom “Troubleshooting”. made from ferromagnetic...
- Page 16 The fan may continue to operate after the appliance has been turned off, if the temperature of the cooker hob is still de- tected to be too high. Rhythmic sounds like a clock ticking This noise only occurs when at least three cooking areas are operating, and it disappears or decreases when some of them are turned off.
-
Page 17: Troubleshooting
16. TROUBLESHOOTING Error code Description Possible causes of the error Solution “Acoustic signal The hood command does LIN cable damaged or badly connec- check connection/replace the LIN upon ignition. No er- not work ted to the hood electronic board cable ror code displayed”... -
Page 18: Technical Data
1,2 Flexible cooking area 1 + 2 In bridge 3,4 Flexible cooking area 3 + 4 In bridge Product identification Parameter Value Dimensions Type: 4300 (mm) Model: HOBD472D Flexible cooking 3000 W; Power Boost: 210 x 390 area 3700 W 1+2, 3+4... - Page 19 991.0689.847_01 - D000000008966_00 - 221116...
Need help?
Do you have a question about the HOBD472D and is the answer not in the manual?
Questions and answers