
Subscribe to Our Youtube Channel
Related Manuals for MSA ALTAIR io 4


Summary of Contents for MSA ALTAIR io 4
- Page 1 User Guide ALTAIR io 4 Gas Detection Wearable Order No.: 10225884/01 Print Spec: 10000005389 (EO) CR: 800000054052 MSAsafety.com...
- Page 2 The warranties made by MSA with respect to the product are voided if the product is not installed and used in accordance with the instructions in this manual. Please protect yourself and your employees by following the instructions.
-
Page 3: Table Of Contents
Contents Safety Notices General Notices Liability Before You Start Welcome ALTAIR io 4 Design Grid Introduction ALTAIR io DOCK Introduction MSA id Introduction MSA id Tags Introduction ALTAIR io CHARGE Introduction Getting Started Overview Commissioning Operation Bump Test and Calibration... -
Page 4: Safety Notices
MSA or authorized persons. • Use of any charger other than the charger supplied with the device or sold by MSA for use with the ALTAIR io 4 may damage or improperly charge the battery. - Page 5 1 Safety Notices Before getting started with the ALTAIR io 4, there are several things to know. Please read this user guide carefully before using the device. The device will perform as designed only if it is used and maintained in accordance with the manufacturer’s instruction.
- Page 6 1.3.6 Battery Use only battery chargers made available by MSA for use with this device; other chargers may damage the battery pack and the device. As the battery pack ages, there will be a reduction in usable device runtime. 1.3.7...
- Page 7 Silicone can desensitize the combustible gas sensor, thereby giving erroneously low readings. Calibrate the detector upon removal from storage and prior to use. Failure to follow this warning can result in serious personal injury or death. ALTAIR io 4...
-
Page 8: Welcome
Welcome The ALTAIR io 4 is a Gas Detection Wearable capable of monitoring ambient air with enhanced safety features to help protect the user. It is for use by trained and qualified personnel. It can be configured to include up to 3 sensors, which can detect up to 4 gases including: •... -
Page 9: Altair Io Dock Introduction
ALTAIR io DOCK is a rugged automated test system that simplifies bump testing and calibration via its plug and play design. Simply place the ALTAIR io 4 into the cradle and let the device do the work. It tells Dock what test it needs to run and starts it automatically. -
Page 10: Getting Started
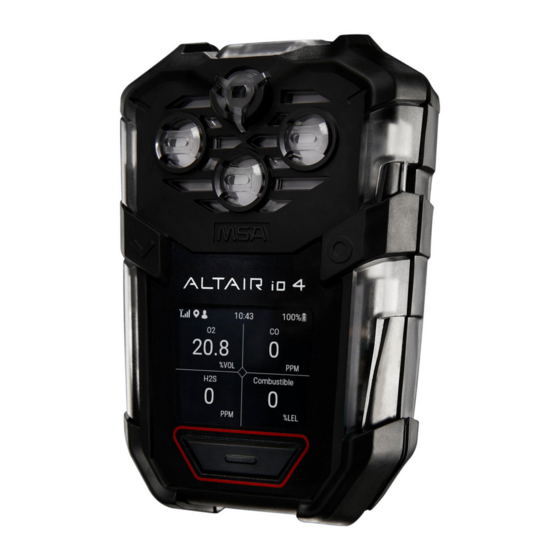
Device Management with Grid Device management is done entirely through your included MSA Grid account, over-the-air via the device's cellular connection. To get started, please set up your account and download the Grid Mobile App from the App Store or Google Play Store. - Page 11 3 Getting Started Left and Right LEDs Right Navigation Button Left Navigation Button LCD Display Safe LED Alert Button Audible Horn MSA id Tag Sensor Inlets Calibration Clip Stainless Steel Clip Product Label Magnetic Charging Interface ALTAIR io 4...
-
Page 12: Commissioning
Commissioning devices is the process of adding assets to your Grid account and activating their cellular connectivity. Typically, devices are commissioned to the appropriate Grid account automatically at order fulfillment. However, if automatic commissioning is not performed, your Grid account can be used to complete this setup. ALTAIR io 4... -
Page 13: Operation
○ Bump test and calibration information ○ Fresh Air Baseline (if enabled) ○ Lock-outs (if enabled and active) NOTE: During power on, the device performs a self-test. This self-test ensures properly functioning display, audible horn, LEDs and vibration. ALTAIR io 4... - Page 14 The Safe LED is used to indicate the device is safe and operational. If the device is operational, compliant, and without any active alerts, the Safe LED will slowly pulse green to intuitively communicate this to the user. ALTAIR io 4...
- Page 15 To resolve the error, remove the device from the charger and cease charging until the ambient temperature is within the approved temperature range of 0 °C (32 °F) to 40 °C (104 °F). ALTAIR io 4...
- Page 16 In a Shutdown Sequence: • the device will power down with an LED pattern, a vibration, and an audible alert • the Safe LED will stop breathing yellow. If the device shuts down due to battery depletion while in use: ALTAIR io 4...
- Page 17 1. Leave any hazardous location immediately. 2. Recharge the battery. Allow very hot or cold devices to stabilize for one hour at room temperature before attempting to charge. 3.3.6 Viewing Device Information 1. Open the Main menu and select Device info. ALTAIR io 4...
-
Page 18: Bump Test And Calibration
Bump Test A bump test quickly confirms that the gas sensors are functioning. Perform a full calibration to ensure accuracy. There are two methods to perform a bump test on the ALTAIR io 4: • Automatically through the ALTAIR io DOCK •... - Page 19 2. The appropriate test runs automatically based on the Grid-configured settings and indicates bump test results upon completion. 3. Remove the ALTAIR io 4 by pressing the gray release button. Manual Bump Test The manual bump test requires the following equipment: •...
- Page 20 Manual calibration must be performed using a flow regulator with a flow set to 0.25 liters per minute. MSA recommends calibration at least every six months; however, many countries and/or organizations have their own calibration guidelines. The ALTAIR io 4 calibration interval can be configured to adapt to these requirements. During zero calibration, the O sensor is also span calibrated to 20.8% O...
- Page 21 1. Insert the device into the ALTAIR io DOCK Test Stand until it clicks. 2. The appropriate test runs automatically based on Grid-configured settings and indicates the calibration results upon completion. 3. Remove the ALTAIR io 4 by pressing the gray release button. Manual Calibration The manual calibration test requires the following equipment: •...
- Page 22 Connect the other end of the tubing to the gas regulator (supplied in calibration kit). 5. Select Next. 6. Open the pressure reducer valve on the calibration gas cylinder. 7. The device will display the calibration results upon completion. 8. Close the valve after calibration. ALTAIR io 4...
- Page 23 Zero sensors allows for wider sensor tolerances than a Fresh Air Baseline when it is performed. To zero the sensors: 1. Navigate to the Zero Sensors menu option. 2. Confirm you are in fresh air. 3. Press Start. ALTAIR io 4...
-
Page 24: Features
Features Alerts The ALTAIR io 4 has three types of alerts that are used to notify the wearer of the device and those in its vicinity: • Notifications: indicate action that needs to be taken soon. • Warnings: indicate a heightened state of awareness and action may be required. - Page 25 Cellular Disconnected Cellular has been disconnected for greater Breathing Yellow than the Grid-configured threshold time. Low Battery Level Battery level is < 5%. Breathing Yellow Device Configuration Device has received an updated Breathing Green Update configuration from Grid. ALTAIR io 4...
- Page 26 Warning Delivery Delivery Type Description 360° LEDs Medium Intensity Yellow LED Pattern Audible Medium Intensity Ringtone Vibration Medium Intensity Vibration User Interface Backlight illuminates and display communicates relevant warning in status bar and gas measurement tile, if applicable. ALTAIR io 4...
- Page 27 • If a Sensor Error alarm activates while using the device, leave the area immediately as the device will be unable to utilize the effected sensor. Failure to follow these warnings can result in serious personal injury or death. Alarm Delivery ALTAIR io 4...
- Page 28 Short-term exposure greater than the alarm threshold. Time-Weighted Average (TWA) Time-weighted average greater than the alarm threshold. Overrange Measurement greater than the sensor range. Enhanced Safety Alarms Emergency Manually activated by pressing Alert button for 3 seconds. ALTAIR io 4...
-
Page 29: Gas Detection
This is the ACGIH / EH40 typically recommended TWA calculation. Example Calculation • Device powered on for 12 hours • 4 hours of exposure at 50 ppm in hours 0 – 4 • 4 hours of exposure of 0 ppm in hours 4 - 8 ALTAIR io 4... - Page 30 Reading Adjustment Factor Adjustment factors provide the ability to provide gas readings to a target gas that may differ from gas used for calibration. The ALTAIR io 4 simplifies the use of adjustment factors through its device configuration. To utilize adjustment factors: 1.
-
Page 31: Device Compliance
To promote device assignment to worker, the device can be configured to not enter standard measurement mode until the device has been assigned to an MSA id Tag. In the lock-out state, a reminder notification will sound every 15 seconds, flash the Safe LED, and vibrate. -
Page 32: Device Precision Configuration
MSA id can be managed through your Grid account. 4.8.1 MSA id Tags With the use of personal-issued MSA id Tags, the ALTAIR io 4 can be digitally assigned to worker personnel – providing historical and up-to-date digital transparency. 4.8.2 Assigning an MSA id Tag to a Worker To assign an MSA id Tag to a user, use your Grid account. - Page 33 If a software update is identified as critical, required, important or otherwise necessary for continued safe use of the product, the update must be installed on all devices within the time frame stipulated in communications from MSA or at the next charging cycle, whichever is earlier.
-
Page 34: Device Care
• Repair or alteration of the device beyond the procedures described in this user guide or by anyone other than a person authorized by MSA, could cause the unit to fail to perform properly. Use only genuine MSA replacement parts when performing any maintenance procedures on the device. Substitution of components can seriously impair performance, alter intrinsic safety characteristics or void agency approvals. - Page 35 • Calibration is required after a sensor is installed; otherwise, the device will not perform as expected. Failure to follow these warnings can result in serious personal injury or death. This section will provide a brief description on how to change the sensor in the ALTAIR io 4 Gas Detection Wearable. Tools Required: •...
- Page 36 Be careful not to break the sensor pins by forcing the sensor into the clear bracket. 5. Install the front housing. ALTAIR io 4...
- Page 37 30 minutes before calibration. 5.1.3 Clip Replacement This section will briefly describe how to replace the clip on the ALTAIR io 4 Gas Detection Wearable. Tools Required: • Phillips head #1 torque screwdriver 2. Remove the two screws with a Phillips head #1 1.
- Page 38 Torque to 6 in-lbs (0.68 N-m). 5.1.4 Front Housing Replacement This section will briefly describe how to replace the front housing for the ALTAIR io 4 Gas Detection Wearable. Tools Required: • Phillips head #1 torque screwdriver ALTAIR io 4...
- Page 39 Step 4 of Sensor Change to reinstall the sensor. 4. Install the four external screws with a Phillips head 3. Install the new front housing and sensor gasket. #1 torque screwdriver. Torque to 6 in-lbs (0.68 N-m). ALTAIR io 4...
- Page 40 ALTAIR io 4 User Guide. 5.1.5 Horn Change This section will provide a brief description on how to change the horn in the ALTAIR io 4 Gas Detection Wearable. Tools Required: • Phillips head #1 torque screwdriver 2. Remove the front housing casing and attached sensor gasket.
- Page 41 Install the horn so the text on the top surface of the horn is aligned as shown in the graphic. 8. Install the four external screws with a Phillips head 7. Install the front housing. #1 torque screwdriver. Torque to 6 in-lbs (0.68 N-m). ALTAIR io 4...
- Page 42 ALTAIR io 4 User Guide. 5.1.6 Display Replacement This section will briefly describe how to replace the display on the ALTAIR io 4 Gas Detection Wearable. Tools Required: • Phillips head #1 torque screwdriver 2. Remove the front housing and attached sensor gasket.
- Page 43 5. Take the new display PCBA and display assembly , and insert the bottom left edge under the snap fit on 6. Install the front housing. the battery holder. Push the display PCBA down to engage the board to board connector. ALTAIR io 4...
- Page 44 ALTAIR io 4 User Guide. 5.1.7 Back Housing Replacement This section will briefly describe how to replace the back housing on the ALTAIR io 4 Gas Detection Wearable. Tools Required: • Phillips head #1 torque screwdriver • Torx T6 torque screwdriver...
- Page 45 Step 4 of Sensor Change to reinstall the sensor. 3. Remove the display PCBA and display assembly by 4. Lift the display PCBA and display assembly away lifting it up. from the main board at the angle shown. ALTAIR io 4...
- Page 46 Discard the back housing according to local screwdriver. regulations. 8. Install the three replacement internal screws with a 7. Install the main board into the replacement back Torx T6 torque screwdriver. Torque to 2 in-lbs (0.23 housing. N-m). ALTAIR io 4...
- Page 47 NOTE: Make sure the board to board connector is properly aligned. 11. Install the four replacement screws with a Phillips head #1 torque screwdriver. Torque to 6 in-lbs (0.68 N-m). 12. Calibrate the device per the instructions in the ALTAIR io 4 User Guide. ALTAIR io 4...
-
Page 48: Troubleshooting
6 Troubleshooting Troubleshooting There may be instances where your ALTAIR io 4 screen displays an error message. If this occurs, take the following troubleshooting steps: 1. Follow the troubleshooting prompts on the screen as they appear. 2. If the troubleshooting steps do not resolve the error, contact MSA:... -
Page 49: Learn More
Dispose the device and batteries in accordance with local health and safety regulations. Warranty The warranties made by MSA with respect to the product are voided if the product is not used and serviced in accordance with the instructions in this manual. Protect yourself and others by following them. We encourage our customers to contact MSA regarding this equipment prior to use or for any additional information relative to use or repairs. - Page 50 LOSSES OF ANY KIND WHATSOEVER, INCLUDING BUT NOT LIMITED TO, LOSS OF ANTICIPATED PROFITS AND ANY OTHER LOSS CAUSED BY REASON OF NONOPERATION OF THE GOODS. THIS EXCLUSION IS APPLICABLE TO CLAIMS FOR BREACH OF WARRANTY, TORTIOUS CONDUCT OR ANY OTHER CAUSE OF ACTION AGAINST SELLER. ALTAIR io 4...
Need help?
Do you have a question about the ALTAIR io 4 and is the answer not in the manual?
Questions and answers
Monitor is blinking yellow says there is cellular disconnect, can you override this so it's blinking green ,it's for a plant shutdown and don't feel comfortable with the guys using it blinking yellow or is it OK? That's the only notification on it
The MSA ALTAIR io 4 monitor blinks yellow for various notifications, such as calibration due, sensor replacement needed, cellular disconnection, or low battery. These indicate that attention is required but do not necessarily mean the device is unsafe.
To make the device blink green, you must resolve the issue causing the yellow blinking. This may involve:
- Performing a bump test or calibration if due.
- Replacing a failing sensor.
- Restoring cellular connectivity.
- Charging the battery if low.
If the device is blinking yellow due to a replace sensor or low battery notification, use caution, as continued operation may be unreliable. Always follow safety warnings, and if a critical battery alarm or shutdown sequence occurs, leave the area immediately.
This answer is automatically generated
How do I? Change the cord from 12 volt to 110v