fantastic furniture VOGUE Assembly Instructions Manual
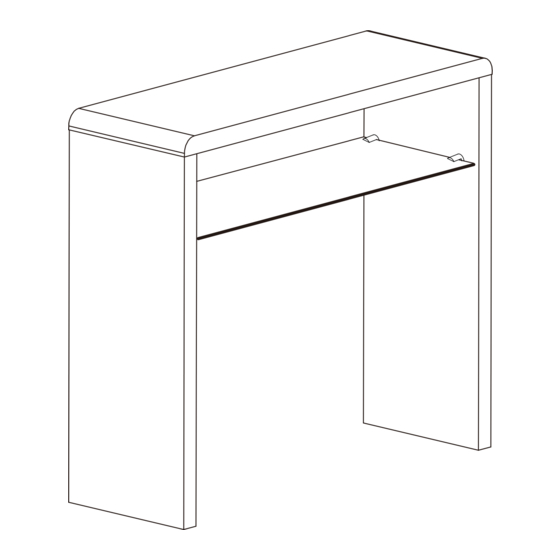
Hall table
Hide thumbs
Also See for VOGUE:
- Assembly instructions manual (11 pages) ,
- Assembly instructions manual (6 pages)
Advertisement
Quick Links
Advertisement

Subscribe to Our Youtube Channel
Related Manuals for fantastic furniture VOGUE


Summary of Contents for fantastic furniture VOGUE
- Page 1 Assembly Instructions VOGUE HALL TABLE Tempered glass should always be handled with care. Ver.1.1...
- Page 2 WA RNING WARNI NG FAILURE TO FOLLOW THESE BASIC STEPS CAN LEAD TO DAMAGE THAT IS NOT COVERED BY YOUR WARRANTY Lay out all of the components on a soft surface Read Instructions carefully. as if you were preparing to do a jigsaw puzzle. Check no parts are missing.
-
Page 3: What You Need
What You Need top panel (P1) (tools not provided) Phillips Head Srewdriver shelf glass (P3) side panel (P2) side panel (P2) 1 x allen key (H5) 4 x Tube 4x Pads Screws 4x Dowels 4x Glass clamps 1 x allen key (H2) (H1) (H3) - Page 4 (H9) Glass clamps (H4) 4x Screw (H9) Attach 2 X Dowels(H3) and 2 X Glass clamps(H4) to each side panel (P2) Make sure the plastic pad of the grub screw is going inside the Glass clamp(H4) and that all the clamps are facing with the grub screw towards to the bottom (longer end) Put the side panel (P2) and the top panel (P1) together.
- Page 5 (H5) Step 3 (H1) (H1) (H1) You will need: 4x Tube Screws (H1) (H1) (H5) allen key (H5) (H1) Attach 4X Tube screws(H1) to fix the side panel and top panel and use allen key(H5) to tighten the screws. Step 4 (H2) You will need: (H2)
- Page 6 Step 5 Don’t overtighten to avoid unwanted stress on the glass panel which might cause it to break during use. Put the shelf glass on the right position use the phillips head screwdriver to tighten the screw and make the glass unmovable . Make sure the edge of the glass shelf is fully slot into the clamp before tightening the grub screw.
- Page 7 Step 6 Turn over carefully. We strongly advise that you use the wall strap Step 7 Provided to prevent the unit toppling. You will need: 1x Screw (H7) (H6) 1x Wall strap (H8) (H7) (H6) 1x Washer (H8) Use the screw (H5) and washer (H7) to connect the safety strap(H6) on the top panel Page 7...
- Page 8 Step 8 Screws and wall plugs are not provided Please use appropriate fixtures for your wall Move the table to the final position. Attach the safety strap to the wall. Make sure it is firmly attached and make sure it is a snug fit . The job is now complete! This product should be checked periodically to ensure that all components are secure and in the correct position and all connectors are tight.
- Page 9 TEMPERED GLASS WARNING TEMPERED GLASS should be handled with care. Scratches, chips, sudden changes in temperature and hairline fractures may cause the glass to break. This glass is designed to break into small, relatively harmless pieces and not sharp fragments. Good to know - Never place extremely hot or cold objects directly onto the glass surface.
Need help?
Do you have a question about the VOGUE and is the answer not in the manual?
Questions and answers