Table of Contents
Advertisement
Quick Links
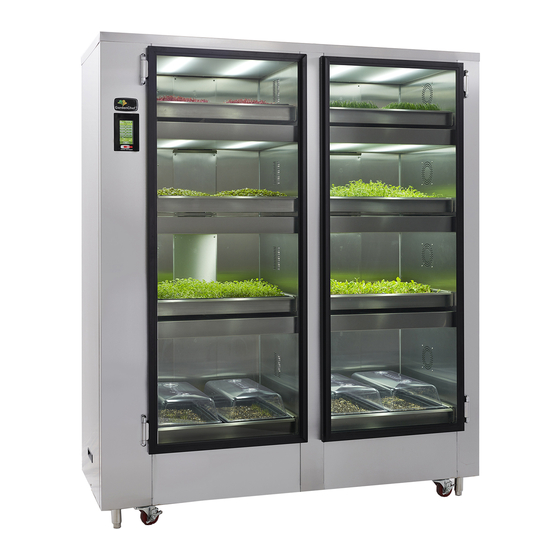
HERB AND MICROGREEN GROWING CABINET
GC42
FUNCTIONS OF THE ZONE SCREEN
FUNCTIONS OF THE MAIN RESERVOIR SCREEN
REPLACEMENT PARTS, WIRING & PLUMBING DIAGRAMS
WARRANTY STATEMENT
Part Number: 18400-3244
GARDENCHEF
Models GC42, GC41, GC12, GC11
PATENT PENDING
TABLE OF CONTENTS
Printed in The United States of America
®
MANUFACTURED BY:
Mundelein, IL 60060 U.S.A.
Fax: 847-367-8981
Toll Free: 800-323-9793
Email: TechnicalService@Carter-Hoffmann.com
GC12
GC41
2
3
3-4
5-10
11
12-13
13
13
14
15-16
16
17-18
19
20
21
22
23
24-25
26-27
28
Rev: KBA022322
Advertisement
Table of Contents

Related Manuals for CARTER-HOFFMANN GARDENCHEF GC42


Summary of Contents for CARTER-HOFFMANN GARDENCHEF GC42
-
Page 1: Table Of Contents
Models GC42, GC41, GC12, GC11 MANUFACTURED BY: CARTER-HOFFMANN 1551 McCormick Avenue Mundelein, IL 60060 U.S.A. Phone: 847-362-5500 Fax: 847-367-8981 Toll Free: 800-323-9793 Email: TechnicalService@Carter-Hoffmann.com GC12 GC42 GC41 PATENT PENDING TABLE OF CONTENTS FEATURES AND SPECIFICATIONS UNPACKING AND INSPECTION SAFETY PRECAUTIONS INSTALLATION &... -
Page 2: Features And Specifications
FEATURES AND SPECIFICATIONS ® The GardenChef provides a self-contained environment that is ideal for growing herbs and micro greens. The lights pro- duce the proper spectrum and an irrigation system delivers water and nutrients to the plants. The automated system pro- vides everything the plants need to grow year round and right in the kitchen. -
Page 3: Unpacking And Inspection
Be sure to retain the container for inspection. Carter-Hoffmann cannot assume liability for damage or loss incurred in transit, freight damage is not covered under war- ranty. We will, however, at your request, supply you with the necessary documents to support your claim. - Page 4 IMPORTANT SAFETY INSTRUCTIONS For your safety and the proper operation of this appliance, please follow these safety guidelines. This manual should remain with the GardenChef so that new owners and users learn about the product and relevant safety precautions. Carefully read through this manual before installing and using the GardenChef.
-
Page 5: Installation & Startup
INSTALLATION AND STARTUP LOCATION WARNING: Risk of personal injury Place the cabinet on level ground. Lock the front wheel caster brakes. Adjust the leveling legs so that they are on the floor. If your floor is not level, adjust the legs Installation procedures must be so that the unit is level. - Page 6 INSTALLATION AND STARTUP **IT IS VERY IMPORTANT THAT THIS NEXT STEP IS WARNING: COMPLETED CORRECTLY** Risk of personal injury Installation procedures must be Pull both ends of the performed by a qualified technician with strap as show in Figure full knowledge of all applicable electrical 5, make sure that the and plumbing codes.
- Page 7 START-UP Note: the cabinet must be plugged in and plumbed by a professional technician in accordance with applicable local and state codes. When you plug the unit in, it will turn on and you will see the startup screen (A). The unit runs diagnostics and start-up functions while this screen is visible.
- Page 8 START UP(continued) CALIBRATE THE pH SENSOR In order to function properly, the pH sensor needs to be calibrated. Supplies needed: #4 pH buffer solution (yellow), #7 pH buffer solution (blue), clean water, 3 cups or containers, clean cloth. Remove the bottom growing drawer(s) to access the reservoir (Fig.1) Locate the pH sensor probe on the left side of the reservoir (Fig.2) Fig.
- Page 9 START-UP (continued) CALIBRATE THE TDS (TOTAL DISSOLVED SOLIDS) SENSOR (EC 1000 PPM solution required) Fig. 1 In order to function properly, the TDS sensor needs to be Access the calibrated. Supplies needed: EC 1000 PPM solution, clean water reservoir water, 2 cups or containers, clean cloth. Remove the lower grow drawer(s) to access the reservoir (Fig.1) Locate the TDS sensor probe on the left side of the reservoir (Fig.2)
- Page 10 START-UP (continued) PRIMING THE IRRIGATION PUMP Access the reservoir (Fig. 1) Fig. 1 If present, remove any grow trays from the bottom drawer(s) Slide out drawer(s) to access the reservoir Fill reservoir Make sure the unit has been connected to the water and power according to local codes From the HOME screen, press SET UP, SET RESERVOIR, AUTO ON, FILL...
-
Page 11: Setting Up Your Growing Cycles
SETTING UP YOUR GROWING CYCLES Note: the cabinet must be plugged in and plumbed by a professional technician. Follow these steps to set up your GardenChef for the first time. Your GardenChef may have 8, 4, 2 or 1 growing zones and the home screen will show the appropriate number of zones for the model that you have. -
Page 12: Programming Cycles
PROGRAMMING CYCLES You can change the lighting and watering cycles for specific seeds, or new seeds that are not in the de- fault programming cycles. EDIT CYCLES From the HOME screen, press SET UP. On the SET UP SCREEN, press EDIT PLANTS. Select a plant and then the cycle will appear for that zone. - Page 13 PROGRAMMING CYCLES TO START A GROWING CYCLE On the HOME screen, select a seed for the zone you have just planted (Fig. 1), and you will enter the screen with the settings for that zone (Fig. 2). Press the START CYCLE button and a cycle will begin. Then press the HOME button Repeat for each zone that you have planted.
-
Page 14: Planting & Growing
PLANTING AND GROWING Planting and growing is easy in the GardenChef. Follow these simple instructions. See the growing guide for specific plants on the next page. Please refer to the Growing Guide and Growing Tips for successful growing and harvesting of specific plants. ... -
Page 15: Growing Guide
GROWING GUIDE Seed Sowing Amount / 10”x20” tray Germination Days Days to Watering Flavor Profile Grams Ounces (domes on) Harvest Schedule¹ (potting soil) Amaranth 2-3 days 7 - 16 days 1 every 4 days Beet, grassy Aniseed 2 days 7 - 8 days 1 every 4 days Licorice Arugula... -
Page 16: Growing Tips
GROWING GUIDE Seed Sowing Amount / 10”x20” tray Germination Days Days to Watering Flavor Profile Grams Ounces (domes on) Harvest Schedule¹ (potting soil) Shiso 3-5 days 12-21 days 1 every 4 days Licorice Sorrell, Ruby-Veined 3-7 days 12-20 days 1 every 4 days Tangy, lemon, mildly sour Sunflower 170-226... -
Page 17: Cleaning And Maintenance
CLEANING AND MAINTENANCE CLEANING THE RESERVOIR & IRRIGATION SYSTEM 1. Make sure cabinet is connected to city drain and water. If you are not hooked up to a drain and city water you will need to manually drain and fill the cabinet; if this is the case, connect the drain fitting to a hose that runs to a drain or sink. - Page 18 CLEANING AND MAINTENANCE (continued) CLEANING THE GROWING DRAWERS Clean your growing drawers between each harvest. Monitor the interior of the cabinet, including the reservoir, during the growing cycle and clean at the first sign of mold or build-up of organic matter. Do not use any chemically damaging or toxic cleaning products such as bleach or ammonia.
-
Page 19: Periodic Maintenance
PERIODIC MAINTENANCE PROCEDURE AND TIPS INSIDE THE RESERVOIR A. DRAIN, CLEAN AND FLUSH RESERVOIR (Monthly) SEE INSTRUCTIONS ON PAGE 17 B. CHANGE FILTER (30-45 days*—more often in areas with hard water; filter is washable for extended use) Locate the filter (large blue or white canister in the reservoir) and unscrew the canister clock- Filter Water circulation pump;... -
Page 20: Replacing The Lights
REPLACING THE LIGHTS Occasionally you may need to replace a light bulb. Push up and back It is a simple process, similar to changing the bulb over notch in back of on a fish tank hood. For part number, see the list cabinet, then let front on page 26. -
Page 21: Sanitation And Food Safety
SANITATION AND FOOD SAFETY RECOMMENDATIONS For your health and safety, please read the infor- Clean Seed mation below. You may choose to clean and sanitize your seed prior Microgreens are baby plants. They have intense con- to growing. It is not necessary with microgreens and centrated flavor and more nutrients than full grown reputable suppliers test their seed for contamination. -
Page 22: Frequently Asked Questions & Troubleshooting
FREQUENTLY ASKED QUESTIONS & TROUBLESHOOTING How much soil should I put in my trays? You should fill each tray 1/2 to 3/4 full with sterile potting soil. Make sure the soil is well moistened, but not overly muddy or soupy. See Resources page 24 for some brands we have found to be high quality soils. For seeds with a shorter life cycle like pea shoots, radishes, wheatgrass (1-2 weeks), 1/2 full is adequate. -
Page 23: Microgreen Problems
MICROGREEN PROBLEMS WHITE MOLD Identification Remedy White mold looks like a spider web crawling Make sure your trays are CLEAN be- across the surface of the growing media. It fore you plant starts out in one area in a small, wispy ball ... -
Page 24: Resources
RESOURCES Every GardenChef comes with a starter set of domes and trays. An optional starter kit is available and includes growing trays, domes, mats, sifter, TDS calibration solution, PH kit, hydrogen peroxide, 20 gallon plastic tub (for mixing/sifting soil) and measuring syringe (for adding nutrients) Many supplies, including seeds and growing media, can be found at local greenhouses and urban garden supply sellers. - Page 25 Plant food: Miracle Gro™ Jungle Juice™ General Hydroponics Flora Series™ Fox Farm Gringo Rasta,™ Bush Doctor™ and Hydroponic Trio™ * This is not a compete list or an endorsement of these products. Brands are trademarked and not affiliated with Carter-Hoffmann...
- Page 26 REPLACEMENT PARTS & WIRING DIAGRAM GARDENCHEF COMPONENTS 120V, 4.4 A Part Number Description Part Number Description 18614-0033 solenoid valve 3/8” tube 5/16” ORF 18301-2649 3” swivel poly caster with brake 18616-0424 power supply, 12 VDC, 120 VAC 18309-0048 4” adjustable S.S. leveling leg 18603-9125 remote control harness 8 pin USB 18310-0209...
- Page 27 CAUTION: Use only (OEM) original equipment manufacturer replacement parts. Using unauthorized parts may cause serious injury or damage to the cabinet. Replacement parts should be installed by a qualified service technician. Contact Carter-Hoffmann with your model and serial number for replacement parts. Call: 800-323-9793 or email:...
-
Page 28: Carter-Hoffmann
This warranty applies only to original equipment owned and possessed by the initial purchaser and the warran- ty period begins on the date of original shipment from the CARTER-HOFFMANN factory and extends as fol- lows: to component parts and labor for 12 months; to refrigeration compressor unit for one year (limited to replacement only - not to include labor for removal, repair or replacement).
Need help?
Do you have a question about the GARDENCHEF GC42 and is the answer not in the manual?
Questions and answers