Advertisement
Quick Links
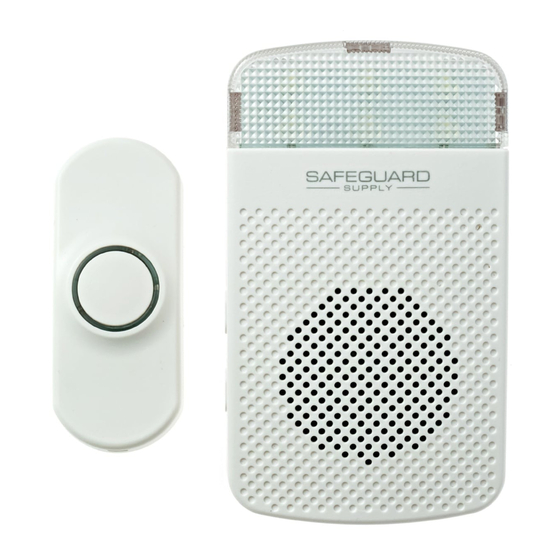
ERA-DCKIT (ERA-RXPG + ERA-
PBTX)
Introduction
The ERA-DCKIT is a long range wireless door chime kit with the
following two components; the ERA-RXPG plugin receiver & the ERA-
PBTX.
This manual outlines how to program the ERA-PBTX push
button to the ERA-RXPG receiver, & will serve as the product
manual for the kit & both individual products in the kit.
Helpful Notes:
•
All ERA transmitters are compatible with all ERA receivers.
The ERA-PBTX is a push button transmitter that must be programmed to a
•
ERA compatible receiver to operated.
The push button is outdoor rated and contains a silicone gasket to keep
•
moisture out. Mount with the small weep hole pointing down to ensure
any moisture in the unit evaporates out.
The ERA-RXPG is a plugin receiver & is indoor rated only.
•
•
Push button measures 3.00'' H x 2.25'' W x 1.75'' D.
The halo ring around the center push will illuminate dimly for visibility at
•
night (this feature consumes very little power.)
When triggered (center push button is pressed) the center halo
•
illuminates brightly for approximately 2 seconds.
The ERA-RXPG has three operational modes; strobe only, sound only,
•
strobe + sound.
• The ERA-RXPG may be programmed with up to 12 ERA transmitters.
• The range (line of site) of a ERA transmitter to receiver is 4,000 ft. Push
Button Battery Installation:
1. Open the front cover by inserting the included screwdriver into the
square hole on the bottom of the unit (figure 1) & gently push & then
separate the top & bottom halves of the case.
2. Remove top part of case from lower part of case (figure 2).
3. Install the included CR2450A battery into the holder with positive (+) side
of the battery facing up (figure 2).
4. Test the battery by pressing the center push. The green halo should
illuminate for approximately 2 seconds, signaling transmission. Note:
Program the push button to a compatible receiver PRIOR to mounting the push
button.
Push Button Battery Installation (cont):
Pair Transmitter to Receiver:
The transmitter works with all ERA receivers. Basic programming calls for
the user to program a transmitter to the receiver & select a melody for the
receiver to play when triggered by the transmitter. In the example below,
the transmitter will be programmed to the ERA-RXPG plugin receiver. If
you are using a different ERA receiver, follow the programming
instructions for that receiver to put the receiver in programming mode &
to change the melody.
1. Ensure the ERA-RXPG is plugged into a standard wall outlet.
2. On the ERA-RXPG receiver, hold down the "mode" button (lower button
in figure 3) until you hear a short tone sound & the red LED (inside the
front lens cover) begins to blink. This denotes the unit is in
programming mode. Release this button.
3. Scroll through available melodies by pressing the melody selector
button. Stop pushing this button when you hear the sound you want
the respective push button to play.
4. Push the center push on the push button. The receiver will play a quick
chime sound notifying the transmitter is programmed to the receiver.
The red LED should still be blinking.
5. If you want to program a second transmitter (push button, door contact,
motion sensor, or driveway sensor) push the melody selector button
(the button on top) to scroll through available melodies. Once you have
(figure 1)
the sound you want, stop pressing the melody selector button and
repeat step 4 above, triggering the sensor/transmitter.
6. Once you have programmed all the transmitter(s), exit programming
mode by holding down the "mode" button until you hear a short tone
sound & the red LED disappears (approx 3 seconds).
Test the Programming of Transmitter to Receiver:
• Ensure the ERA-RXPG receiver is plugged in & the battery is installed
in the ERA-PBTX push button.
• Push the center button of the ERA-PBTX push button.
figure 2
(figure 3)
Advertisement

Related Manuals for Safeguard Supply ERA-DCKIT


Summary of Contents for Safeguard Supply ERA-DCKIT
- Page 1 2 Introduction Pair Transmitter to Receiver: The ERA-DCKIT is a long range wireless door chime kit with the following two components; the ERA-RXPG plugin receiver & the ERA- The transmitter works with all ERA receivers. Basic programming calls for PBTX.
- Page 2 WARRANTY Safeguard Supply warrants this product to be free of defects in material and workmanship for a period of one year from the date of purchase. This warranty does not cover damage resulting from accident, abuse, act of God or improper operation. If this product does become defective, simply return it to Safeguard Supply.
Need help?
Do you have a question about the ERA-DCKIT and is the answer not in the manual?
Questions and answers