Table of Contents
Advertisement
Quick Links
ERA-PRXPG Motion Kit
Owner's Manual
Introduction
The ERA-PRXPG is a doorbell/entry alert kit that features the ERA-PIR
motion sensor, the ERA-DCRX and a strobe light.
The ERA-PIR is a passive infrared (PIR) sensor/transmitter compatible with
the ERA-RXPG Receiver. The ERA-PIR is activated when a combination
of heat & movement is detected in the monitored zone. When the
transmitter is activated, it will send a signal to the receiver which will
sound one (1) of twelve (12) different melodies or tones for a few
seconds.
Helpful Tips:
• Do not mount the transmitter (ERA-PIR) to the wall or door frame until
you have successfully paired & tested the device.
• Each receiver (ERA-RXPG) is capable of pairing with twelve (12)
transmitters.
• There is virtually no limit to the number of receivers (ERA-RXPG) a
transmitter may be paired to.
• There are three modes of operation for the ERA-RXPG; sound only,
strobe only, sound and strobe.
• Volume control: 4 levels plus mute, plus off.
• All ERA transmitters/sensors are cross-compatible with all ERA
receivers.
• To expand the kit, add more receivers such as the ERA-RXPG, ERA-
DCRX, and the ERA-VPRX.
• Add more sensor/transmitters to this kit such as the ERA-PBTX push
button, ERA-PIR motions sensor, ERA-DSTX driveway sensor, and the
ERA-UTX magnetic door contact.
ERA-PIR Battery Installation:
The sensor is powered by a 9V alkaline battery. Follow the steps below to
remove the cover and install the battery. Note: Program the tone and
volume level prior to reassembling the unit.
1. Remove the screw located on the backside
of the case using a phillips head
screwdriver (see figure 1). Once the screw
is removed, open the case.
2. Remove top half of case from lower half of
the case to find the battery holder
(see figure 2).
3. Install a fresh 9-volt alkaline battery.
4. Follow the instructions for
"Programming the Sensor/Transmitter to
a Receiver".
Programming the Sensor/Transmitter to a Receiver:
(Always test unit prior to final installation)
The transmitter works with all ERA receivers. Basic programming calls for
the user to program a transmitter to the receiver & select a melody for the
receiver to play when triggered by the transmitter. In the example below,
the transmitter will be programmed to the ERA-RXPG plugin receiver. If
you are using a different ERA receiver, follow the programming
instructions for that receiver to put the receiver in programming mode &
to change the melody.
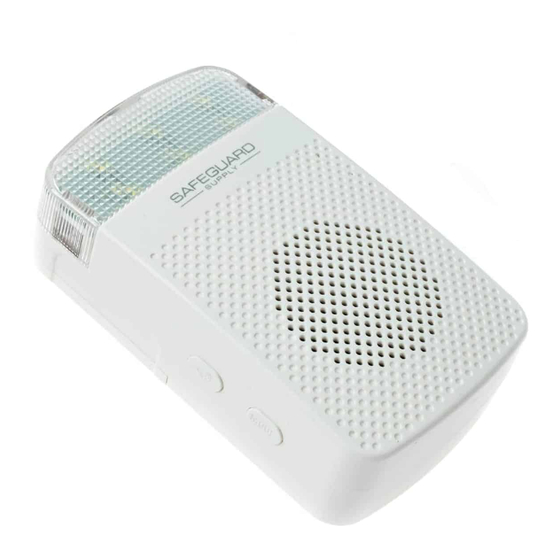
1. Ensure the ERA-RXPG is plugged into a standard wall outlet.
2.
On the ERA-RXPG receiver, hold down the "mode" button (lower button
in figure 2) until you hear a short tone sound & the red LED (inside the
front lens cover) begins to blink. This denotes the unit is in
programming mode. Release this button.
3.
Scroll through available melodies by pressing the melody selector
button. Stop pushing this button when you hear the sound you want
the respective push button to play.
4. Push the center push on the push button. The receiver will play a quick
chime sound notifying the transmitter is programmed to the receiver.
The red LED should still be blinking.
5. If you want to program a second transmitter (push button, door contact,
motion sensor, or driveway sensor) push the melody selector button
(the button on top) to scroll through available melodies. Once you have
the sound you want, stop pressing the melody selector button and
figure 1.
repeat step 4 above, triggering the sensor/transmitter.
6. Once you have programmed all the transmitter(s), exit programming
mode by holding down the "mode" button until you hear a short tone
sound & the red LED disappears (approx 3 seconds).
ERA-PIR Transmitter
figure 3.
Advertisement
Table of Contents

Related Manuals for Safeguard Supply ERA-PRXPG


Summary of Contents for Safeguard Supply ERA-PRXPG
- Page 1 ERA-PRXPG Motion Kit Owner’s Manual Introduction The ERA-PRXPG is a doorbell/entry alert kit that features the ERA-PIR motion sensor, the ERA-DCRX and a strobe light. The ERA-PIR is a passive infrared (PIR) sensor/transmitter compatible with Programming the Sensor/Transmitter to a Receiver: the ERA-RXPG Receiver.
- Page 2 WARRANTY Low Battery Indicator: Safeguard Supply warrants this product to be free of defects in material and workmanship for a period When the battery in the ERA-PBTX is low & needs to be replaced, it will signal of one year from the date of purchase. This warranty does not cover damage resulting from the receiver to double play the programmed melody on the receiver when accident, abuse, act of God or improper operation.
Need help?
Do you have a question about the ERA-PRXPG and is the answer not in the manual?
Questions and answers