Table of Contents
Advertisement
Quick Links
ERA-PBDCR-STROBE
Owner's Manual
This device complies with Part 15 of the FCC rules, Operation of this device is subject
to the following conditions: 1. This device may not cause harmful interference. 2. This
device must accept any interference, including interference that may cause unde-
sired operation.
Helpful Notes:
• Each receiver is capable of pairing with three (3) transmitters per
zone.
• Each zone features 1 x 12V DC output. The zone output will be used
to power the strobe included in th kit.
• Output duration for the 12V DC output may be set to 5 sec, 10 sec, 1
min, & 2 min. The receiver features 1 x C-Form relay assignable to one
or multiple zones & will take on the duration of the 12V DC output.
• Volume control: 4 levels plus mute, plus off.
• Each transmitter must be paired to a zone on the receiver.
• Each zone is programmed to the "ding-dong" sound from the factory.
• When transmitter battery is low, it sends a signal to the receiver when
triggered & the corresponding LED on the receiver will continue to
flash for 10 minutes.
• The ERA-PBTX is a push button transmitter that must be
programmed to a ERA compatible receiver to operated.
• Push button measures 3.00'' H x 2.25'' W x 1.75'' D.
• When triggered (center push button is pressed) the center halo
illuminates brightly for approximately 2 seconds.
• The push button is outdoor rated and contains a silicone gasket to
keep moisture out. Mount with the small weep hole pointing down
to ensure any moisture in the unit evaporates out.
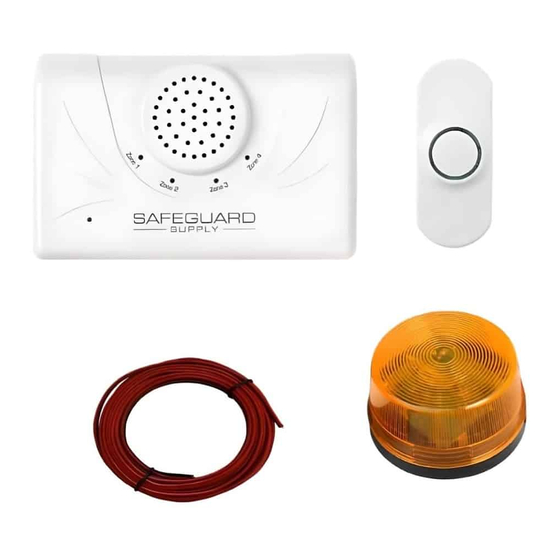
What's in the Kit:
• ERA-PBTX Wireless Push Button with Mounting Hardware/Double Sided
Tape
• ERA-DCRX Desktop / Wall Mount Receiver
• Strobe Light
• Wire (if needed)
Battery Installation:
1. Open the front cover by inserting the included screwdriver into the
square hole on the bottom of the unit (figure 1) & gently push & then
separate the top & bottom halves of the case.
2. Remove top part of case from lower part of case (figure 2).
3. Install the included CR2450A battery into the holder with positive (+) side
of the battery facing up (figure 2).
4. Test the battery by pressing the center push. The green halo should
illuminate for approximately 2 seconds, signaling transmission. Note:
Program the push button to a compatible receiver PRIOR to mounting the
push button.
Figure 1
Pair Transmitter to Receiver:
(Always test unit prior to mounting)
The transmitter works with the ERA-DCRX receiver & basic programming
calls for the user to pair the transmitters with a receiver & select a melody for
the transmitter to instruct the receiver to play when triggered.
For quick setup, however, each zone defaults to a basic "ding-dong" sound allowing you to
easily pair the transmitter for a faster set up process.
1. On the ERA-DCRX receiver, hold down the "mode" (left button in figure 3
below) button until you hear a short tone sound & the "zone 1" LED flashes
(approx 3 sec).
2. If you are programming the transmitter to zone 1 press the button on your
transmitter. You will hear the receiver play a short musical note (zone 1 will
continue to flash).
3. To program a transmitter to a different zone, press the "zone" button on
the receiver to scroll to the appropriate zone . The zone you want to
program will flash. Repeat step 2 above.
4. Once you have programmed all the zones move to the next step.
5. To exit program mode, hold down the "mode" button until you hear a short
tone sound (approx 3 sec)
Changing the Zone Melody:
By default, each zone is programmed by the factory to play the ding-dong
sound
1. Hold down the "zone" button until you hear a short tone & all LEDs on
front panel of receiver are red (approx 3 seconds). The zone you are
programming will flash.
2. Press the "volume" button to scroll through the 12 available melodies
for selection. Once you find a melody you like, move to step 3.
3. Press the "zone" button to scroll to the next zone & repeat step 2 to
program a melody to other zones.
4. Once you have programmed a melody to all necessary zones, move to
step 5.
5. Hold down the "zone" button until you hear a short tone sound (approx
3 seconds) notifying the receiver is out of melody programming mode.
Volume, Mute, Off:
The volume button on the side of the receiver controls the four different volume
levels, mutes & turns off the receiver. Pushing the volume button controls these
functions.
• When all four zone LED lights are red, this indicates maximum volume.
• Three zone LED lights indicate the third volume level.
• Two zone LED lights indicate the second volume level.
• One zone LED light indicates the minimum volume level.
• No zone LED lights & a red power indicator light means the
Figure 2
Figure 3
Advertisement
Table of Contents

Related Manuals for Safeguard Supply ERA-PBDCR-STROBE


Summary of Contents for Safeguard Supply ERA-PBDCR-STROBE
- Page 1 ERA-PBDCR-STROBE Owner’s Manual Figure 2 This device complies with Part 15 of the FCC rules, Operation of this device is subject Pair Transmitter to Receiver: to the following conditions: 1. This device may not cause harmful interference. 2. This device must accept any interference, including interference that may cause unde- (Always test unit prior to mounting) sired operation.
- Page 2 For example, if a push button is Safeguard Supply warrants this product to be free of defects in material and workmanship paired to zone 1, and you want the siren to sound for zone 1, wire the siren for a period of one year from the date of purchase.
Need help?
Do you have a question about the ERA-PBDCR-STROBE and is the answer not in the manual?
Questions and answers