Table of Contents
Advertisement
Quick Links
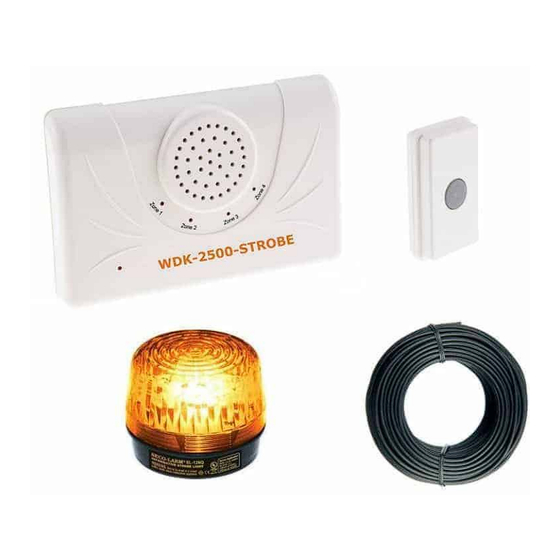
WDK-2500-STROBE
Long Range Business Wireless Doorbell Kit w/ Flashing Strobe
User Manual
Warning:
This device complies with Part 15 of the FCC rules, operation of this
device is subject to the following conditions: 1. This device may not
cause harmful interference. 2. This device must accept any
interference, including interference that may cause undesired
Introduction:
The WDK-2500-STROBE is a long-range doorbell/entry alert kit
designed for businesses, warehouses, shops, etc. There are two
major components of the kit and that is the UT-2500 transmitter
and the DCR-2500 receiver. The other two pieces of the kit are
accessories, an amber colored strobe light and bellwire to connect
the strobe to the receiver.
Operation:
The first part of this manual will cover the two major components of
the kit. The WDK-2500 plug-in receiver and the UT-2500 transmitter
(push button or door/window contact).
Advertisement
Table of Contents

Related Manuals for Safeguard Supply WDK-2500-STROBE


Summary of Contents for Safeguard Supply WDK-2500-STROBE
- Page 1 Introduction: The WDK-2500-STROBE is a long-range doorbell/entry alert kit designed for businesses, warehouses, shops, etc. There are two major components of the kit and that is the UT-2500 transmitter and the DCR-2500 receiver. The other two pieces of the kit are accessories, an amber colored strobe light and bellwire to connect the strobe to the receiver.
- Page 2 WDK-2500-RECEIVER Switch 9 Switch 10 Channel Tune Classical Westminster Ding Dong Whistle NOTE: Whenever a change is made to the jumpers or the dip switches, the receiver must be turned “OFF” and then back “ON” to operate properly. Tone, relay and voltage output: Each of the four transmitter zones (selectable by switch 9 &...
- Page 3 The receiver has a red led light for each of the four zones. The lights can be set to and release. The green led will flash for 5 minutes and during this time no signals blink for every activation up to ten and then repeat or turn on once for ten seconds will be received from the selected zones.
- Page 4 battery compartment and dip switches. Coding the transmitter: Install the CR-2 battery in the holder Open the transmitter. Set the dip switches 1-8 on the transmitter module to match the receiver. Locate the 10 dip switches in the transmitter (Figure 2). Set dip switches 9 and 10 to control the desired zone, tune, and relay The first eight dip switches are for the frequency setting (256 out- put.
- Page 5 N/O contacts. *Note: Both N/O and N/C contacts can be used simultaneously along with the Distributed by SafeGuard Supply, LLC. Manufactured By Dakota Alert, Inc. For sales related questions, please contact:...
Need help?
Do you have a question about the WDK-2500-STROBE and is the answer not in the manual?
Questions and answers