Table of Contents
Advertisement
Quick Links
Visit website for
available languages of
this document.
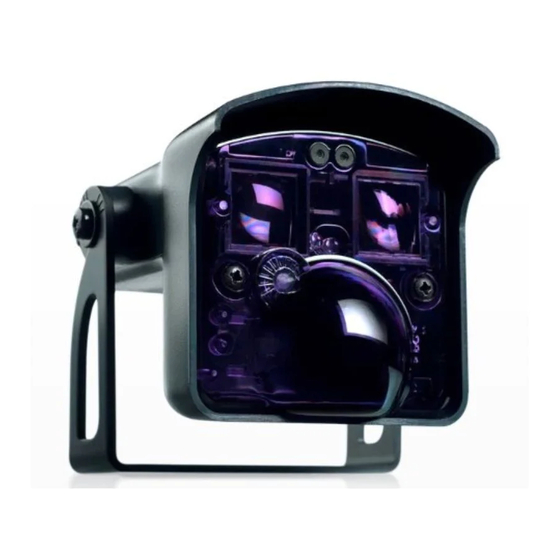
DESCRIPTION
1. push buttons
2. LED's
3. infrared emitter
4. sensor angle indicator
5. bracket
6. cable
TECHNICAL SPECIFICATIONS
Supply voltage
Power consumption
Mains frequency
Output
max. contact voltage
max. contact current
max. switching power
Output holdtime
Mounting height
Temperature range
Humidity
Degree of protection
Dimensions
Materials
Weight
Cable length
Norm conformity
Technology
Transmitter frequency/wavelength
Transmitter power density
Detection mode
Detection field
Min. detection speed
Reaction time
Tilt angle
75.5696.08 IS40P 20211220
1
2
3
12 – 24 VAC ±10%; 12 – 24 VDC +10% / -3%
< 3.5 W
50 – 60 Hz
2 relays (free of potential change-over contact)
42 VAC/VDC
1 A (resistive)
30 W (DC) / 48 VA (AC)
0.5 s
8 – 16'
-22 – 140 °F
0 – 95% non condensing
IP65 / NEMA 4
3.8" (W) × 4" (H) × 5" (D)
ABS and polycarbonate
14 oz
32' (105 m)
Electromagnetic Compatibility (EMC) 2004/108/EC, R&TTE 1999/5/EC
active infrared (AIR)
875 nm
< 250 mW/m²
presence
10' × 10' @ 16' max. mounting height (emitting spots**)
0 in/s to activate detection
250 ms
15 – 45°
** zone detected by spotfinder, i.e. slightly larger than actual detection field
Presence sensor for automatic, industrial doors
IS40P
(US version)
4
5
6
Page 1 of 8
Advertisement
Table of Contents

Related Manuals for Halma BEA IS40P


Summary of Contents for Halma BEA IS40P
- Page 1 IS40P Presence sensor for automatic, industrial doors Visit website for (US version) available languages of this document. DESCRIPTION 1. push buttons 2. LED’s 3. infrared emitter 4. sensor angle indicator 5. bracket 6. cable TECHNICAL SPECIFICATIONS Supply voltage 12 – 24 VAC ±10%; 12 – 24 VDC +10% / -3% Power consumption <...
-
Page 2: Safety Instructions
PRECAUTIONS ‰ This device IS NOT intended for use as a safety sensor. ‰ This device is not recommended for dynamic environments (snow, rain, fog, etc.). ‰ Shut off all power going to header before attempting any wiring procedures. ‰ Maintain a clean and safe environment when working in public areas. ‰... -
Page 3: Mounting Tips
MOUNTING TIPS Avoid proximity to neon Do not cover the sensor. Avoid extreme vibrations. Avoid exposing the sensor to lamps or moving objects. sudden temperature changes. MOUNTING Remove the bracket from the sensor. Position the sensor on the bracket and tighten the screws. Drill 2 holes accordingly. -
Page 4: Sensor Angle
SENSOR ANGLE CEILING WALL Tighten the screws firmly. Adjust the angle of the sensor to position the detection fields. DOOR DOOR DOOR DOOR DOOR 15° 30° 45° • The graphics above are not to scale and are for illustration purposes only. These graphics represent an approximate AIR detection field when mounted at 16 ft. - Page 5 SETUP POSSIBLE REMOTE CONTROL SETTINGS first or first or DOOR EXAMPLE air entry air exit last line last line First Line presence presence presence pulse pulse air entry air exit pulse pulse OUTPUT REDIRECTION presence presence presence presence presence presence presence Last Line FREQUENCY...
-
Page 6: Troubleshooting
TROUBLESHOOTING The door never closes and Object in the AIR detection area. Move objects or reduce automatic the LED is ON. learn time. Wait for learn time to expire and/or Launch a setup or cycle power. The door remains closed and The sensor power is off. - Page 7 HOW TO USE THE REMOTE CONTROL After unlocking, the red If the red LED flashes quickly after unlocking, you To end an adjustment session, LED flashes and the sensor need to enter an access code from 1 to 4 digits. always lock the sensor.
- Page 8 BEA, INC. INSTALLATION/SERVICE COMPLIANCE EXPECTATIONS BEA, Inc., the sensor manufacturer, cannot be held responsible for incorrect installations or incorrect adjustments of the sensor/device; therefore, BEA, Inc. does not guarantee any use of the sensor/device outside of its intended purpose. BEA, Inc. strongly recommends that installation and service technicians be AAADM-certifi ed for pedestrian doors, IDA-certifi ed for doors/gates, and factory-trained for the type of door/gate system.
Need help?
Do you have a question about the BEA IS40P and is the answer not in the manual?
Questions and answers