Table of Contents
Advertisement
Quick Links
Advertisement
Table of Contents

Related Manuals for Dahua MPTZ1100-2030RA


Summary of Contents for Dahua MPTZ1100-2030RA
- Page 1 Mobile Portable HD IR PTZ Camera User’s Manual Version 1.0.0...
-
Page 2: Table Of Contents
Table of Contents PRODUCT OVERVIEW ....................1 Brief Introduction ..............................1 Features ................................1 Specification Parameter ............................. 3 Electric Index ................................ 3 Mechanical Index ..............................3 Environmental Conditions ..........................4 PTZ Control ................................4 Quick Configuration Tool ............................ 4 Web Operation ..............................6 1.8.1 Network Connection ............................ - Page 3 2.2.2.1 Sucker-Type PTZ Installation Description .................... 12 2.2.2.2 PTZ Sucker Disassembly Description ....................13 2.2.2.3 Bracket-Type PTZ Installation Description ................... 13 System Connections ............................16 DAILY MAINTENANCE ....................17 Problems and Solutions ............................ 17 APPENDIX 1 LIGHTENING PROTECTION AND SURGE PROTECTION ......18...
- Page 4 Welcome Thank you for purchasing our product! This user’s manual is designed to be a reference tool for the operation of your camera. Here you can find information about this camera features and functions. Please keep it well for future reference! Before installation and operation, please read the following safeguards and warnings carefully!
- Page 5 Important Safeguards and Warnings The purpose of the content of this manual is to ensure that the user can use the product correctly. Please read the related content carefully before use and keep it properly for future reference. 1 Safety Measures 1.1 Qualified Engineer Needed ...
- Page 6 2.7 Avoid moisture and dust In order to avoid the damage of camera, do not set the camera in the place with lampblack, water vapor, high temperature or too much dust. 2.8 Avoid high temperature Do not install the camera close to the heating furnace or other heat source, such as spotlight; the temperature may rise very high if the camera is installed in the ceiling, kitchen or near the boiler room.
- Page 7 We are not liable for any damage caused by the operation which in not in accordance with guidance in the manual.
-
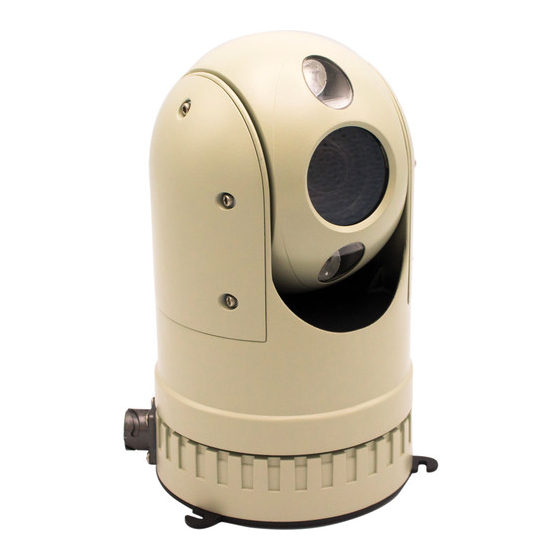
Page 8: Product Overview
1 Product Overview 1.1 Brief Introduction Mobile portable HD IR PTZ camera is a type of hi-tech monitoring product with high degree of integration and intelligentization. It adopts new design about structure; it becomes smaller and more portable compared with traditional T-shaped PTZ. The portable PTZ can be divided into sucker type and bracket type according to different installation mode;... - Page 9 Support 3D noise reduction setup to reduce the camera noise under the low illumination environment. It is to enhance video quality. Power up HD Mobile High-Speed Positioning System executes the power up operation after it reboots and completes the initialization. The power up function includes horizontal and vertical self-check and zoom function self-check, also displays the information of the system.
-
Page 10: Specification Parameter
Specification Parameter Please refer to sheet 1-1 for specification parameter. Parameter Index Model MPTZ1100-2030RA CMOS size 1 / 2.8" Effective pixel 1920 ( H ) × 1080 ( V ) Zoom 30x optical zoom; focal length 4.5~135 mm; (F1.6 to 4.4) Horizontal:67.8°... -
Page 11: Environmental Conditions
Environmental Conditions Please refer to sheet 1-4 for environmental condition information. Parameters Index Working environment -35℃~60℃ temperature Relative Humidity 10%~90% Sheet 1-4 PTZ Control Please refer to sheet 1-5 for PTZ control information. Preset Function Setting Call Defog/heat IR Lamp or white light lamp Sheet 1-5 Quick Configuration Tool NOTE:... - Page 12 router. Network camera default IP address is 192.168.1.108. If there is a router, please set the corresponding gateway and subnet mask. The factory default user name is admin and password is admin. For security reasons, please modify your password after you first login. For detailed WEB operation, please refer to the Web Operation Manual in the resource CD.
-
Page 13: Web Operation
Please note the port information here shall be identical with the port value you set in TCP port in Web Network interface. Otherwise, you cannot login the device. If you are using device background upgrade port 3800 to login, other setups are all invalid. Figure 1-4 After you logged in, the configuration tool main interface is shown as below. -
Page 14: Login And Logout
Speed dome IP address and PC IP address shall be in the same network segment. Speed dome default IP address is 192.168.1.108. If there is router, please set the corresponding gateway and subnet mask. Use order ping ***.***.***.***(* speed dome address) to check connection is OK or not. 1.8.2 Login and Logout Open IE and input speed dome address in the address bar. - Page 15 Figure 1-7 After installation, the interface is shown as below. See Figure 1-8. Please input your user name and password. Default factory name is admin and password is admin. Select the network connection type. Note: For security reasons, please modify your password after you first login. Figure 1-8 After you logged in, you can see the main window.
- Page 16 Figure 1-9 Click on “Please click here to download and install the plug-in”. The system pops up warning information to ask you whether run or save this plug-in. Click to install and run the plug-in, see Figure 1-10 after you log in again. Figure 1-10 Please refer to the Web Operation Manual included in the resource CD for detailed operation instruction.
-
Page 17: Camera Installation
2 Camera Installation 2.1 Preparation before Installation 2.1.1 Four-Core Aviation Plug Pin Definition Please refer to Figure 2-1 for the 4-core aviation plug pin, and see sheet 2-1 for more details about pin. Figure 2-1 Port number Definition DC 12V+ NULL NULL Sheet 2-1... -
Page 18: Product Installation
Please refer to Figure 2-1 for product dimension information. Figure 2-1 2.2.2 Installation Modes The portable PTZ can be divided into sucker-type PTZ (MPTZ1100-2030RA-NC) and bracket-type PTZ (MPTZ1100-2030RA-NT) according to different installation modes; it can be optional according to the users’ requirements. -
Page 19: Sucker-Type Ptz Installation Description
2.2.2.1 Sucker-Type PTZ Installation Description Step1 Aim the lock catch on the PTZ at the unlocking label on the quick installation pedestal, as it is shown in Figure 2-4. Figure 2-4 Step 2 Embed the speed dome into the quick installation pedestal and rotate clockwise till it is fixed firmly (you can hear “click”... -
Page 20: Ptz Sucker Disassembly Description
Step 3 Tie one end of the anti-fall rope to the buckle on the quick installation pedestal, as it is shown in Figure 2-6, and tie the other end to the appropriate location of the vehicle. Figure 2-6 2.2.2.2 PTZ Sucker Disassembly Description Step 1 Pull out the lock catch outward and rotate the speed dome anticlockwise to the location shown in Figure 2-7. - Page 21 Figure 2-8 The installation steps of camera and seismic damper are as follows: Step 1 Loosen the three screws on the seismic damper, as it is shown in Figure 2-9. Figure 2-9 Step 2 Install the camera on the seismic damper and rotate the camera body clockwise, as it is shown in Figure 2-10.
- Page 22 Figure 2-10 Step 3 Match the seismic damper with the chassis base, see Figure 2-11. Figure 2-11...
-
Page 23: System Connections
2.3 System Connections Please refer to Figure 2-12 for the connection between HD mobile PTZ camera and NVR. Figure 2-12... -
Page 24: Daily Maintenance
3 Daily Maintenance 3.1 Problems and Solutions Please refer to sheet 3-1 for detailed information. SYMPTOM CAUSE SOLUTION No action after Power supply abnormity Check if NVR starts normally, if not, it power up, no needs to check NVR malfunction. image and IR If NVR starts normally, it needs to light is off. -
Page 25: Appendix 1 Lightening Protection And Surge Protection
Appendix 1 Lightening Protection and Surge Protection This series speed dome adopts TVS lightning protection technology. It can effectively prevent damages from various pulse signals below 1500V, such as sudden lightning and surge. While maintaining your local electrical safety code, you still need to take necessary precaution measures when installing the speed dome in the outdoor environment.
Need help?
Do you have a question about the MPTZ1100-2030RA and is the answer not in the manual?
Questions and answers