Advertisement
Quick Links
Ashford Handicrafts Ltd.
Factory and Showroom: 415 West Street,
PO Box 474, Ashburton, New Zealand
Telephone 64 3 308 9087
Facsimile 64 3 308 8664
Email: sales@ashford.co.nz
Internet: www.ashford.co.nz
INSTRUCTIONS
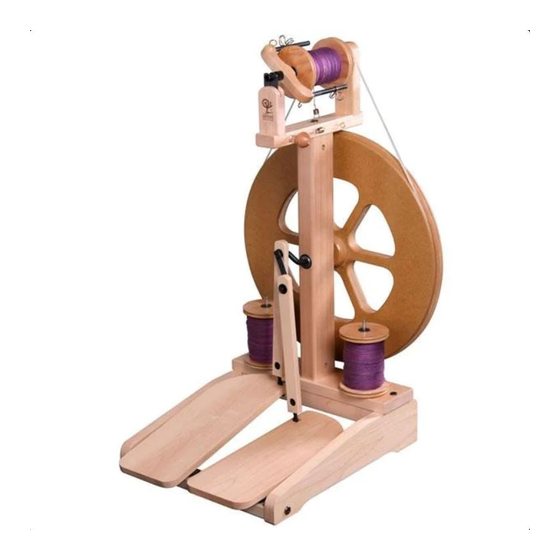
KIWI 2 SPINNING WHEEL
KSWII08052012V2
Ashford Guarantee
Thank you for purchasing this Ashford product. In the
unlikely event there is any fault in manufacture we will
replace the item. To validate our guarantee please visit
our website or write to us.
Please also join our Ashford Club for the Wheel Magazine,
competitions and more at www.ashfordclub.co.nz
Advertisement

Related Manuals for Ashford KIWI 2


Summary of Contents for Ashford KIWI 2
- Page 1 Telephone 64 3 308 9087 replace the item. To validate our guarantee please visit Facsimile 64 3 308 8664 our website or write to us. Email: sales@ashford.co.nz Please also join our Ashford Club for the Wheel Magazine, Internet: www.ashford.co.nz competitions and more at www.ashfordclub.co.nz...
- Page 2 REAL SCALE HARDWARE...
- Page 3 The Silver Beech tree is a native of New Zealand and has a lovely variety of colour and grain. For a silky smooth matt finish, use the Ashford Wax Finish to enhance the natural colours and character of this timber.
- Page 4 Tap wooden dowels to the bottom of the holes in either end of the treadle rail. Loosely attach the feet to the treadle rail with 50mm (2”) bolts and barrel nuts. Sit the base on a flat surface and check the feet are level. Then tighten the bolts.
- Page 5 Locate the metal cover plates into the polyurethane hinges. Then attach the hinges to the treadle rail with 16mm (5/8”) screws. Lay the base on its back. Locate the metal cover plates into the polyurethane hinges. Then attach the treadle boards to the hinges with 16mm (5/8”) screws.
- Page 6 Turn the base back over. Tap wooden dowels down to the bottom of the holes in the feet. Attach the “toe saver” to the base with 50mm (2”) screws. Locate the base onto the dowels and secure the base to the legs with 50mm (2”) bolt and barrel nuts.
- Page 7 Tap wooden dowels to the bottom of the holes in both ends of the main upright. Position the main upright onto the holes in the base. Check that the ball bearing with the extension faces the back. Secure main upright in place with a 50mm (2”) bolt and barrel nut.
- Page 8 Insert the polyurethane conrod joints into the end of the conrods. Slide the crank through the ball bearings. Slide the inner shell of the conrod universal joint onto the crank until it clicks into the groove. Then click the front conrod onto the universal joint on the crank.
- Page 9 Slide the wheel onto the crank and rotate the wheel until the groove in the wheel aligns with the hole in the end of the crank. Then carefully tap the hub pin into position. HINT: Use a lazy kate pin as a punch to avoid damaging the wheel.
- Page 10 Lay the wheel on it’s back. (protect your table with a towel or piece of cardboard) Remove the front conrod from the crank. Insert the front conrod joint into the right treadle board. Hold the conrod joint with one hand on either side of the treadle board.
- Page 11 Tap the nylon bearing down to the bottom of the hole in the rear flyer support. Secure the front and back flyer supports to the maiden bar with 50mm (2”) Allen head screws. Screw the hook and eye into the maiden bar. Place the maiden bar onto the dowels in the main upright and secure with a 50mm (2”) bolt and barrel nut.
- Page 12 35cm (13¾") Insert the end of the flyer shaft into the rear flyer bearing and click the flyer orifice into the front flyer bearing. Tie the nylon brake band to spring . Thread the nylon brake band through the eye and tie spring 35cm (13 ¾”) from spring , then cut the surplus nylon off and tie it to the other end of spring Take the nylon brake band up and over the groove in the bobbin and place spring...
- Page 13 & large groove in the wheel. This gives a flyer to wheel ratio of 7.25:1. NOTE. When not using your Kiwi 2 Spinning Wheel, please loosen the drive belt to avoid it stretching. Tie the 2 ends of the tape together, loop it through the threading hook and hang it on the tension knob.
Need help?
Do you have a question about the KIWI 2 and is the answer not in the manual?
Questions and answers