Table of Contents
Advertisement
Quick Links
Ashford Handicrafts Ltd.
Factory and Showroom: 415 West Street,
PO Box 474, Ashburton, New Zealand
Telephone 64 3 308 9087
Facsimile 64 3 308 8664
Email: sales@ashford.co.nz
Internet: www.ashford.co.nz
INSTRUCTIONS
ASHFORD INKLETTE LOOM
A PORTABLE INKLE LOOM
Ashford Guarantee
Thank you for purchasing this Ashford product. In the
unlikely event there is any fault in manufacture we will
replace the item. To validate our guarantee please visit
our website or write to us.
Please also join our Ashford Club for the Wheel Magazine,
competitions and more at www.ashfordclub.co.nz
IKL13022012V3
Advertisement
Table of Contents

Related Manuals for Ashford INKLETTE LOOM


Summary of Contents for Ashford INKLETTE LOOM
- Page 1 Telephone 64 3 308 9087 replace the item. To validate our guarantee please visit Facsimile 64 3 308 8664 our website or write to us. Email: sales@ashford.co.nz Please also join our Ashford Club for the Wheel Magazine, Internet: www.ashford.co.nz competitions and more at www.ashfordclub.co.nz...
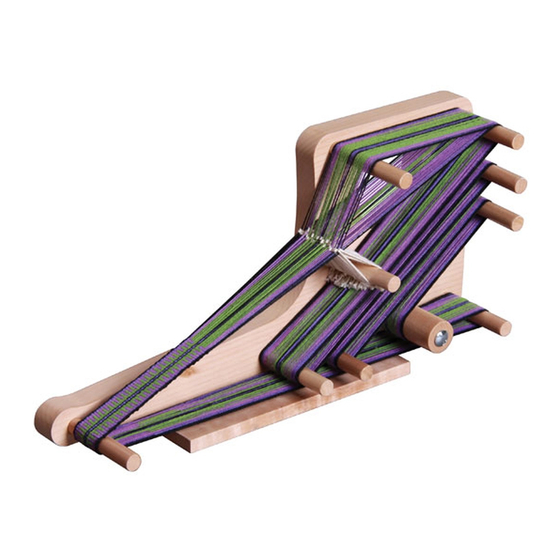
- Page 2 Weave your own colourful belts, bracelets, hand bag and guitar straps, necklaces, ties and braids Amazing 72”, 1.8m warp Lightweight portable and strong Take it with you to workshops, meetings or on holiday! TOOLS REQUIRED Hammer, screwdriver, candlewax (for screw threads) and glue (included). ASSEMBLY Use the sandpaper provided to remove any sharp edges and to smooth the pegs.
- Page 3 WARPING AND WEAVING INSTRUCTIONS WARP LENGTH: MAX WARP WIDTH 1 .8m - 72” : 40mm - 1 1/2” INKLE BANDS These colourful bands are very strong and have many uses. They make belts, ties, guitar straps, braiding for homespun’s and trims for joining pieces of weaving. They have a dominant warp face, ie the warp threads show.
- Page 4 LONG WARP ROUND 1 - Take the warp thread directly to the tension flap as illustrated. ROUND 2 - Take the warp thread over the top peg and over the tension flap. Round 2 Round 1 Repeat Round 1 and Round 2 until the desired warp width is achieved. If you have a multicoloured warp, add one extra Round 1.
- Page 5 Attach a leash to all the top threads between each open (centre) thread. Keep the knot for the leash under each leash peg. MAKING THE SHED The shed is the space between the two layers of warp and is obtained by the use of leashes. A thread NOT going through a leash is called an “open”...
- Page 6 WEAVING Make Shed 1. Pass the shuttle into the space between the threads. Pull the shuttle firmly down towards the front peg. Pull the shuttle out of the shed - pull the weft thread tightly.The weft threads will move together closely so you cannot see the weft at all through the warp. - Make shed 2 and repeat.
- Page 7 Telephone 64 3 308 9087 replace the item. To validate our guarantee please visit Facsimile 64 3 308 8664 our website or write to us. Email: sales@ashford.co.nz Please also join our Ashford Club for the Wheel Magazine, Internet: www.ashford.co.nz competitions and more at www.ashfordclub.co.nz...
Need help?
Do you have a question about the INKLETTE LOOM and is the answer not in the manual?
Questions and answers