
Subscribe to Our Youtube Channel
Related Manuals for Rexing S3


Summary of Contents for Rexing S3
- Page 1 Dash Cam User Manual The information in this manual is subject to change without notice. Rexing All Rights Reserved www.rexingusa.com...
- Page 2 (877) 740-8004 Our support team will respond to you as soon as possible. Always a surprise in Rexing. Check us out here • https://www.facebook.com/rexingusa/ • https://www.instagram.com/rexingdashcam/ • https://www.rexingusa.com/support/registration/ •...
-
Page 3: What's In The Box
Safety Guide 安全ガイド The information in this manual is subject to change without notice. Rexing All Rights Reserved www.rexingusa.com www.rexingusa.com Rexing S3 3-Channel Dash Cam Adhesive Mount Power Cable with GPS Logger (12ft) User Manual Cable Management Kit Safety Guide... -
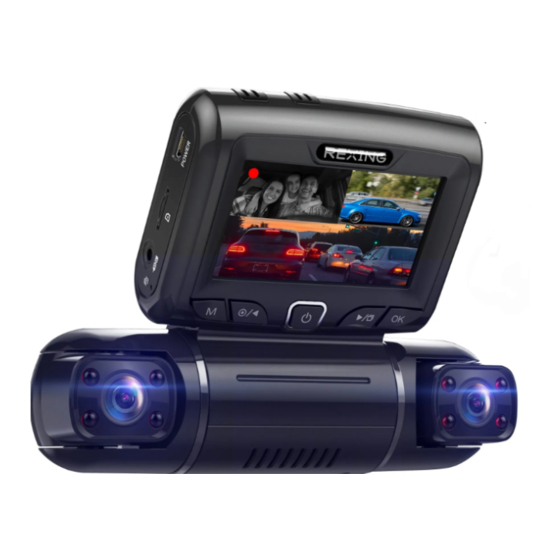
Page 4: Camera Overview
Camera Overview Power Port Screen-view Switching, Audio Button, Down Button Micro SD Card Slot Confirm Button, Video Lock Reset Pin Hole Button, Wi-Fi Button Menu Button, Mode Rotating Front Camera (90°) Switch Button Rotating Rear/Cabin Cameras Record Button, Photo (180° horizontal and 270° vertical) Button, Up Button Infrared Lights Power Button, Screen... - Page 5 Button Function • Press to turn on or turn off the screen • Press and hold for 3 seconds to turn the device on or off • Press to confirm a selection in settings • Lock a Video: Press to manually lock / unlock a video file while recording •...
-
Page 6: Screen Icons
Screen Icons 9 10 11 00:25 1080P*3 11/10/2021 15:25:04 Recording Mode Wi-Fi Signal Recording Indicator GPS Signal Recording Time Microphone Resolution SD Card Date Power Indicator Time... -
Page 7: Installation
Installation Step 1 Installing Adhesive Mount Place the 3M adhesive on the mount plate and properly orient the mount piece to the roof and hood line of the vehicle. Important! Ensure the T-interlock on the mount is oriented in the correct direction. Firmly press the mount onto the windshield. - Page 8 Step 2 Mount the Rear Camera Mount the rear camera as shown below. Use the included rear camera cable to connect the rear camera to the front camera. Plug the rear camera into the rear camera port Rear camera wiring instructions...
-
Page 9: Insert The Memory Card
Step 3 Insert the Memory Card The Rexing S3 accepts Class 10/ UHS-1 or higher Micro SD memory cards up to 256GB. You will need to insert a memory card before recording. Before inserting or removing a memory card, ensure you've powered down the device. - Page 10 To ensure the S3 records to your memory card properly and without error, we strongly recommend you to format the card within the camera when you're using the dash cam for the first time.
- Page 11 To format the memory card, first press the REC button to stop recording. Then press the MENU button twice to enter the Setup Settings. Use the REC and MIC buttons and toggle to the Format. Press the OK button to confirm the format. System Settings Format 11578 MB...
-
Page 12: Basic Operation
Basic Operation Video Playback To playback a video on the device, press the Record button to stop recording. Press and hold the Mode button to enter the playback mode. Use the the Up and Down buttons to toggle to the desired video. Press the OK button to play. During playback, use the OK (pause), Up (rewind) and Down (fast forward) buttons to control the video playback. -
Page 13: Menu Settings
Menu Settings Loop Recording With loop recording mode enabled, the device will continuously erase the oldest video once the memory card reaches the storage limit. The video will be recorded and kept with the user-selected time range. Loop Recording 1 Minute 2 Minute 3 Minute Time Lapse Record... -
Page 14: Date Stamp
Note: Locked video files won’t be erased by Loop Recording, they will remain on the memory card until they are manually deleted, or when the card is formatted. Gravity Sensing High Middle Close Date Stamp You have the option to display the date and time in your videos. Note that the date and time stamp cannot be removed from videos if this feature was enabled at the time of recording. -
Page 15: Light Frequency
Light Frequency This option should be set according to the power supply specification used in your country or geographical region (U.S. users should select the "60Hz" option). Screen Saver Select a time duration for the screen to stay lit after recording starts. Screen Saver 10 Seconds 30 Seconds... - Page 16 Parking Monitor (Parking Surveillance Mode) Parking monitor provides surveillance on your parked vehicle. When the engine is off, the hardwire kit is used to provide continuous power and protect your car battery from being discharged. Option 1: Vibration Detection To enable the Parking Monitor, you'll need to connect it with the Smart Hardwire Kit (ASIN B07RN24B7V, sold separately).
- Page 17 There are 2 options under parking mode: We recommend using the Time Lapse option. • Time Lapse Record: Record video in one frame per second to conserve memory and reduce the time it takes to review video. • Gravity Sensing Record: The Gravity Sensing detects significant or sudden movement (such as an impact or collision), it will trigger an event recording.
-
Page 18: Set Time Zone
Date and Time Use the following procedure to change the device’s time and date. Set Time Zone Use the following procedure to change the device’s time zone. Set Time Zone GMT-09:00 Alaska GMT-08:00 LosAngeles GMT-07:00 Arizona GMT-06:00 Chicago GMT-05:00 New York GPS Speed Unit Use the following procedure to change the GPS speed unit. - Page 19 You can also press and hold the OK button for about 3 seconds to turn on/off the Wi-Fi feature. Downloading the Wi-Fi App Download Rexing Connect app from the App Store or Google Play or scan the QR code below. Pairing the camera to your device Turn on Wi-Fi on the dash cam and the SSID and password will be shown as below.
-
Page 20: Restore Factory Settings
SSID in the network list, then enter the default password 12345678 to connect. Once it’s connected, the Wi-Fi icon on the dash cam screen will turn to green. Open the Rexing Connect app and press connect to complete the pairing. Wi-Fi Connect Connect... -
Page 21: Warranty And Support
Warranty & Support Warranty The Rexing S3 Dash Cam comes with a full 12-month warranty. If you register your product on our official site https://www.rexingusa.com/support/registration, you can extend the warranty to 18 months. Support If you have any questions regarding your product, please do not hesitate to contact us at care@rexingusa.com, or call us at... - Page 22 FCCID: This device complies with part 15 of the FCC Rules. Operation is subject to the following two conditions: (1) This device may not cause harmful interference, and (2) this device must accept any interference received, including interference that may cause undesired operation. Changes or modifications not expressly approved by the party responsible for compliance could void the user's authority to operate this equipment.
Need help?
Do you have a question about the S3 and is the answer not in the manual?
Questions and answers