Advertisement
Quick Links
Advertisement

Related Manuals for Rexing S1 Pro


Summary of Contents for Rexing S1 Pro
- Page 1 S1 Pro User Manual...
- Page 2 Notice Menu Setup Operation: The menu is to be set up in non-video mode. If the device is in video mode, proceed after stopping the video recording. Memory card: A new card must be formatted to the machine before use. Continuous image recording for long periods of time may produce protected files that are not subject to long-term protection (these files may not be overwritten during loop recording) and storage fragments, which need to be cleared regularly in order to save stable...
- Page 3 The features described in the operation manual are available for all products of the same type. Your model may have come with optional or additional functions. Menu operations may vary. Please refer to the instructions that apply to your actual product. Warning The battery (module or pack) must not be expose to an overheat environment such as direct sunlight or flame.
- Page 4 Overview Thank you for choosing REXING! We hope you love your new products as much as we do. If you need assistance, or have any suggestions to improve it, please contact us. You can reach us via care@rexingusa.com or call...
-
Page 5: Table Of Contents
Table of Contents Camera Overview................6 Installation and Operation……………………………………………….....9 Basic Operations…………………………………………………………..……………12 Mobile Connection…………………………………………………………………….16 GPS Player………………………………………………………………………………….22 Product Specifications……………………………...……………………………….24 General Troubleshooting…………………………...………………………………25... -
Page 6: Camera Overview
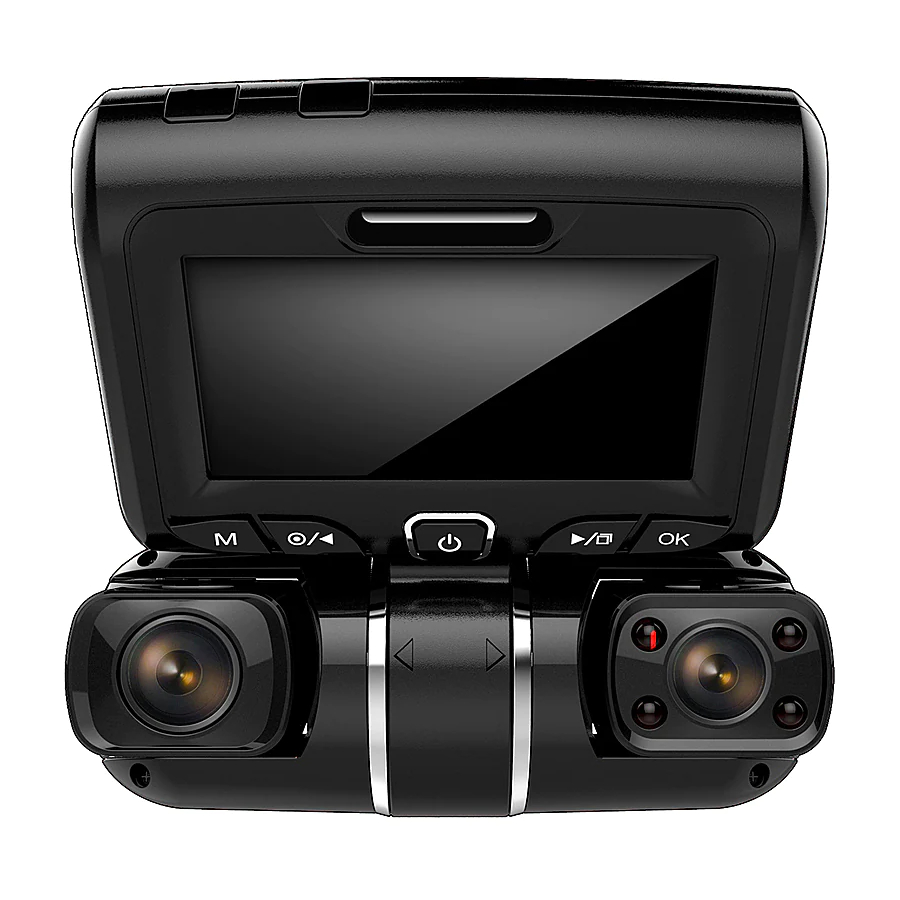
Camera Overview I. Visual Features Rearview Camera Socket Smart Hardwire Kit Socket USB 5V Socket IR light GPS Socket Cabin Camera Front Camera (For reference only) 1. Menu/Mode Button 2. Record/Up Button 3. Power Button 4. Down/Toggle Button 5. OK Button 6. - Page 7 Buttons Description 1. In standby mode, press this button to start/stop the related menu options such as recording mode, photography mode, M Button playback mode. (Menu/Mode 2. In recording mode, press and hold the button for 3 second to Switch) enter picture-taking and playback interface.
- Page 8 4. In photography mode or playback mode, press the button to take a picture or play back a file. USB Port Power charging port/USB data cable port Power Port Power cable connection port Rearview Camera Rearview Camera Connection Port Connection Port Reset Pinhole If the system crashes, use a pin to reset the system.
-
Page 9: Installation And Operation
Installation and Operation 1. Turn off the car’s engine. 2. Place the MicroSD card into the slot. 3. Secure the dashcam to a place close to the original rearview mirror. 4. Plug the GPS module into the GPS port and secure the module to a position close to A-pillar of the car. - Page 10 Connection to rearview camera For the rearview camera, there are two wiring options as shown in the above figure. The first part of both options is characterized with concealed wire routing against the edges of the door(s). A: The rearview camera can be mounted directly above the rear window inside the car.
- Page 11 III. Turn on the Dash Cam Connect the dash cam to the car charger after installation. Starting the car engine will start the device. The built-in battery will be charged at the same time. Note: Due to unstable voltages caused by starting the car engine, a voltage fluctuation in some vehicles may be especially obvious.
-
Page 12: Basic Operations
Basic Operation Main Interface System Setup I. Open the Setup Menu Press the Menu Button to open system menu setup. Select Settings. Press the Up/Down Button to change the option and press the OK Button to confirm. II. Video Mode - Setup Select Record on the main menu. - Page 13 7. Date Stamp: Off/On III. System Menu Setup 1. Date/Time: Year, Month, Day, Hour, Minute, Second (RTC system time setup). Press the OK Button to access [Date/Time] of system setup. Press the Menu Button to shift to the next setting. Press the Up/Down Button to set the parameters.
- Page 14 button to select parameters. Press the OK Button to save your setup selections and return to the previous menu. Press the Menu Button to exit setup when complete. 1. Picture Taking Method: Single Shot, 2s Timer, 5s Timer, 10s Timer 2.
- Page 15 When browsing files in playback mode, quickly press the Menu Button to enable the pop-up menu options. The following operations are available: Delete: Delete a single file or all files. Note: Locked files cannot be simply deleted. Unlock the file before you need to delete it.
-
Page 16: Mobile Connection
Power Voltage Wi-Fi Record Playback Parking Power Voltage Settings II. Monitoring Mode In the monitoring mode menu setup on the main page, when a smart hardwire connection is detected, turning on the parking monitor will enable modes: Super Night Scene and Time-Lapse video monitoring. Parking Mode Wi-Fi Record... - Page 17 Google Store II. Apple iOS system 1. Open The App Store and search for LuckyCam or scan the QR code below to quickly download and install it. App Store QR code 2. Open the app after installation. There will be a pop-up message asking if you will allow LuckyCam to access the photos in your phone.
- Page 18 For an initial connection, it is necessary to access Wi-Fi setup. Find network and input the password. Later connections require no password input. Simply click the link of the Wi-Fi equipment to be switched when it becomes switchable. 1. Select Wi-Fi ON/OFF on the main menu or press the OK Button to turn on the Wi-Fi of the device.
- Page 19 device’s screen will turn from white to green. To view the camera record images, simply return to the app. VI. App Overview: Audio Photo Current resolution Switch image Duration Internal view Front view Rear view Start/pause recording Photo mode Video mode Menu setup Video file folder Video...
- Page 20 Shortcut Menu Shortcut Menu Enabled Local File Folders Date Label Enabled App Setup General Video Setup Wi-Fi ID Video Setting Dual Recording Wi-Fi Password Exposure Compensation G-sensor System Setup Loop Recording 1 minute Software Version Video Resolution Available Space Format camera Enabled Camera Language Simplified Chinese...
- Page 21 Photo Video File Folder Setup 5. Click the Photo button on the bottom to enter picture taking mode. 6. Click the button on the top to toggle between images from the front camera, cabin camera, and rearview camera. 7. Click the button on the top to take a picture in real time.
-
Page 22: Gps Player
GPS Player I. Install a GPS Module Typical installation locations for the GPS module are on the center console or sun visor with the GPS module facing outward or upward and the back side of GPS module (applied with double-sided, adhesive tape) facing inward or downward so as to ensure an effective satellite signal reception as shown in the picture: Installation Instructions... - Page 23 3. When LUCKY PLAYER is used and a pop-up message appears in the upper right corner, place the cursor in the range of text and right click the mouse to view the options. Select allow blocked content as shown below: To assist ensure security protection, your web browser has been blocked ……...
-
Page 24: Product Specifications
Note: The GPS player is edited on the basis of the current version. The pictures given are for reference only. The version is subject to change without prior notice. Please refer to the actual one. Product Specifications SDRAM Built-in Speaker Built-in Built-in Power Cable Port... -
Page 25: General Troubleshooting
General Troubleshooting Trouble Possible Causes Solution Failure to Plug in the charger to charge the Dead battery power on battery. In standby mode, automatic Automatic The automatic shutdown shutdown is activated when no shutdown function is enabled. time is set. Set time/date. during Dead battery Plug in the charger to charge the...
Need help?
Do you have a question about the S1 Pro and is the answer not in the manual?
Questions and answers