
Related Manuals for Joerns Hoyer Calibre


Summary of Contents for Joerns Hoyer Calibre
- Page 1 User Instruction Manual Hoyer Calibre ® To avoid injury, read user manual prior to use.
-
Page 2: Table Of Contents
Hoyer ® English Calibre Contents 1. The Hoyer Calibre Patient Lift ................2. Introduction: About Your Lift ................3. Assembly and Commissioning Instructions ............4. Safety Precautions .................... 5. Standard Control Box & Handset ..............6. Smart Monitor & Handset .................. -
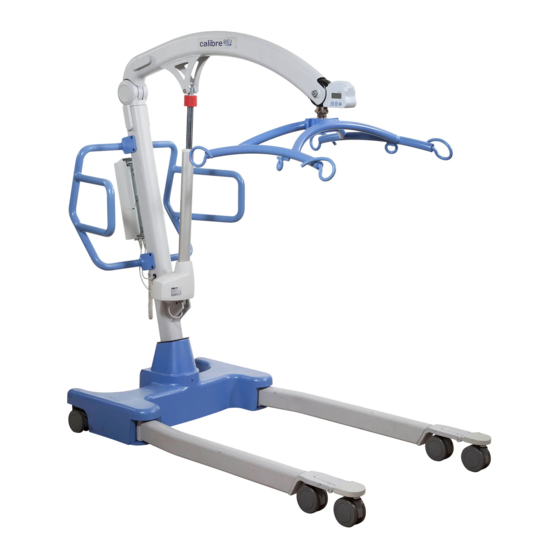
Page 3: The Hoyer Calibre Patient Lift
Hoyer ® English Calibre 1. The Hoyer Calibre Patient Lift Boom Battery/ Control Pack Push Handle 6-point Cradle Electric Actuator Mast Foot Push Pad Straight Line Steering Device Rear Castor (braked) Front Castor (non-braked) -
Page 4: Introduction: About Your Lift
The Hoyer Calibre lift is a passive patient handling device intended for the safe lifting and transferring of patients up to a safe working load of 385 kg (850 lbs). The Hoyer Calibre lift is intended for INDOOR USE ONLY and must be operated by a MINIMUM of two people/carers. -
Page 5: Assembly And Commissioning Instructions
Hoyer Service agent/Dealer. Warning a minimum of 2 perSonS requireD. The Hoyer Calibre is heavy and will need to be lifted with care. You will need assistance to lift the Hoyer Calibre from the carton. Assembly Instructions Remove all the parts from the carton and place on the floor, taking care to protect the paint finish from damage. - Page 6 Hoyer ® English Calibre 3. Tighten the M10 screws to secure each leg using a socket and torque wrench. Warning ensure the screws are secured firmly. it is recommended to tighten these to 10nm Warning avoid trapping fingers. Keep fingers away from the end of the leg when inserting into the leg socket.
- Page 7 Hoyer ® English Calibre 6. Insert quick-release pin sleeve into mounting bracket/actuator hole. make sure the sleeve is fully engaged in the hole on both mounting brackets. 7. Insert the quick-release pin through the quick-release pin sleeve until it is fully located. Warning Check that the quick-release pin has been fully inserted by trying to push the pin back out.
- Page 8 Hoyer ® English Calibre Disassembly Warning Disassembly must be carried out by a competent engineer from an authorised Hoyer Service agent/Dealer. The lift should not be disassembled unless for service, repair or transport if necessary. Therefore follow the assembly instructions in reverse sequence. aLWaYS CHeCK THe foLLoWing Before operaTion •...
- Page 9 Hoyer ® English Calibre • The legs of the lift open and close satisfactorily (This is done via the hand control). • Push the up and down buttons on the hand control and confirm the boom rises and lowers.
-
Page 10: Safety Precautions
Following these few basic safety precautions will make lifting operations easy and trouble free. reaD anD unDerSTanD THe uSer inSTruCTion manuaL Before uSing THe HoYer CaLiBre LifT Warning: Important safety information for hazards that might cause serious injury. CauTion: Information for preventing damage to the product. - Page 11 Hoyer ® English Calibre • Do noT push a loaded lift at speeds, which exceed a slow walking pace (2.6 ft/sec). • Do noT push the lift over uneven or rough ground. particularly if loaded. • Do noT attempt to push/pull a loaded lift over a floor obstruction. •...
-
Page 12: Standard Control Box & Handset
Hoyer ® English Calibre 5. Standard Control Box & Handset Detachable Battery Pack Raise & Lower Buttons Legs Open / Emergency Stop Button Close Buttons Handset Emergency Raise & Lower Redundant Controls Actuator Handset Actuator Information Connection Connection Screen Socket Socket Handset Connection... -
Page 13: Smart Monitor & Handset
Hoyer ® English Calibre 6. Smart Monitor & Handset Detachable Battery Pack Emergency Stop Button Smart Monitor Raise & Lower Buttons Emergency Raise & Lower Redundant Controls Legs Open / Close Legs Open / Redundant Controls Close Buttons Handset Actuator Actuator Information Connection... - Page 14 Hoyer ® English Calibre Intended Use The Hoyer Smart Monitor is a control system for Hoyer lifts. The Smart Monitor stores useful servicing information about the lift that can be recalled when required. This servicing information includes: • Number of patient lift cycles •...
- Page 15 Joerns Healthcare recommend that aLL routine daily checks are carried out on the lift prior to further use (for a list of daily checks, please refer to your lift user manual). Joerns Healthcare also recommend that you contact your authorised...
- Page 16 Hoyer ® English Calibre On-Board Redundant Controls On-board redundant controls enable the lift to be raised or lowered in the event of an emergency. If your lift incorporates powered leg positioning, there are redundant controls to both open and close the legs. Battery Information The display showing full battery means that the battery is fully charged and the lift is ready for use.
-
Page 17: Operating Instructions
7. Operating Instructions 1. Leg adjustment The legs on the Hoyer Calibre are electrically adjustable for width. The legs can be opened to enable access around armchairs or wheelchairs. For transferring and negotiating narrow doorways and passages the lift legs should be in the closed position. - Page 18 For detailed fitting instructions, please refer to the user guide supplied with each sling. Warning Joerns Healthcare recommends that slings be checked regularly and particularly before use for signs of fraying or damage. Do noT use slings that are worn or damaged.
-
Page 19: Removal Of 6-Point Cradle System
Hoyer ® English Calibre 8. Removal of 6-point Cradle System foLLoW THeSe inSTruCTionS eXaCTLY Your Calibre lift uses the 6-point cradle. The removal of this systems is completed by the use of a quick-release pin. This is done quickly and easily, but you must read the following safety instructions to ensure the 6-point cradle is safely locked into position before use. - Page 20 Hoyer ® English Calibre Removal CauTion: Be sure to support the weight of the 6-point cradle before removing pin. To detach pin, depress the spring barb (using a flat blade electrical screw driver or similar) and pull the pin out. Support the 6-point cradle, and then pull the pin sleeve in the opposite direction, removing it completely from the boom.
-
Page 21: Charging Instructions
Hoyer ® English Calibre 9. Charging Instructions When the power pack needs charging it is removed from the lift and fitted to an off board charging unit. 1. Remove the power pack from the lift. The pack is retained by a simple latch at the top of the power pack. -
Page 22: Maintenance Schedule & Daily Check List
• EXAMINE slings for fraying or other damage. DO NOT use any sling if damaged or if the sling shows signs of wear. Maintenance, Inspection and Test Joerns Healthcare recommends regular inspection and maintenance. Please refer to the chart on the next page. - Page 23 Hoyer ® English Calibre *THeSe CHeCKS SHouLD inCLuDe: = Recommended ü 1. SpreaDer Bar: Check the spreader bar for freedom of rotation and swing. Check for wear on the central pivot. Check for firm attachment to the ü ü ü boom.
-
Page 24: Technical Specifications
Hoyer ® English Calibre 11. Technical Specifications Safe Working Load ................850 lbs ....385 kgs Maximum Overall Length ..............71 inches ....1805 mm Minimum Overall Length ..............68.5 inches ....1740 mm Maximum Overall Height ..............87 inches ....2210 mm Minimum Overall Height ..............62 inches ....1575 mm 6-point Cradle Maximum Height ............73 inches .... - Page 25 Hoyer ® English Calibre Electrical Specifications BATTERIES.............24 volt Rechargeable sealed lead acid type BATTERY CAPACITY ........3.2 Ampere hours CHARGER RATED INPUT ......230Vac 50/60Hz CHARGER RATED OUTPUT ......27.4/29.0 VDC@0.8A electric Shock protection CHARGER ............CLASS II LIFT ..............INTERNAL POWER SOURCE Degree of Shock protection CHARGER ............TYPE B LIFT ..............TYPE B Environmental Conditions...
- Page 26 Hoyer ® English Calibre KeY SYmBoLS: The following symbols are used on the charger, control unit and battery: Type B equipment, as per EN 60601-1 Class 2 equipment The disposal of the charging and control unit should not be mixed with general household waste The disposal of batteries should not be mixed with general household waste.
-
Page 27: Warranty
Joerns Healthcare’s obligation under this warranty is limited to supplying replacement parts, servicing or replacing, at its option, any product which is found by Joerns Healthcare to be defective. Warranty replacement parts are covered by the terms of this warranty until the product’s original warranty period expires.
Need help?
Do you have a question about the Hoyer Calibre and is the answer not in the manual?
Questions and answers