
Related Manuals for EdilKamin WIDRO 85


Summary of Contents for EdilKamin WIDRO 85
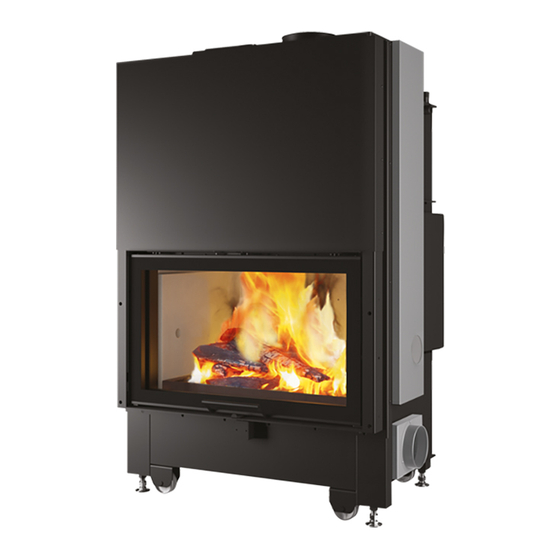
- Page 1 WIDRO 85 WOOD-BURNING WIDRO 85 CS THERMO-FIREPLACE For all updates visit www.edilkamin.com EN Installation, use and maintenance page 2...
- Page 2 WOOD-BURNING THERMO-FIREPLACE, trade name EDILKAMIN, models WIDRO 85 and WIDRO 85 CS SERIAL NO.: Rating plate reference WIDRO 85 and WIDRO 85 CS: Declaration of perfor- mance (DoP - EK no. 203) The liability of the manufacturer is limited to the supply of the product.
- Page 3 11.5 Model / Modell / Modele / Modello Environnement puissance / Potenza resa all'ambiente requirements will compromise WIDRO 85 Efficiency / Wirkungsgrad / Rendement / Rendimento 85.70 Year of construction/Produktionsiahr 0.068 CO Emission (at 13% O2)/CO-Ausstoss (bei 13 % O2)
- Page 4 SAFETY INFORMATION room. DO NOT BLOCK THE AERATION VENTS • The product is not designed for use by people, OR FLUE. Risk of smoke returning into the room including children, with limited physical, sensory with consequent damage and injury. and mental abilities. •...
- Page 5 INTRODUCING THE RANGE Available with open vessel - Widro 85 and closed vessel - Widro 85 CS. only for Widro 85 CS IN ITALY: • ONLY THERMO-FIREPLACES WITH COIL CON- TROLLED BY VST THERMAL DISCHARGE VALVE (not included) CAN BE INSTALLED WITH A CLOSED-VESSEL...
- Page 6 Smoke flow rate 18.1 Intermittent combustion device Position five pieces of dry wood with 33-cm length, placed horizontally. EDILKAMIN S.p.A. reserves the right to modify the product at its own discretion and without prior notice, with a view to improvements. USER/INSTALLER...
- Page 7 DIMENSIONS WIDRO 85 (dimensions in cm) delivery 1” return 1” delivery 1” Ø 20 Ø 13 * maximum extension of feet 8 cm USER/INSTALLER...
- Page 8 DIMENSIONS WIDRO 85 CS (dimensions in cm) delivery 1” return 1” 1/2” connectors for coil delivery 1” Ø 20 * maximum extension of feet 8 cm Ø 13 int. USER/INSTALLER...
- Page 9 INSTALLATION PREPARATION AND UNPACKING The packaging materials are neither toxic nor noxious and do not require special disposal. The packaging materials are neither toxic nor noxious and do not require special disposal. The user is responsible for storing, disposing of and recycling them in a regulatory fashion. The user is responsible for storing, disposing of and recycling them in a regulatory fashion.
- Page 10 HANDLING OF THE PRODUCT PICK-UP POINTS FOR HANDLING SHIFTING OF THE PRODUCT WITH WHEELS The monobloc is equipped with four hooks to facilitate NEAR THE INSTALLATION POSITION its transport (A). The fireplace is equipped with feet (B) and wheels (C). Screw on the feet to use the wheels.
- Page 11 INSTALLATION DELIVERY The packaging can provide a useful indication of the product’s condition. Check the packaging on receipt and report any anomalies to the reseller straight away. The packaging consists of a single pack with the contents as below. Description Number in Quantity the figure...
- Page 12 INSTALLATION LOOSEN THE SCREWS ONLY AFTER THE PRODUCT HAS BEEN POSITIONED. DO NOT SHIFT THE PRODUCT WITHOUT THE LOCKING SCREWS. LOOSEN THE LOCKING SCREWS ON THE SIDES IN ORDER TO LIFT THE DOOR. locking screws INSTALLER...
- Page 13 INSTALLATION INTERNAL REFRACTORY ELEMENTS Assembly sequence for REFRACTORY ELEMENTS: 1+2) Position the LH SIDE element. 3) Position the REAR element. 4+5) Position the RH SIDE element. 6) Position (A) REFRACTORY ELEMENTS on top. ONLY LIGHT THE PRODUCT WITH THE REFRACTORY ELEMENTS IN PLACE. INSTALLER...
- Page 14 INSTALLATION SELF-CLOSING DOOR The fireplace is delivered with the door balanced, that is, it does not drop automatically once raised. To make the door self-closing, one or more plates (P) must be applied to the inner frame for the door. To access the inner frame of the door, remove the cover door located on the fireplace casing on both sides.
- Page 15 INSTALLATION REMARKS ON INSTALLATION REMARKS ON INSTALLATION Checking the suitability of the installation Note that: Note that: space • • the appliance must be installed by authorised the appliance must be installed by authorised • The room must have a volume of at least 70 m technical personnel;...
- Page 16 INSTALLATION Protection from heat and safety clearances. MINIMUM SAFE DISTANCES FROM The surfaces of the building adjacent to the product FLAMMABLE MATERIALS must be protected against overheating. The insulation to be used will depend on the type of surface in question. Rear = 0 Check on the chimney system’s data plate the safety Side = 0...
- Page 17 INSTALLATION FLUE SYSTEM FLUE SYSTEM The smoke outlet diameter does not ( ( Fumes duct, flue and chimney pot Fumes duct, flue and chimney pot) ) match the chimney system diameter, This chapter has been drawn up pursuant to European which must be sized accordingly.
- Page 18 INSTALLATION THE SMOKE DUCT THE SMOKE DUCT THE CHIMNEY POT THE CHIMNEY POT • if it is metal, it must have CE marking (EN 1856-2) or • must be anti-downdraught some similar national standard marking; • must have an internal cross section equivalent to •...
- Page 19 INSTALLATION EXTERNAL COMBUSTION AIR INTAKE (A) DIRECT AIR INTAKE DIRECT AIR INTAKE To restore the oxygen burnt during operation, it is Install an air intake with an effective size (net of the necessary to have an adequate air intake, pursuant to mesh or other protective equipment) that is at least local regulations, of 200 cm equal to that of the air intake at the back of the product.
- Page 20 INSTALLATION ORIENTATION OF AIR INTAKE ON LEFT-HAND ORIENTATION OF AIR INTAKE ON LEFT-HAND SIDE (P) SIDE (P) IT IS IT IS possible to position the air intake on the left-hand side possible to position the air intake on the left-hand side of the chimney.
- Page 21 HYDRAULIC INSTALLATION Never light the fire in the product (even to Widro 85 is designed to install to a water circuit with Widro 85 is designed to install to a water circuit with test it) when the circuit is dry (no water);...
- Page 22 INSTALLATION INSTALLATION ON AN OPEN EXPANSION INSTALLATION ON AN OPEN EXPANSION INSTALLATION ON A CLOSED EXPANSION INSTALLATION ON A CLOSED EXPANSION VESSEL CIRCUIT VESSEL CIRCUIT VESSEL CIRCUIT VESSEL CIRCUIT (supplementary instructions to those for the closed vessel installation) • The appliance and circuit must be filled with the The pressure upline of the cooling circuit must be at expansion vessel open, with the water fed by least 1.5 bar (UNI 10412 in Italy).
- Page 23 HYDRAULIC INSTALLATION DELIVERY AND RETURN CONNECTION INCLUDED AS DELIVERY AND RETURN CONNECTION INCLUDED AS STANDARD: STANDARD: Ø 1” DELIVERY COMPARTMENT FOR DELIVERY WATER PROBE Ø 1” RETURN Remember to use the gaskets on connectors and to employ proper installation methods. The appliance must be correctly sized, installed, The appliance must be correctly sized, installed, maintained and operated in compliance with local and...
- Page 24 HYDRAULIC INSTALLATION COMPARTMENT FOR THERMAL DISCHARGE VALVE PROBE (for CS version) VENT (manual) THERMAL DISCHARGE VALVE PROBE (for CS version) INSTALLER...
- Page 25 HYDRAULIC INSTALLATION ORIENTATION FOR LEFT-HAND DELIVERY ORIENTATION FOR LEFT-HAND DELIVERY AND RIGHT-HAND RETURN AND RIGHT-HAND RETURN The right delivery and return can be oriented The right delivery and return can be oriented “symmetrically” in relation to the standard position, by “symmetrically”...
- Page 26 HYDRAULIC INSTALLATION KIT The Edilkamin price list includes pre-assembled hydraulic kits for open-vessel and closed-vessel installation. Ask your local distributor for details. Hydraulic parts are also available (control unit, valves, etc.) Position the control unit in a cool location to prevent overheating of the circuits.
- Page 27 INSTALLATION Facings, gather hood and vents Facings, gather hood and vents Install inspection hatches for cleaning access. Install inspection hatches for cleaning access. Face the product only after having completed the Face the product only after having completed the following steps: following steps: •...
- Page 28 INSTALLATION FOR INSTALLER Possible adjustment of smoothness (loosening or tightening) of sliding action of the door using the Allen screws. INSTALLER...
- Page 29 INSTALLATION INLET SURROUND: INLET SURROUND: The inlet surround is an optional accessory. It fills in the gap remaining between the firebox's frame and the cladding itself. If purchased, it is sold in a single package. TEMPLATE FOR GATHER HOOD: TEMPLATE FOR GATHER HOOD: Optional, to position before finishing cladding and frame for its placement.
- Page 30 USER INSTRUCTIONS • • VERTICAL-OPENING AND BOTTOM-HUNG DOOR FOR CLEANING VERTICAL-OPENING AND BOTTOM-HUNG DOOR FOR CLEANING The door unlocking adjuster lever (LR) is located on the top part of the door; The levers (L) to open the door with the bottom-hung system are to the right and left of the door. (LR) •...
- Page 31 USER INSTRUCTIONS AIR LIMITATION AIR LIMITATION To increase or decrease the combustion air and post-combustion supply to the chamber, adjust the air lever. To increase or decrease the combustion air and post-combustion supply to the chamber, adjust the air lever. Move the lever by following the indications + and - .
- Page 32 USER INSTRUCTIONS Depending on the draught, above all while lighting, it is possible to increase draught with the draught lever. DRAUGHT LEVER 1) To open: unlock lever A by moving it to the right (R), pull it forward and lock it to the left (L). 2) To close: unlock lever A by moving it to the right (R), push it in and lock it to the left (L).
- Page 33 Edilkamin nor the retailer can be held responsible. For reasons of safety and respect for the environment, DO NOT burn: plastics, painted wood, coal or waste bark or other unsuitable material.
- Page 34 USER INSTRUCTIONS First ignition procedure First ignition procedure Adding Adding wood wood when when combustion combustion • Make sure you have read and understood this chamber is hot chamber is hot manual When is the right time to add wood? When the fuel has When is the right time to add wood? When the fuel has •...
- Page 35 • use of fuels other than those recommended On first ignition, there may be a slight smell of paint, which will disappear in a short time. Neither Edilkamin nor distributors are liable for damage due to the above actions USER...
- Page 36 MAINTENANCE Cleaning the door glass WHILE COLD Cleaning the door glass WHILE COLD Cleaning the outside of the stove Do not use aggressive detergents to clean the outside Open the product with the bottom-hung Open the product with the bottom-hung of the stove.
- Page 37 MAINTENANCE CLEANING EXCHANGER With the fireplace off and cooled, take the following steps, observing the criteria for safe operation to protect people and property. • Open the fireplace door with vertical opening. • Remove the deflector (A) • Brush (S) •...
- Page 38 If you fail to regularly clean and inspect the system, Using non-original spare parts may damage the there is an increased risk of the chimney pot catching appliance and relieves Edilkamin of all liability for any fire. resulting damages. This also invalidates the warranty on the basis of tampering.
- Page 39 TROUBLESHOOTING TROUBLESHOOTING 1) If smoke comes out of the combustion chamber opening, check whether: • The installation is correct (smoke duct, flue, chimney pot; air intake). • The wood being used is dry. • The door was opened too quickly. 2) If the combustion is uncontrolled, check whether: •...
- Page 40 The names of Edilkamin official, authorised technical assistance centres (TAC) and distributors are available ONLY at www.edilkamin.com *942139-GB* w w w . e d i l k a m i n . c o m code 942139-GB 07.21/B...
Need help?
Do you have a question about the WIDRO 85 and is the answer not in the manual?
Questions and answers