Table of Contents
Advertisement
Machine Translated by Google
Portable mini disc recorder
operating instructions
Basic version
Advanced version
When in trouble • Q & A
Thank you for your purchase.
Failure to follow safety precautions for electrical
products can result in fire or personal injury.
This instruction manual describes important precautions to prevent accidents
and how to handle the product. Please read this instruction manual carefully
before using the product safely. After reading it, be sure to keep it in a place
where you can see it at any time.
MZ-N920
© 2004 Sony Corporation
3-263-705-04 (1)
Page 13
Page 26
Page 75
Advertisement
Table of Contents

Related Manuals for Sony MZ-N920


Summary of Contents for Sony MZ-N920
- Page 1 Please read this instruction manual carefully before using the product safely. After reading it, be sure to keep it in a place where you can see it at any time. MZ-N920 © 2004 Sony Corporation...
- Page 2 If you notice any malfunction or damage to the AC power adapter, charging stand , due to electric shock or other etc., immediately contact the store where you purchased the product or a Sony causes. service representative for repair.
- Page 3 The price of this product includes private copying levy according to the copyright law. (Contact: Private Copy Levy Management Association Tel.03-5353-0336) • "Walkman" and "WALKMAN" are Sony Corporation's headphone stereo products. Is a registered trademark of Sony Corporation. It is a registered trademark.
- Page 4 Machine Translated by Google What you can do with this machine and the attached manual This page explains what you can do with a portable MD recorder and the manual. Please refer to the following and use the required manual. When using this machine You can connect a CD player or microphone to the main unit to record, and play back what you have recorded to enjoy.
- Page 5 Machine Translated by Google When using the included software on your computer You can use the software SonicStage / MD Simple Burner that comes with this unit to transfer music data between the main unit and your computer. Music CD Music Phi internet Installation / Operation Guide...
-
Page 6: Table Of Contents
Machine Translated by Google table of contents ................8 Basic edition Check the accessories ................13 prepare Names of each part ................... 14 prepare Basic usage 18 18 Record twenty one Reproduce twenty four Advanced version How to operate the menu ............ - Page 7 Machine Translated by Google Before editing ..................47 Set up To edit a group ................. 47 Canceling a group ................ 49 Give a name (name) ............. 49 Change the order of songs (move) ................Divide 53 songs (divide) ........
- Page 8 Unplug the AC power adapter from the outlet , disconnect the dedicated USB cable from the PC, and contact the store where you purchased the product or Sony's service counter. Do not use domestic dedicated machines overseas AC adapters other than the world model are for use only in Japan.
- Page 9 Machine Translated by Google Do not touch the AC power adapter or charging station with wet hands . It may cause an electric shock. If you do not use the main unit, AC power adapter, or charging stand covered with a cloth, the case may be deformed or a fire may occur due to heat buildup.
- Page 10 Machine Translated by Google If you do not follow the precautions below, you may be injured or damage the surrounding household goods. Do not listen too loudly for a long time If you listen for a long time at a loud volume that stimulates your ears, it may adversely affect your hearing.
- Page 11 Please contact the customer service center or Sony service center. Rechargeable battery If the liquid gets into your eyes, it may cause blindness. Do not rub Nickel metal hydride your eyes.
- Page 12 Machine Translated by Google About batteries • Keep small batteries out of the reach of children as they can be swallowed. If swallowed, it may cause suffocation or stomach damage, so consult a doctor immediately. • Enter + and-correctly according to the display of the device.
-
Page 13: Check The Accessories
Manual • CD-ROM (SonicStage Ver.2.0 / MD Simple Burner Ver.2.0) * • Installation / Operation Guide SonicStage Ver.2.0 / MD for Walkman MD Simple Burner Ver.2.0 • Warranty • Sony consultation desk information • Customer registration request * Do not play the CD-ROM on a music CD player. please note When using this machine, be sure to observe the following to prevent the cabinet from being deformed or damaged. -
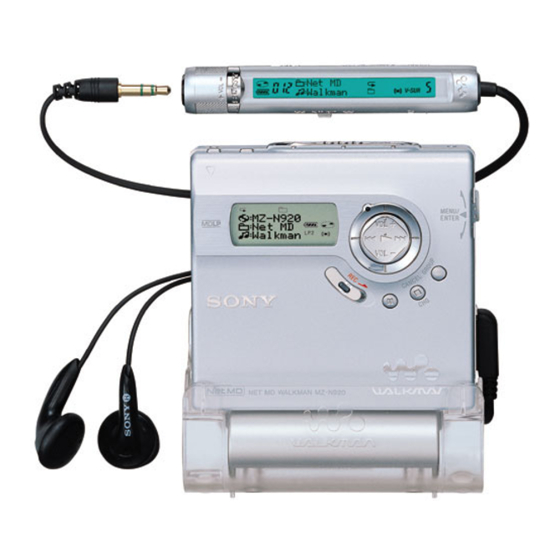
Page 14: Names Of Each Part
Machine Translated by Google Name of each part Body 1 2 3 4 5 6 7 8 qk ql w; open End search END SEARCH button OPEN knob Track mark group T MARK button 3 qf GROUP button qg Rechargeable battery Jog dial hold Menu enter... - Page 15 Machine Translated by Google Display window (main body) one two three 6 7 89 Five Four 1 Playback mode display 7 Recording mode display monaural LP2 stereo / LP4 stereo / MONO 8 Melody Displays the playback status of shuffle playback, program playback, repeat playback, group timer display 9 Disc display During recording and playback, book mark playback, and so on.
- Page 16 Machine Translated by Google Remote controller volume VOL (volume) +,-knob 6 clips 7 hold 2 x (stop) button 3 jog lever If you shift the HOLD switch in the direction of the arrow to enter display the yellow mark, you will not be able (NX / ENT •.
- Page 17 Machine Translated by Google How to use the remote control clip You can also remove the clip and attach it in the opposite direction. To remove To put it in the opposite direction Display window (remote control) C DE 1 Disc display 2 Song 5 Sound display 6 number display 3 Battery level display 7...
- Page 18 Machine Translated by Google prepare At the time of purchase, first charge the rechargeable battery. However, if you connect the AC power adapter to the main unit, you can use it without charging. 1 Insert the rechargeable battery 1 Put the lid of the battery holder in the direction of the arrow 2 Insert the rechargeable battery.
- Page 19 To i / LINK OUT Connect firmly When using with alkaline batteries and using for a long time 2 Insert one Sony alkaline battery 1 Attach the battery case to the main body. (AA) . Be sure to insert from the E side.
- Page 20 3) Rechargeable nickel-metal hydride battery NH-14WM charging time (A) 4) Measured with Sony alkaline battery LR6 (SG) made in Japan will be notified during use by displaying the remaining battery level on the display window of the main unit or remote control.
-
Page 21: Record
Machine Translated by Google Record This section describes how to use an optical digital cable to connect to a CD player or BS tuner for digital recording. Please prepare an optional optical digital cable. 1 Insert a recording disc 1 Move the OPEN knob. - Page 22 Machine Translated by Google 3 Record 1 Pause the CD you want to record. 2 While stopped, hold down the REC knob and shift vinegar. "REC" display and REC in the center of the REC knob The lamp will light up and recording will begin. pause Connected device 3 Start playing CD etc.
- Page 23 Machine Translated by Google If you cannot start recording • Check the hold please note (malfunction prevention) switch . (Pages 14 and 19). • Check the disc • When recording, we recommend connecting the AC power adapter erasure prevention knob. directly to the main unit.
-
Page 24: Reproduce
Machine Translated by Google Reproduce 1 Insert a disc Insert a pre-recorded disc. 1 Move the OPEN knob. 2MD with the label side on the lid side and the direction of the arrow The lid will open. Push it all the way in and close the lid. 2 Listen 2 Press VOL +,-to adjust the volume. - Page 25 Machine Translated by Google In such a case Remote control operation Main unit operation stop Press x. Press x. Pause Press X. Press the jog lever (NX). Press Press it again to cancel. it again to cancel. Turn the jog dial to display the song Directly select a song number or —...
-
Page 26: How To Operate The Menu
Machine Translated by Google Before starting the operation How to operate the menu Use the menu to operate convenient functions for recording, playback, and editing on this unit. Follow the procedure below to operate the menu. To operate with the remote control 1 Press DISPLAY for 2 seconds or longer. - Page 27 Machine Translated by Google Menu list please note The displayed items differ depending on the operation status and disk settings. Remote control menu The first floor Second level function Chastity reference page Written EDIT Name Give song name, disc name, group name Beginning Set up a group Group Set...
- Page 28 Machine Translated by Google The first floor Second level function reference page PLAY MODE1) Normal Normal playback 1 Track Play one song Bookmark playback TrPLAY Shuffle Playback Shuffle Program playback Program : Normal2) Group playback : Shuffle2) Group shuffle playback : Program2) Group program playback SOUND SOUND OFF Default setting...
-
Page 29: View Information In The Display Window
Machine Translated by Google Various recording methods Operate with the main body View information in the display window Jog dial While recording or stopped, you can check information such as remaining time and song number in the display window. The display related to the group function is displayed when the grouped song is played and stopped. -
Page 30: Recording For A Long Time (Mdlp)
Machine Translated by Google A (selected item) B 4 Hold down the REC knob and slide it Date Current time Clock to start recording. 5 Start playing the recording device. please note The display may differ depending on the disk group setting status, operating status, and setting status. -
Page 31: Manually Adjust The Recording Level
Machine Translated by Google 4 While looking at the display window, turn Manually adjust the the jog dial to adjust the recording level. recording level Adjust the recording level so that the level display bar lights up between A During recording, the recording level is and B as a guide . - Page 32 Machine Translated by Google 1 While recording or pausing recording , Add a track mark during select "REC SET"- "TIME recording MARK"-"ON" from the menu operation. You can add a track mark (song number) 2 Turn the jog dial to display the desired during recording to separate songs and time, and press to confirm.
- Page 33 Machine Translated by Google please note 2 Turn the jog dial to "SENS" • Press the T MARK button during recording , Display "HIGH" or "SENS LOW" and press to If you press X and the track mark is added, the confirm.
- Page 34 Machine Translated by Google Record in a group END SEARCH Centralized control key (. >) The group function is a disc that has been set as a group, and you can use the "group function". This is a convenient function when Jog dial recording several CDs on a single disc in GROUP...
- Page 35 Machine Translated by Google Select " : REC OFF" to restore the settings . Start / stop recording according to the recording source (synchronized Additional recording to an existing recording) group Starts or stops recording according to the sound of Add a song to an existing group.
-
Page 36: Tv Or Radio (Analog Recording)
Machine Translated by Google Record from TV or radio If there is no sound for about 3 seconds at the recording source during synchronized recording, the unit automatically pauses (analog recording) recording. When the sound is detected again, it returns to the synchronized recording. -
Page 37: View Information In The Display Window
Machine Translated by Google Various ways of playback Operate with the main body View information in the display window Jog dial During playback, you can check information such as the song title and disc name in the display window. The display related to the group function is the display during playback of the grouped songs. -
Page 38: Select A Playback Mode
Machine Translated by Google Select a playback mode During group playback, songs that are not set to a group on the disc are temporarily grouped together and treated as the last group. At this time, "Group – –" is displayed. The song number is displayed as the serial number of the disk, not the number for P MODE / each group. - Page 39 Machine Translated by Google 2 Repeat step 1 to bookmark. You can add up 4 After selecting, press the jog lever for 2 seconds or to 20 songs in total. longer to confirm . The settings are confirmed and playback starts from the first song. To play a bookmarked song 1 During playback, press P MODE / repeatedly The program settings remain even when playback ends...
- Page 40 Machine Translated by Google Display A / B Playback state Operate with the main body PGM / Group program playback (play by rearranging in the order you : Program * Centralized control key Jog dial like for each group) (. N >) * Displayed only when the disk is set as a group vinegar.
- Page 41 Machine Translated by Google Arrange and listen to groups in the order Listen by rearranging the songs in the order you like (group program playback) Follow you like (program playback) the same procedure as "Listing songs in the 1 "Select playback mode" Select order you like (program playback)"...
- Page 42 Machine Translated by Google 3 Move the jog lever to. Or> to the side 4 Press the jog lever to confirm. Then select the surround type. If you want to stop the setting on the way Press x for 2 seconds or longer. When canceling the setting A and B each time you shift the jog lever Nothing is displayed in B in step 1...
- Page 43 Machine Translated by Google If you want to stop the setting in the middle, press When you turn the jog dial, A changes x for 2 seconds or longer. as follows, and when you press the jog dial , B is displayed. Press x to return to the previous setting .
- Page 44 Machine Translated by Google Make the sound quality you like Change the 1 During playback, by menu operation playback speed (digital pitch con Select "SOUND"-"SOUND EQ"- "CUSTOM 1" or "CUSTOM 2" . This is convenient when you want to change the playback speed for language learning.
- Page 45 Machine Translated by Google Operate with the main body Listen with your Jog dial system (LINK OUT) You can listen to and record the playback sound of this unit with other audio devices. Stereo equipment, radio cassette player, etc. 1 During playback, by menu operation Select "USEFUL"-"DPC".
- Page 46 Machine Translated by Google please note • If the i / LINK OUT output (“AUDIO OUT”) is set to “LINK OUT”, volume, virtual surround, and 6-band equalizer will not work. • Connect the included headphones with remote control When is set, the i / LINK OUT output (“AUDIO OUT”) setting cannot be set to “LINK OUT”.
-
Page 47: Before Editing
Machine Translated by Google To edit Before editing Set up a group You can add a track mark (song You can group songs that have already number) to a minidisc, and add a song been recorded, group multiple groups title or disc name. into one group, and group songs that are not included in the group. - Page 48 Machine Translated by Google please note please note • If the total number of song titles and disc names • In step 2, you can only select the first song in an on a single disc exceeds the maximum number existing group or a song that has not been of characters that can be input to this unit, group grouped.
- Page 49 Machine Translated by Google 3 Select "EDIT"-" : Release" from Ungroup the menu operation. "Release?" And "Push ENTER" are displayed . DISPLAY 4 Press the jog dial to confirm. The group will be released. To stop the setting in the middle, press x for 2 seconds or longer.
- Page 50 Machine Translated by Google Number of characters that can be entered on one disc • For Give a name alphanumericals / symbols only: Approximately 120 titles with You can name it while playing, recording, or approximately 10 characters (maximum approximately 1700 stopped.
- Page 51 Machine Translated by Google Press x to return to the The buttons and functions used for character input are previous setting . as follows. function operation please note Move the jog lever to. Or > to Move the character cursor •...
- Page 52 Machine Translated by Google Function * 3 Press VOL –. operation Confirm the name. Press and hold N or the jog dial for at least The cursor moves and blinks alternately with the letters. 2 seconds. Press END SEARCH and VOL + You can put a space for at the same time.
- Page 53 Machine Translated by Google Move songs from a Change the song order (move) grouped disc Move songs You can move songs that are not grouped or songs that are in a group to another group or group. Example: When moving the 3rd song (C song) to the 2nd song disk Group 1 Group 2 Group 3...
- Page 54 Machine Translated by Google To stop the setting in the middle, press Operate with the main body x for 2 seconds or longer. Centralized control key (.,>) Press x to return to the previous setting . Rearrange the order of groups Jog dial (group move) Move songs...
- Page 55 Machine Translated by Google Move songs on a grouped disc Rearrange the order of groups (group move) 1 While playing the song you want to move, 1 While playing a song in the group you want select "EDIT"-"Move"-" : Move" from the menu to move, select "EDIT"- "Move"...
- Page 56 Machine Translated by Google Divide the song after adjusting Divide the song (divide) the division position (divide rehearsal) You can put a track mark in the middle of a song and move it to the next song. You can also fine- tune the position to divide the songs before 1 Press T MARK for 2 seconds or longer during playback.
- Page 57 Machine Translated by Google 2 Press the. Of the centralized control key to move Combine songs to the beginning of the song (00:00). For example, into one (combine) if you want to connect the 2nd and 3rd songs, put it at the beginning of the 3rd song. When recording with analog input (LINE IN) or "MARK"...
- Page 58 Machine Translated by Google Erase all songs Erase the song (erase) Erase all songs on the disc. You can delete whole songs that you no longer 1 Play the disc you want to erase and then disc need or songs on the disc. Check the contents of.
- Page 59 Machine Translated by Google Operate with the main body 4 Press the jog dial to confirm. The "TOC Edit" display flashes and all songs Once deleted, songs and groups cannot be are deleted. When the erasure is completed, restored. Please check the contents carefully "BLANK DISC"...
-
Page 60: What You Can Do By Connecting To A Computer
Machine Translated by Google Use by connecting to a computer What you can do by connecting to Connect to computer a computer After installing the software, connect this unit to your computer. For the installation of software, Use the included software • refer to the separate "Installation and Operation Transfer music data between this unit and your computer Guide SonicStage Ver.2.0 / MD Simple Burner... - Page 61 Machine Translated by Google 2 Connect the main unit, PC, and AC adapter as follows . 1 Insert a charged rechargeable battery. 2 AC power adapter is rechargeable Connect to Tando. 3 Dedicated USB that comes with the main unit and PC Connect with a cable.
-
Page 62: Set The Clock
Machine Translated by Google various settings To display the current date and time • Set the clock On the main unit, select "DISPLAY"-"Clock" from the menu operation while stopped or recording . If you set the clock, the recording date and time will be recorded automatically when recording. -
Page 63: Change The Movement Of The Jog Dial
Machine Translated by Google Change the movement of Turn off the confirmation sound the jog dial You can set whether to sound the confirmation sound of the main unit / remote control or not. By default, turning the Jog Dial downwards scrolls the display screen downwards, but DISPLAY you can change this in the opposite direction. -
Page 64: Recording Without Overwriting
Machine Translated by Google Record without overwriting Listen to the sound quickly (quick mode) You can change the recording start position to always record from behind the recorded After pressing the play button or cueing a part without overwriting. At the time of song, you can quickly hear the playback purchase, it is set to record by overwriting. - Page 65 Machine Translated by Google Operate with the main body Reduce battery consumption Jog dial It is a function that reduces battery consumption and maximizes the duration. Immediately after the operation, turn off the display on the main unit and remote control. DISPLAY 1 While stopped or playing, select "OPTION"-"Power Mode"...
-
Page 66: Limiter-System-Comfortable Volume)
Machine Translated by Google 1 While stopped or playing, select Suppresses sound leakage and "OPTION"-"AVLS" from the menu operation. makes the sound easy on the 2 Turn the jog dial to select "AVLS ON" and ears (AVLS-auto volume limiter- press it to confirm. system-comfortable volume) You can listen at a more comfortable volume by Turn on / off the backlight of... -
Page 67: Adjust The Shade Of The Display Window (Contrast Adjustment)
Machine Translated by Google View the titles of Chinese Adjust the shade of the display characters entered on a computer, etc. window (contrast adjustment) You can adjust the contrast of the LCD display on If you use the included software the main unit. -
Page 68: Sounds An Alarm (Melody Timer)
Machine Translated by Google 3 Move the jog lever to. Or> to select the Sound an alarm time until the alarm sounds. (melody timer) It is convenient to prevent passing by trains . Please choose one from three types Every time I shift the jog lever of alarms . -
Page 69: Each Disk (Personal Disk Memory)
Machine Translated by Google please note Store settings for • When you start recording, the setting will be canceled. • When you select “ON” in step 1, each disk (personal the timer starts counting. Also, when you disk memory) change the time until the sound is heard in step 3, try the count again. - Page 70 Machine Translated by Google To unregister 1 Insert the disc you want to delete from the registration and check the contents. 2 After step 1 above, select "Erase?". "Erase OK" is displayed and the disk setting information is deleted from the registration. please note If you perform this operation on an unregistered disc, "No Entry!"...
-
Page 71: Precautions For Use
Machine Translated by Google others For inquiries regarding the collection / recycling and recycling of rechargeable batteries, please refer to the Precautions for use Battery Industry Association website http:// www.baj.or.jp/ . Do not disassemble It is dangerous if the laser used in the MiniDisc recorder hits your eyes. Handling •... - Page 72 Machine Translated by Google Headphones • If you feel that the Charging • The included charging stand is for this unit only. Other devices supplied headphones do not fit your skin, stop using them cannot be charged. • Use the supplied charging stand to as soon as possible and consult a doctor or customer charge only the specified batteries.
-
Page 73: Main Specifications
Modulation method the product or a Sony service center. (If the product breaks down while it is in the main unit, we recommend that you Frequency characteristics ( at the time of optical digital / analog... - Page 74 Machine Translated by Google Output terminal Optional accessories i / LINK OUT3): Stereo mini jack (dedicated remote control jack) / specified output 123 mV (10 kÿ) Optical digital cable Optical square plug y Optical mini plug POC-5 / 10 / 15AB Practical maximum output (at DC) 4) Optical Mini Plug y Optical Mini Plug Headphones: 5 mW + 5 mW (16 ÿ)
-
Page 75: Is It A Malfunction? If You Think
"Message List". Check the applicable item. Step 2 Check the homepage of "Personal Audio Customer Support" Check http:// www.sony.co.jp/support-pa/ . It contains the latest support information, frequently asked questions, and answers. Trouble Step 3 If the problem still persists, please contact the Customer Support Center (back cover) or the store where you purchased the product. - Page 76 Machine Translated by Google About charging Cause Symptoms measures Cannot be charged or cannot be The rechargeable battery or dry battery is not Correctly reinsert the e and E terminals of the fully charged. inserted correctly. Or the AC power adapter is not rechargeable battery or dry battery .
- Page 77 Machine Translated by Google Cause measures Symptoms Even though the "REC- The group recording (" : REC") setting is Set ": REC" in the menu to " : REC Posi" setting is "From set to always be a group (" : REC ON"). OFF"...
- Page 78 Machine Translated by Google Cause measures It is a system constraint. Once 254 songs have To add more songs, erase unnecessary songs and Symptom Even if the maximum been recorded, no further recordings will be possible record. recordable time (60 minutes, 74 minutes, 80 minutes) has not been (page 93).
- Page 79 Machine Translated by Google Cause Recorded in analog. (In the case of Symptom When playing a Countermeasure Use the correct connection recorded song, the sound is low. digital recording, it is automatically recorded cord (sold separately, RK G129 / RK-G136, etc.). at the same level as the recording source.
- Page 80 Machine Translated by Google While editing Cause Symptoms The power was removed or the battery was The lid does not open. Countermeasures Turn the power off and then on exhausted during editing. again to charge the battery, or replace it with a new battery. Cannot be edited with this machine.
- Page 81 Machine Translated by Google Cause Symptoms It does not accept Countermeasure Set the HOLD switch in The hold function is working ("HOLD" is operations or does not work the opposite direction of the arrow to cancel displayed when you press the operation properly.
- Page 82 Machine Translated by Google Cause Symptom When using with the AC Countermeasure This is a system constraint. In — — power adapter, the display window is order to accumulate the charging time at the shining faintly for a while even after it charging stand, the power is supposed to be is stopped.
- Page 83 Machine Translated by Google Message list If you see a message in the display window of the main unit, please check it according to the table below. meaning display measures I tried to bookmark the 21st song (page 39). You can bookmark up to 20 songs . Please FULL bookmark within 20 songs.
- Page 84 Machine Translated by Google display meaning measures NO COPY Dubbing is prohibited by the Serial Copy Record using analog input (LINE IN) (page Management System (SCMS). 36). NO DISC There is no disc in it. Insert the disc. NO EDIT On an ungrouped disc, select "...
- Page 85 Machine Translated by Google display meaning NO SIGNAL The digital input signal is interrupted. Countermeasure Check the connection of the optical digital input. Ignore when inputting analog (LINE IN). P / B ONLY Contains a play-only disc. Replace with a recording disc. The PROTECTED disk is in the erasure prevention state (page 73).
-
Page 86: Service
Please read this manual again to find out. • If you still feel sick Please contact the store where you purchased the product or your nearest Sony service counter in the attached "Sony Consultation Counter Information". • Repairs during the warranty period will be repaired based on the contents of the warranty card. -
Page 87: Md Know
Q3: What is DSP TYPE-S for ATRAC / ATRAC3 ? A3: Uses DSP TYPE-S for ATRAC installed in Sony's high-spec MD decks . You can enjoy high-quality sound when playing back in MDLP mode, which is attractive for long -time stereo recording. In addition, this DSP inherits the... - Page 88 Machine Translated by Google Q5: How to distinguish between a stereo plug and a monaural plug? Stereo plug: 2 Monaural plug: 1 bands of insulation band of insulation Insulated band Insulated band recording Q1: What can be recorded on MD? A1: Both analog input and digital input can be recorded.
- Page 89 Machine Translated by Google Digital input: • Recording by connecting an optical digital cable (CD, MD, DAT, DVD, BS, CS broadcasting, etc.) When recording, check the shape of the audio output terminal of the recording source, and use an appropriate connection cord and optical digital cable.
- Page 90 Machine Translated by Google Q2: What is the difference between digital recording and analog recording? A2: The following differences are made between digital recording (optical digital input) and analog recording (analog input). I have. Input type Optical digital input Analog input (LINE IN) Difference Equipment that can be connected Equipment with an optical digital output jack (CD Equipment with an output (LINE OUT) jack...
- Page 91 Machine Translated by Google Q4: Is it possible to record from a device that does not have an optical digital output jack? A4: Digital recording is not possible, but analog recording is possible if you use an analog output jack (LINE OUT / AUX OUT / REC OUT / CD OUT jack, headphone jack, etc.).
- Page 92 Machine Translated by Google Q6: How do you get the MD song number? A6: When recording from a medium with a song number such as a CD, the recorder will set the song number under the following conditions. I will put it on.
- Page 93 Machine Translated by Google edit Q1: Why can't the track mark (song number) be erased? A1: In the following cases, the track mark cannot be erased due to system restrictions. • The data of the songs to be connected are distributed on the disc, and the length of each data is short (12 seconds or less for stereo recording, 24 seconds or less for LP2 / monaural recording, or 48 seconds or more for LP4 recording.
- Page 94 Machine Translated by Google Q2: How to combine separated songs and groups into one? A2: In advance, set the group settings after connecting the songs and groups you want to put together next to each other. is. For details, see "Changing the song order (move)" (page 53) and "Rearranging the order of groups ( group move)"...
-
Page 95: Index
Machine Translated by Google Divide rehearsal 56 Clock adjustment 62 Track mark index erase 57 Automatically turn on (recording) 32 Manually A line turn on (recording) 32 Turn on Erase 58 , 59 Care 73 Auto Time Mark 32 Line Ka line Give a name 49-51 Confirmation... - Page 96 • To find out on the homepage, go to k Personal Audio Customer Support. (Http://www.sony.co.jp/support-pa/) We provide the latest support information about this machine, as well as frequently asked questions and answers. • For inquiries by phone or fax, contact the Customer Service Center (see below).
Need help?
Do you have a question about the MZ-N920 and is the answer not in the manual?
Questions and answers