Table of Contents
Advertisement
Quick Links
Advertisement
Table of Contents
Troubleshooting

Related Manuals for Barco Demetra


Summary of Contents for Barco Demetra
- Page 1 Barco Demetra User Guide BDEM-01 ENABLING BRIGHT OUTCOMES...
- Page 2 Barco NV Beneluxpark 21, 8500 Kortrijk, Belgium www.barco.com/en/support www.barco.com Registered office: Barco NV President Kennedypark 35, 8500 Kortrijk, Belgium www.barco.com/en/support www.barco.com...
-
Page 3: Table Of Contents
Charging the Demetra Scope..........................20 Setup of Demetra Scope ................................20 2.4.1 Configuration .................................20 2.4.2 Status bar ..................................21 When the Demetra subscription is terminated .......................22 3 Operation with the Demetra Scope............................23 Start the Demetra Scope ................................24 Basic workflow....................................24 Live video preview..................................25 Image detail screen ..................................26 Localize (on clinical overview) ..............................27... - Page 4 4 Operation with the Demetra Web Application......................29 Open the Demetra Web Application.............................30 Main menu ......................................30 Patient detail screen..................................31 Consultations screen ..................................33 Image detail screen ..................................33 User entry of diagnosis and management strategy .....................36 Reports .........................................36 Sharing patient data (Collaboration) ............................37 5 Troubleshooting ......................................39...
-
Page 5: Welcome
About the Demetra solution ......................7 What’s in the box ..........................7 Demetra Scope ..........................8 Demetra Web Application........................9 Analytics Toolkit..........................9 Refer to www.barco.com/support/demetra/docs for the latest version and translations of this User Guide. Contact the Barco helpdesk via www.barco.com/support/demetra. K5902200 /07 Barco Demetra... -
Page 6: Use Specification
Contra-Indications Not for lesions in the eyes. Intended users The intended users for the Demetra solution are trained medical practitioners, whether they are active in a private practice, hospital or clinic. Operating principle The Demetra solution consists of a hardware device and a stand-alone software application. -
Page 7: About The Demetra Solution
• Adapter and plugs • Quick Start Guide • User Guide Keep your original packaging. It is the ideal protection during transport of the Demetra Scope and is required to be used in case of service/return. K5902200 /07 Barco Demetra... -
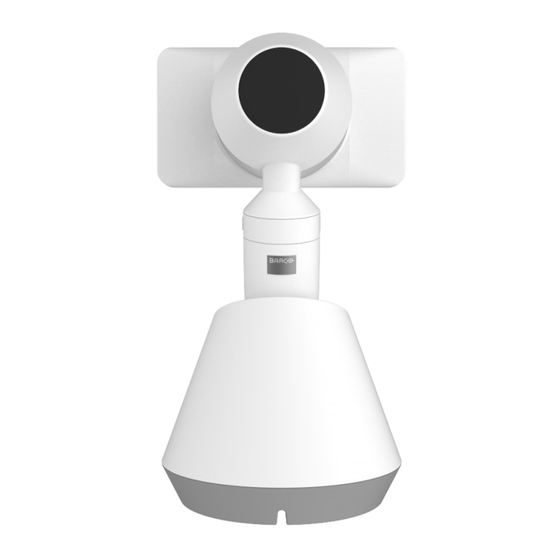
Page 8: Demetra Scope
10. Secondary camera for clinical overview photographs and clinical close-up photographs (more than 10 cm from the skin) 11. Non-contact cone 12. Locking ring The power supply is specified as a part of the Demetra Scope. Use only the delivered power supply for charging your device. K5902200 /07 Barco Demetra... -
Page 9: Demetra Web Application
1.5 Demetra Web Application Overview The Demetra Web Application is an on-line application which allows the user to view and manage all patient information and images/photographs captured with the Demetra Scope. The Demetra Web Application offers a lot of functionalities (see “Operation with the Demetra Web Application”, page... - Page 10 Welcome! K5902200 /07 Barco Demetra...
-
Page 11: Installation And Configuration
Installation and configuration Minimum system requirements ......................12 Setup of Demetra Web Application....................12 Installation of Demetra Scope ......................17 Setup of Demetra Scope .......................20 When the Demetra subscription is terminated .................22 K5902200 /07 Barco Demetra... -
Page 12: Minimum System Requirements
2.1 Minimum system requirements Upload/download speed requirements The Demetra Scope may be used offline after the initial setup, but a WiFi connection is required for data to be synchronized to the Cloud. For an optimal user experience, we recommend the following bandwidth: •... -
Page 13: Configuration (Admin)
Image 2–2 A new window opens to set your password. Click Send to confirm. You are then guided to the Demetra welcome screen. As an admin user, refer to “Configuration (admin)”, page to start the configuration. As a regular user, refer to “Configuration (user)”, page... -
Page 14: Configuration (User)
Next to confirm. 6. An overview of the selected settings is shown. Tick the checkbox I have read the Barco product privacy statement and the End User License Agreement. Indicate whether you agree to linking your product feedback to your user identity. -
Page 15: Settings (Admin)
2.2.5 Settings (admin) Admin When logged in as admin, click your name at the top of the screen in the Demetra Web Application and select Admin settings. The following tabs are available under the Admin settings: •... -
Page 16: Settings (User)
2.2.6 Settings (user) User When logged in as a regular and/or admin user, click your name at the top of the screen in the Demetra Web Application and select User settings. Here you can: • Edit your personal information •... -
Page 17: About Demetra
Medical device information When logged in as admin or as regular user, click your name at the top of the screen in the Demetra Web Application and select About Demetra. This page shows medical device information for BDEM-01 (e.g., model... -
Page 18: Removal Of The Grip / Battery Pack
Caution: Only turn the locking ring of the grip, not the entire grip itself. Image 2–7 2.3.2 Removal of the grip / battery pack Procedure 1. Place the complete Demetra Scope on a flat, stable surface. K5902200 /07 Barco Demetra... -
Page 19: Installation Of The Non-Contact Cone
Image 2–9 3. Remove the grip from the Demetra Scope head. Image 2–10 It may be needed to firmly pull the grip to separate it from the Demetra Scope head. 2.3.3 Installation of the non-contact cone Non-contact cone When capturing dermoscopic images with the Demetra Scope in non-contact mode, the non-contact cone can be installed on the Demetra Scope head. -
Page 20: Charging The Demetra Scope
Installation and configuration Install the non-contact cone on the head of the Demetra Scope. The notch in the non-contact cone must be fitted on the secondary camera. The non-contact cone is held in place safely through a magnetic attachment. 2.3.4 Charging the Demetra Scope Procedure 1. -
Page 21: Status Bar
14. Complete the correct identity for this WiFi network and tap Connect. 2.4.2 Status bar Overview The status bar at the top right corner of the Demetra Scope display can be tapped or swiped down to: • Log out the current user •... -
Page 22: When The Demetra Subscription Is Terminated
60 day period, users can request an export of all their data via the Barco helpdesk. 4. In order to retain viewing access to all data available in the Demetra Web Application beyond the 60 day period after termination of the regular Demetra Customer subscription, you can subscribe to the Demetra Extended License. -
Page 23: Operation With The Demetra Scope
Operation with the Demetra Scope Start the Demetra Scope .......................24 Basic workflow ..........................24 Live video preview ........................25 Image detail screen ........................26 Localize (on clinical overview)......................27 User entry of diagnosis and management strategy ................27 K5902200 /07 Barco Demetra... -
Page 24: Start The Demetra Scope
[...] Image 3–1 1. Press the On/Off button on top of the Demetra Scope head. After login, the live video preview screen will be shown. 2. Tap the image mode icon on the display screen and select the desired image mode. The following image... -
Page 25: Live Video Preview
(<70%) or ethanol (<90%) as the liquid interface. 3.3 Live video preview Overview Press the main button on the grip of the Demetra Scope to return to the live video preview from any other screen (except in edit modes). Image 3–2 1. -
Page 26: Image Detail Screen
Operation with the Demetra Scope 8. Polarized/non-polarized illumination 9. Add/remove digital scale The digital scale is not 100% accurate and should not be considered a measurement device. 3.4 Image detail screen Overview Image 3–3 1. Automatically assigned image number 2. Lesion number: Links the image to a location on an overview photograph or on a dummy mannequin 3. -
Page 27: Localize (On Clinical Overview)
Overview Image 3–5 1. On the Demetra Scope it is possible to select a tentative diagnosis from the predefined list. Note that the device does not automatically suggest this tentative diagnosis. 2. It is not possible to select a user-defined pathology-proven diagnosis on the device. This function is only available through the Demetra Web Application. - Page 28 Operation with the Demetra Scope No follow-up or treatment: Green Follow-up: Yellow Treatment: Orange Excision or biopsy: Red Excision or biopsy finished: Blue Lesion markers on the dummy mannequin or on a clinical overview photograph are displayed in the color of the user-defined management strategy.
-
Page 29: Operation With The Demetra Web Application
Operation with the Demetra Web Application Open the Demetra Web Application ....................30 Main menu ...........................30 Patient detail screen ........................31 Consultations screen ........................33 Image detail screen ........................33 User entry of diagnosis and management strategy ................36 Reports............................36 Sharing patient data (Collaboration) ....................37... -
Page 30: Open The Demetra Web Application
2. Browse to https://demetra.barco.com 3. Select your region (i.e., the region where your Demetra account is hosted in the Cloud) and click Go to Login. 4. The Login screen will be shown. Fill in your e-mail address and password (set through user authentication, “Activation”, page... -
Page 31: Patient Detail Screen
Image type: This filter allows to show all images of the selected image type(s). 3. Collaboration tab: Click this tab to access all collaboration requests shared with you by other Demetra users, or that you have shared with other medical professionals (including non-Demetra users). See “Sharing patient data (Collaboration)”, page 37... - Page 32 Operation with the Demetra Web Application Image 4–3 1. Consultations tab: Click this tab to show the Consultations screen of the selected patient (see “Consultations screen”, page 33). 2. Gallery tab: Click this tab to view all captured images of the selected patient. The images can be shown in...
-
Page 33: Consultations Screen
The image detail screen is shown when a captured image is selected (by clicking on the thumbnail of the captured image). This is possible from different locations in the Demetra Web Application (such as the different image gallery modes and the images of the current consultation (shown below the dummy mannequin in the Consultations screen). - Page 34 Operation with the Demetra Web Application Image 4–5 1. Lesion number: Links the image to a location on a clinical overview image or dummy mannequin 2. Automatically assigned image number 3. Date when the image was captured 4. Time when the image was captured 5.
- Page 35 Operation with the Demetra Web Application Image 4–6 1. Delete the selected image 2. Button to download the full resolution image as png file 3. Transfer the selected image to another patient 4. View all images linked to the selected image e.g. previous images of the same lesion or body part, or linked images of the other image types 5.
-
Page 36: User Entry Of Diagnosis And Management Strategy
Overview Image 4–7 1. On the Demetra Web Application it is possible for the user to select a tentative diagnosis from the predefined list or add your own diagnosis by selecting Other benign lesion or Other malignant lesion and specifying your diagnosis in the available text field. -
Page 37: Sharing Patient Data (Collaboration)
• Click the Collaboration tab in the top menu at the left hand side of the Demetra Web Application and select Requests shared by you. Click the button Create a new request, select a patient and confirm to create the request. - Page 38 Receiving a collaboration request The recipient of a collaboration request will be notified by email. When the recipient is a Demetra user, they will have access to all received collaboration requests through their existing Demetra account. When the recipient is no Demetra user, they will receive an onboarding email with temporary password to create a Demetra ‘guest’...
-
Page 39: Troubleshooting
Troubleshooting Troubleshooting instructions......................40 Contact the Barco helpdesk via www.barco.com/support/demetra. Log a service ticket or find the email address and phone number for your country. K5902200 /07 Barco Demetra... -
Page 40: Troubleshooting Instructions
Fully recharge the batteries and check again. If the condition persists, your Demetra Scope may require servicing. LED fails The LEDs used in your Demetra Scope are designed to last over 100,000 hours. If any of the LEDs fail, your Demetra Scope requires servicing. LED indicator error codes In case the LED indicator in the grip of the device shows other behavior than during normal operation, please contact the Barco helpdesk. - Page 41 The Customer Contact shall confirm to Barco whether Barco’s support has resolved the Customer’s issue Barco may close a service ticket on written notice to the Customer in the absence of the Customer’s confirmation or when the issue, in Barco’s reasonable opinion is resolved.
- Page 42 Troubleshooting K5902200 /07 Barco Demetra...
-
Page 43: Repacking Instructions
Repacking instructions Repacking overview........................44 K5902200 /07 Barco Demetra... -
Page 44: Repacking Overview
6.1 Repacking overview Overview Image 6–1 1. Box 2. Bottom buffer 3. Middle buffer 4. Top buffer 5. Demetra Scope head 6. User documentation 7. Non-contact cone 8. Rechargeable grip / battery pack 9. Battery charging station 10. Adapter K5902200 /07... - Page 45 Repacking instructions 11. Plugs K5902200 /07 Barco Demetra...
- Page 46 Repacking instructions K5902200 /07 Barco Demetra...
-
Page 47: Cleaning And Disinfection
Cleaning and disinfection Instructions ..........................48 K5902200 /07 Barco Demetra... -
Page 48: Instructions
To disinfect the contact glass and biocompatible plastic of the Demetra Scope The exterior and contact glass of your Demetra Scope may be cleaned and disinfected by wiping it with a recognized product for disinfection. Read and follow all label instructions on the disinfection product. -
Page 49: Important Information
Important information Safety information.........................50 Environmental information......................52 Regulatory compliance information ....................52 Integration of Demetra in IT networks .....................54 EMC notice ..........................56 Explanation of symbols .........................58 Explanation of icons........................61 Legal disclaimer ...........................64 Technical specifications.........................64 K5902200 /07 Barco Demetra... -
Page 50: Safety Information
Batteries and charging Your Demetra Scope uses lithium batteries (one in the grip and one in the head), which can only be purchased from Barco or from an authorized Barco dealer. Do not under any circumstances use other batteries than the ones designed for this unit. - Page 51 Eye safety Hold your Demetra Scope so that the LEDs are aimed in the direction of the lesion to be examined. Do not look directly into the bright LED light. It is recommended that patients close their eyes during examination near their eyes.
-
Page 52: Environmental Information
> tap Settings). 8.3.1 EU statement RF information Hereby, Barco NV declares that this device is in compliance with the Directive 2014/53/EU. The full text of the EU declaration of conformity is available at: https://www.barco.com/support/Demetra/docs The device is restricted to indoor use only when operating in the 5150 to 5350 MHz frequency range. -
Page 53: Fcc Statement
Changes or modifications not expressly approved by the party responsible for compliance could void the user's authority to operate the equipment. FCC responsible: Barco Inc., 3059 Premiere Parkway Suite 400, 30097 Duluth GA, United States, Tel: +1 678 475 8000... -
Page 54: General Information
The manufacturing country of the product is indicated on the product label (“Made in …”). Importers contact information To find your local importer, contact one of Barco’s regional offices via the contact information provided on our website (www.barco.com). 8.4 Integration of Demetra in IT networks... - Page 55 Barco allows the user to enable integration with selected EHR systems. This integration facilitates the retrieval of patient IDs and other data from the EHR to Demetra, and the export of consultation reports, images and metadata from Demetra back to the EHR system. The integration can be configured such that exported images are compressed (lossy) and reduced in resolution to keep file size limited.
-
Page 56: Emc Notice
WARNING: Portable RF communications equipment (including peripherals such as antenna cables and external antennas) should be used no closer than 30 cm (12 inches) to any part of the Demetra solution, including cables specified by the manufacturer. Otherwise, degradation of the performance of this equipment could result. - Page 57 Consult the dealer or an experienced technician for help. Electromagnetic immunity The Demetra solution is intended for use in the electromagnetic environment specified below. The customer or the user of the Demetra solution should assure that it is used in such an environment.
-
Page 58: Explanation Of Symbols
Indicates the device is approved according to the UL regulations MEDICAL – GENERAL MEDICAL EQUIPMENT AS TO ELECTRICAL SHOCK, FIRE AND MECHANICAL HAZARDS ONLY IN ACCORDANCE WITH ANSI/AAMI ES 60601-1 (2005) + AMD (2012) and CAN/CSA-C22.2 No. 6060-1 (2014) K5902200 /07 Barco Demetra... - Page 59 Caution: Federal law (United States of America) restricts this device to sale by or on the order of a licensed healthcare practitioner. Indicates the USB connectors on the device Indicates the DisplayPort connectors on the device Type BF applied part Class II equipment K5902200 /07 Barco Demetra...
- Page 60 Indicates this device must not be thrown in the trash but must be recycled, according to the European WEEE (Waste Electrical and Electronic Equipment) directive. Indicates Direct Current (DC). Indicates Alternating Current (AC). Stand-by Values for xx and yy can be found in the technical specifications paragraph. K5902200 /07 Barco Demetra...
-
Page 61: Explanation Of Icons
Save image Device Confirm Battery status: full Close Battery status: empty Compare images Battery issue (contact Barco helpdesk) Analyze WiFi error: offline Generate Lesion Analytics WiFi status: full strength Toggle visualization of Lesion Analytics WiFi status: no WiFi Reject Lesion Analytics... - Page 62 Edit Physician-admin user • Undo • Reset • Retry Delete physician (user) Rotate clockwise Switch patient Rotate Undocounterclockwise Select date Zoom in Image gallery Zoom out • Mannequin view of image gallery • Localize on mannequin K5902200 /07 Barco Demetra...
- Page 63 • Overview mode (to capture an image) • Localize on clinical overview Switch camera (in close-up mode) View report Overlay Download Polarized/non-polarized image Download speed Autofocus Upload speed Warning Down Notification Left Show third-party licenses Right K5902200 /07 Barco Demetra...
-
Page 64: Legal Disclaimer
Barco software products are the property of Barco. They are distributed under copyright by Barco NV or Barco Inc., for use only under the specific terms of a software license agreement between Barco NV or Barco Inc. and the licensee. No other use, duplication, or disclosure of a Barco software product, in any form, is authorized. - Page 65 CE, ANSI/AAMI ES 60601-1 (2005) + AMD (2012) and CAN/CSA-C22.2 No. 60601-1 (2014) EMI: EN 60601-1-2 : 2015, IEC 60601-1-2 ed 4.0, EN55011 : 2009+A :2010, CISPR 11 ed 5.1, IEC 60601-2-57, FCC Part 15, ICES-003/NMB-003 Radio Equipment Directive 2014/53/EU K5902200 /07 Barco Demetra...
- Page 66 Important information K5902200 /07 Barco Demetra...
- Page 68 Barco NV President Kennedypark 35 8500 Kortrijk K5902200-07 Belgium K5902200 /07 | 2021-11-04 www.barco.com...
Need help?
Do you have a question about the Demetra and is the answer not in the manual?
Questions and answers