
Related Manuals for Barco 6300


Summary of Contents for Barco 6300
- Page 1 BARCO PROJECTION SYSTEMS Lamp 6300 R9829900 INSTALLATION MANUAL KIT LAMP FOR 6300 PROJECTORS Date : Rev : Art. No. : 060199 R5975949...
- Page 2 Produced by BARCO NV, January 1999. All rights reserved. Trademarks are the rights of their respective owners. BARCO n.v./Projection Systems Noordlaan 5 B-8520 Kuurne Belgium Tel : +32/56/368211 Fax : +32/56/351651 E-mail : sales.bps@barco.com Visite Barco at the web : http://www.barco.com Printed in Belgium...
- Page 3 The total lifetime of the lamp for safe operation is 750 hours maximum in normal power Warning mode. Do not use it longer ! Always replace the lamp with the BARCO lamp kit for 6300 projectors. BARCO ——————————————————— 3 ————————————— Projection Systems...
-
Page 4: Contents Of The Kit
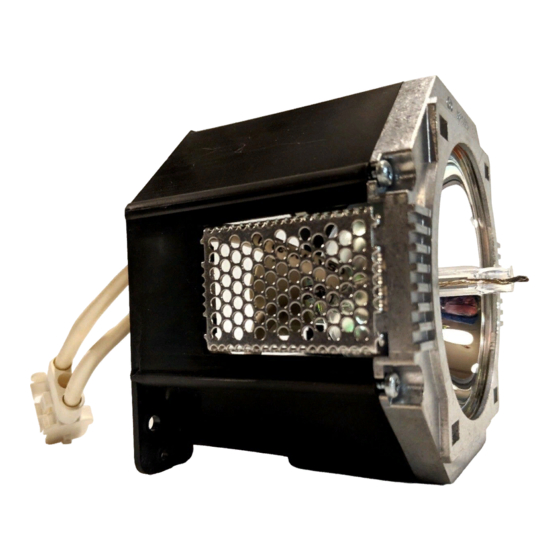
Serial number lamp : Part Listing The following parts are in the kit : Part Number Description Indication R808017 FRMC G6300 LMP HSG +LMP R5975949 MAN INS G6300 LMP Illustration of the BARCO ——————————————————— 4 ————————————— Projection Systems... - Page 5 Turn with a screwdriver a quarter turn counter clockwise. Open the door a little. Unhook the door from its fixing points. Illustrations on Opening the Lamp House Door. Image 1 Image 2 To be continued on next page. BARCO ——————————————————— 5 ————————————— Projection Systems...
- Page 6 Take out the protection cover. Caution Hot surface. Do not touch rotating fan blades. High pressure lamp may explode if improperly handled. Refer servicing to qualified service personnel. Illustrations on Removing the Protection Cover BARCO ——————————————————— 6 ————————————— Projection Systems...
-
Page 7: Removing The Lamp Unit
Push at the same time on both looking parts. Unplug the connectors. Illustrations on The following images give an overview how to discoonect the power cable. Disconnecting the Lamp Power Cable image 1 image 2 To be continued on next page. BARCO ——————————————————— 7 ————————————— Projection Systems... - Page 8 Image Slide the lamp assemble backwards Take out the lamp assembly. Illustrations on The following image gives an illustration on how to slide out the lamp. Removing the Lamp Assembly image 1 image 2 BARCO ——————————————————— 8 ————————————— Projection Systems...
- Page 9 Put the lamp assembly in the lamp house. Slide the lamp assemble forwards until fits on its place. Illustrations on Installing the Lamp Assembly Image 1 Image 2 To be continued on next page. BARCO ——————————————————— 9 ————————————— Projection Systems...
- Page 10 Lamp Power Cable. Step Action Image Connect the connector at the lamp side into the connector at the power side. Put the connector under the metal slip. Illustrations on Connecting Lamp Power Cable. Image 1 BARCO ——————————————————— 10 ————————————— Projection Systems...
- Page 11 To install the protection cover, follow the next procedure: Protection Cover Step Action Image Put the protection cover on its place. Turn in with a screwdriver the four indicated bolts. Illustrations on Removing the Protection Cover To be continued on next page. BARCO ——————————————————— 11 ————————————— Projection Systems...
- Page 12 To close the lamp house door, follow the next procedure: House Door. Step Action Image Hook the door on its fixing points. Close the door. Turn with a screwdriver a quarter turn clockwise. Illustrations on Closing the Lamp Door. Image 1 Image 2 BARCO ——————————————————— 12 ————————————— Projection Systems...
-
Page 13: Cleaning The Dust Filter
Turn out both screws of both dust filters. 1 & 2 Clean the dust filter with a dry cloth. Re-insert the dust filter. Turn in both screws of both dust filters to secure their position. Illustrations Image 1 Image 2 BARCO ——————————————————— 13 ————————————— Projection Systems... - Page 14 RCU. Start with 0 and continue Enter the serial number of the new lamp : with the number written on page 4. x x x x x x x Press ENTER to continue. <ENTER> to continue <EXIT> to return. BARCO ——————————————————— 14 ————————————— Projection Systems...
Need help?
Do you have a question about the 6300 and is the answer not in the manual?
Questions and answers