Intermec 6820 User Manual
Hide thumbs
Also See for 6820:
- User manual (184 pages) ,
- Technical reference manual (90 pages) ,
- Installation instructions manual (26 pages)

Related Manuals for Intermec 6820

Summary of Contents for Intermec 6820
- Page 1 All manuals and user guides at all-guides.com 6820 Printer USER’S GUIDE " " " " " " " " " " " " " " " " " " " " " " " " " " " " P/N: 961-019-013...
- Page 2 All manuals and user guides at all-guides.com " NOTICE AS IS WITH ALL FAULTS." ALL WARRANTIES ARE EXPRESSLY DISCLAIMED, INCLUDING THE IMPLIED WARRANTIES OF MERCHANTABILITY AND FITNESS FOR A PARTICULAR PURPOSE. Acknowledgments Microclean II...
- Page 3 All manuals and user guides at all-guides.com CONTENTS " " " " " " " " " " " " " " " " " " " " " " " " " " " " SECTION 1 Introduction 6820 Printer User’s Guide...
- Page 4 All manuals and user guides at all-guides.com CONTENTS SECTION 2 Installation SECTION 3 Operation ii 6820 Printer User’s Guide...
- Page 5 All manuals and user guides at all-guides.com CONTENTS SECTION 4 Maintenance SECTION 5 Troubleshooting 6820 Printer User’s Guide...
- Page 6 All manuals and user guides at all-guides.com CONTENTS FIGURES 6820 Printer User’s Guide...
- Page 7 All manuals and user guides at all-guides.com CONTENTS TABLES INDEX 6820 Printer User’s Guide...
- Page 8 All manuals and user guides at all-guides.com CONTENTS 6820 Printer User’s Guide...
- Page 9 " " " " " " " " " " " " " About this Guide Section 1, Introduction " Section 2, Installation " Section 3, Operation " Section 4, Maintenance " Section 5, Troubleshooting " 6820 Printer User’s Guide...
- Page 10 All manuals and user guides at all-guides.com Introduction SECTION 1 Related Publications 6820 Printer Technical Reference " Printer Descriptions Fixed Mount Printer " Portable Printer " Wall Mount Printer " only 6820 Printer User’s Guide...
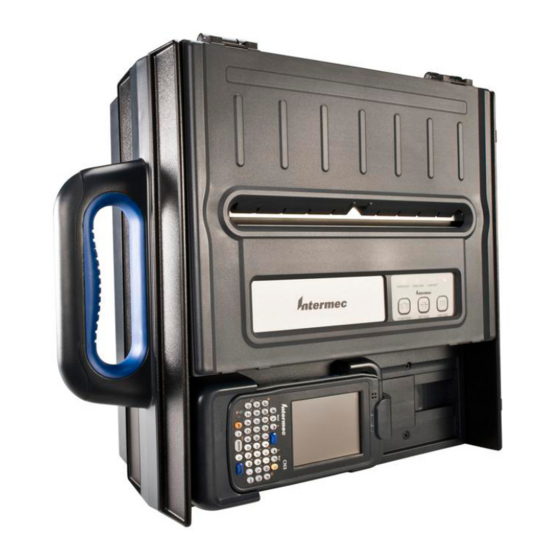
- Page 11 All manuals and user guides at all-guides.com SECTION 1 Introduction 1. Fixed Mount Printer (with 4000 Series/62XX Terminal Holder) 2. Portable Printer (with 61XX Terminal Holder) 3. Wall Mount Printer (with mounting plate and flat paper tray) Figure 1 1 6820 Printers 6820 Printer User’s Guide...
- Page 12 All manuals and user guides at all-guides.com Introduction SECTION 1 Connectors Fixed Mount Printer " Portable Printer " Wall Mount Printer " 6820 Printer User’s Guide...
- Page 13 All manuals and user guides at all-guides.com SECTION 1 Introduction Fixed Mount Printer Portable Printer Wall Mount Printer 1. Hand-held computer socket 2. DC power connector 3. Data communications connector Figure 1 2 Printer Connectors 6820 Printer User’s Guide...
- Page 14 All manuals and user guides at all-guides.com Introduction SECTION 1 Reset Button Fixed Mount or Portable Printer " 1. Printer mechanism (raised) 2. Reset button Figure 1 3 Reset Button on Portable Printer 6820 Printer User’s Guide...
- Page 15 All manuals and user guides at all-guides.com SECTION 1 Introduction Wall Mount Printer " 1. Reset button 2. Front of printer Figure 1 4 Reset Button on Wall Mount Printer 6820 Printer User’s Guide...
- Page 16 Control Panel Indicators PAPER OUT " HEAD JAM " LOW BATT " Power " Buttons FORM FEED " SET PAGE " Paper Out" conditions, press this button to clear the Paper Out error before printing can resume. 6820 Printer User’s Guide...
- Page 17 All manuals and user guides at all-guides.com SECTION 1 Introduction LINE FEED " Power LOW BATT HEAD JAM PAPER OUT LINE FEED SET PAGE FORM FEED Figure 1 5 Control Panel 6820 Printer User’s Guide...
- Page 18 Internal Power Module not for wall mount printers is not an add on option. 1. AC foot 2. Plug on power cord (goes to ac outlet) Figure 1 6 Power Cord Wrapped Around AC Foot 1-10 6820 Printer User’s Guide...
- Page 19 All manuals and user guides at all-guides.com SECTION 1 Introduction Battery Options Internal Battery " Vehicle Battery " Paper " " 6820 Printer User’s Guide 1-11...
- Page 20 All manuals and user guides at all-guides.com Introduction SECTION 1 Hinges on Printer Cover Figure 1 7 Hinge Tension Adjustment Printer Dimensions Wall Mount Printers Width Height Depth 1-12 6820 Printer User’s Guide...
- Page 21 Table 1 1 Fixed Mount Printer Dimensions Configuration Width Height Depth Portable Printers Note that the ac foot adds 2.5" (6.35 cm) to the width. Table 1 2 Portable Printer Dimensions Configuration Width Height Depth 6820 Printer User’s Guide 1-13...
- Page 22 Print Speed: Weight: Temperature: Humidity: Altitude: Electrical: Vibration: ESD: Battery: (order batteries through Inside Sales) " NOTE: Battery will go dead within two weeks if connected to the printer and with no external charge source. 1-14 6820 Printer User’s Guide...
- Page 23 All manuals and user guides at all-guides.com SECTION 1 Introduction Customer Support Factory Service Customer Response Center support@intermec.com Web Site http://www.intermec.com http://www.intermec.com/manuals/english.htm 6820 Printer User’s Guide 1-15...
- Page 24 All manuals and user guides at all-guides.com Introduction SECTION 1 Bulletin Board Service Phone number: " Protocol: " high speed modems, disable XON/XOFF and enable RTS/CTS. 1-16 6820 Printer User’s Guide...
- Page 25 All manuals and user guides at all-guides.com SECTION 1 Introduction Inside Sales " " " " " " " " " " " " " " " " " " " " 6820 Printer User’s Guide 1-17...
- Page 26 All manuals and user guides at all-guides.com Introduction SECTION 1 1-18 6820 Printer User’s Guide...
- Page 27 " " " " " " " Installation Kit " NOTE: Battery cables at various lengths and other power cables are sold separately. See “Inside Sales” in Section 1 for ordering information and part numbers. " 6820 Printer User’s Guide...
- Page 28 All manuals and user guides at all-guides.com Installation SECTION 2 directly Installation Procedures Tools Required Vehicle Electrical System " NOTE: If the vehicle voltage is too high or too low, the printer may not work. It must not exceed 18.0 V. 6820 Printer User’s Guide...
- Page 29 Check your en- gine for a bad voltage regulator or a poor ground, either of which can cause excessive voltage. Electrical Installation Power Cable Routing Cable Length " Y" Power Cable " 6820 Printer User’s Guide...
- Page 30 3. 3/8” terminal ring 4. Fuse link assembly with 15-amp fuse 5. Splice 6. Vehicle battery cable — 8, 16, or 22 feet (2.4, 4.9, or 6.7 meters) 7. Chassis ground Figure 2 1 Two-Cable Installation Solution " " 6820 Printer User’s Guide...
- Page 31 SECTION 2 Installation Routing the Cables from " toward " " " " " " before Preparing the Vehicle Battery Cable The gray vehicle battery cable must be connected according to the instructions on the next page 6820 Printer User’s Guide...
- Page 32 Î Î Î Î Î Î Î Ç Ç Ç Ç Î Î Î Î Î Î Î Black (or Brown) Wire Strip the Cable Jacket 12–14 inches (31–36 centimeters) Figure 2 2 Vehicle Battery Cable Jacket 6820 Printer User’s Guide...
- Page 33 Black (or Brown) Wire D Strip wire D Install terminal ring Crimp Here Red Wire 1. 3/8” terminal ring 2. Fuse link assembly 3. Fuse link 4. Vehicle battery cable Figure 2 3 Vehicle Battery Cable Ends 6820 Printer User’s Guide...
- Page 34 All manuals and user guides at all-guides.com Installation SECTION 2 Connecting to the Vehicle Battery Connecting to a Side-Mount Vehicle Battery negative positive positive 6820 Printer User’s Guide...
- Page 35 All manuals and user guides at all-guides.com SECTION 2 Installation 1. 3/8” x 1-1/2” bolt 2. 3/8” nut 3. Vehicle battery 4. Vehicle battery cable 5. Fuse link 6. 3/8” washers Figure 2 4 Side-Mount Vehicle Battery 6820 Printer User’s Guide...
- Page 36 All manuals and user guides at all-guides.com Installation SECTION 2 Connecting to a Top-Mount Vehicle Battery negative positive (5). (5). 2-10 6820 Printer User’s Guide...
- Page 37 All manuals and user guides at all-guides.com SECTION 2 Installation 1. 3/8” nut 2. Vehicle battery 3. Vehicle battery cable 4. Fuse link 5. 3/8” x 1-1/2” bolt 6. 3/8” washers Figure 2 5 Top-Mount Battery Terminal 6820 Printer User’s Guide 2-11...
- Page 38 All manuals and user guides at all-guides.com Installation SECTION 2 Securing the Vehicle Battery Cable #6 Sheet-metal Screw Goes Here Figure 2 6 Clamp Grounding the Printer Power Cable (to fit the screw) 2-12 6820 Printer User’s Guide...
- Page 39 Table 2 1 Volt Meter Readings for Printer Power Cable Volt Meter Black Reading Lead Lead DC Volts Meaning " " Do not connect wire to printer. " " Do not connect wire to printer. 6820 Printer User’s Guide 2-13...
- Page 40 This mounting plate and instructions apply to fixed mount printers. Latch Unlatch 1. Mounting keyholes on oversize paper tray 2. Latch (top view) 3. Latch (side view) Figure 2 8 Top View of Fixed Mount Printer Paper Tray 2-14 6820 Printer User’s Guide...
- Page 41 Nuts and bolts are not provided. You must locally select and pur- chase hardware that provides the most secure installation possible for the application and vehicle. Side View Back View 7.32” (19 cm) 11.36” (29 cm) Figure 2 9 Angled Mounting Plate for Fixed Mount Printer 6820 Printer User’s Guide 2-15...
- Page 42 Bolts are not provided. 17” (43 cm) 13” (33 cm) 18” (46 cm) 26” (66 cm) 11” (28 cm) below for paper tray 13” (33 cm) Figure 2 10 Mounting Dimensions for Wall Mount Printer 2-16 6820 Printer User’s Guide...
- Page 43 All manuals and user guides at all-guides.com SECTION 2 Installation Installing the Mounting Plate 1. Knob screw 2. Mounting lips Figure 2 11 Mounting Plate for Wall Mount Printer 6820 Printer User’s Guide 2-17...
- Page 44 SECTION 2 Attaching Paper Tray to Mounting Plate 1. Center lip on flat paper tray 2. Compact paper tray 3. Center bottom lip on mounting plate Figure 2 12 Attaching Paper Tray to Mounting Plate 2-18 6820 Printer User’s Guide...
- Page 45 Mounting the Printer 1. Knob screw on mounting plate assembly 2. Knob 3. Printer tie-down bracket 4. Printer 5. Bottom lips on mounting plate assembly 6. Bottom of printer Figure 2 13 Mounting the Wall Mount Printer 6820 Printer User’s Guide 2-19...
- Page 46 3. Rectangular connector 4. Vehicle battery cable (goes to battery connector) 5. Chassis ground 6. 61XX Vehicle Dock 7. 61XX Computer 8. Data communication cable (goes to printer connector) Figure 2 14 “Y” Power Cable Connections 2-20 6820 Printer User’s Guide...
- Page 47 " " " " " " " " Check List " " " " " Specific instructions for these tasks are described on the pages given " NOTE: Complete these tasks before starting any printer operations. 6820 Printer User’s Guide...
- Page 48 Remove the printer battery when storing a printer for over 30 days. After storage, reinstall the battery and connect the printer to an ex- ternal power source for at least two hours, to recharge the battery. 6820 Printer User’s Guide...
- Page 49 All manuals and user guides at all-guides.com SECTION 3 Operation 1. Battery 2. Battery cable 3. Printer mechanism (raised) 4. Latches or rubber bumpers Figure 3 1 Inserting Battery 6820 Printer User’s Guide...
- Page 50 All manuals and user guides at all-guides.com Operation SECTION 3 Installing the Ribbon Cartridge (sold separately Inside Sales" in Section 1 for ordering information and part number) down outward (follow raised arrows) 6820 Printer User’s Guide...
- Page 51 All manuals and user guides at all-guides.com SECTION 3 Operation 1. Ribbon 2. Locking tab 3. Advance knob 4. Tightens ribbon Figure 3 2 Installing Ribbon Cartridge 6820 Printer User’s Guide...
- Page 52 All manuals and user guides at all-guides.com Operation SECTION 3 Adjusting the Print Head Gap opposite the green thumb wheel. " away from the paper. " away from the paper. " away from the paper " 6820 Printer User’s Guide...
- Page 53 All manuals and user guides at all-guides.com SECTION 3 Operation Figure 3 3 Print Head Adjuster Set on Third Notch 6820 Printer User’s Guide...
- Page 54 When loading multiple-sheet paper, be sure to have the origi- nal faced up, with the leading edge towards the rear of the printer. Fixed Mount and Portable Printers with the original faced up " " 6820 Printer User’s Guide...
- Page 55 All manuals and user guides at all-guides.com SECTION 3 Operation 1. Paper tray (beneath printer mechanism) 2. Printer mechanism (raised) Figure 3 4 Pulling Paper Over Printer Mechanism 6820 Printer User’s Guide...
- Page 56 Loading the Flat Paper Tray up to 2.5 inches (6 cm) thick, Loading the Compact Paper Tray With the original facing you, to 2.5 inches (6 cm) thick, like a U," Figure 3 5 Loading Compact Paper Tray 3-10 6820 Printer User’s Guide...
- Page 57 Follow these steps to load the paper into the printer, or paper jams may occur. Positioning the Paper original side facing down Figure 3 6 Putting Paper into Pinfeed Holders " NOTE: Go to the next page to adjust the pinfeed holders. 6820 Printer User’s Guide 3-11...
- Page 58 If the paper does not fit on the two pinfeed holders properly, opposite 3-12 6820 Printer User’s Guide...
- Page 59 All manuals and user guides at all-guides.com SECTION 3 Operation 1. Pinfeed holder 2. Locked pinfeed holder locking tab 3. Released pinfeed holder locking tab 4. Thumb wheel (green) Figure 3 7 Positioning Pinfeed Holder and Paper 6820 Printer User’s Guide 3-13...
- Page 60 If not, you can adjust the position of the paper, either by pressing the LINE FEED button, or by using the green thumb wheel. SET PAGE PAPER OUT Figure 3 8 Setting Paper for Printing 3-14 6820 Printer User’s Guide...
- Page 61 Inserting 4000 Series or 62XX Computer bottom 1. Bottom (or battery) end of computer 2. Terminal slide retainer 3. Computer connector end in printer Figure 3 9 Inserting 4000 Series or 62XX Computer into Terminal Holder 6820 Printer User’s Guide 3-15...
- Page 62 All manuals and user guides at all-guides.com Operation SECTION 3 Inserting 61XX Computer 1. Top (display) of computer inserted in terminal slide retainer 2. Docking connectors Figure 3 10 Inserting 61XX Computer into Terminal Holder 3-16 6820 Printer User’s Guide...
- Page 63 " " " " " " " Operating Guidelines Do Not " " " " " " " " " " " " See next page See next page for more cautions about glass cleaners. " 6820 Printer User’s Guide...
- Page 64 Both cleaners are sold separately. See “Inside Sales” in Section 1 for ordering information and part numbers. Cleaning the Outside Do not use solvent solutions. 6820 Printer User’s Guide...
- Page 65 Let the printer cool before you clean the inside of the printer, or you may burn your fingers. 1. Head gap adjuster 2. Ribbon cartridge 3. Paper bail 4. Thumb wheel (green) 5. Pinfeed holder Figure 4 1 Visible Moving Parts in Printer Mechanism 6820 Printer User’s Guide...
- Page 66 All manuals and user guides at all-guides.com Maintenance SECTION 4 Removing Old Ribbon Cartridge Figure 4 2 Removing Old Ribbon Cartridge 6820 Printer User’s Guide...
- Page 67 Cleaning the Mask Spring 1. Print head 2. Mask spring Figure 4 3 Mask Spring Location " NOTE: The mask spring and paper guide are sold separately. See “Inside Sales” in Section 1 for ordering information and part number. 6820 Printer User’s Guide...
- Page 68 (rubber roller). This can damage the mask spring and print head. 1. Print head locking tabs 2. Print head (lifted aside) 3. Mask spring 4. Paper bail (raised) Figure 4 4 Exposing the Mask Spring 6820 Printer User’s Guide...
- Page 69 Factory defaults are in bold Protocol Selection " NPCP Configuration " " 19.2K " slashed (4) " Protocol Selection Mode both FORM FEED LINE FEED in the order they are stored. PAPER OUT, HEAD JAM, LOW BATT 6820 Printer User’s Guide...
- Page 70 " LOW BATT " LINE FEED Selecting the Bit Rate PAPER OUT " PAPER OUT " FORM FEED Adjusting the Zero Print Option HEAD JAM " HEAD JAM " SET PAGE both SET PAGE LINE FEED 6820 Printer User’s Guide...
- Page 71 SET PAGE decrement EXAMPLE: If the printer is set for “DTR no parity” protocol (ON, OFF, OFF), press the SET PAGE button four times to return to “NPCP” (OFF, OFF, OFF). both FORM FEED LINE FEED 6820 Printer User’s Guide...
- Page 72 All manuals and user guides at all-guides.com Maintenance SECTION 4 4-10 6820 Printer User’s Guide...
- Page 73 " " " " " " " " " " " " " " " " " " " " " " " Checking the Power Source Internal battery: " Vehicle cable: " AC power: " 6820 Printer User’s Guide...
- Page 74 This method is recommended for determining printer functionality. FORM FEED SET PAGE Note the self test can be aborted by pressing a button while the report is printing. " " " " " " " " " " 6820 Printer User’s Guide...
- Page 75 All manuals and user guides at all-guides.com SECTION 5 Troubleshooting First Page of Self-Test " " " LOW BATT LOW BATT " " 6820 Printer User’s Guide...
- Page 76 All manuals and user guides at all-guides.com Troubleshooting SECTION 5 " " " " " " " " " " 6820 Printer User’s Guide...
- Page 77 All manuals and user guides at all-guides.com SECTION 5 Troubleshooting " " " " " " " " " " " " " " " " " 6820 Printer User’s Guide...
- Page 78 Sample First Page of Self-Test " NOTE: Lines 15–18 are factory-default printer settings. Take note of these lines when reading the self-test report. yyyyyyyyyyyyyyyyyyyyyyyyyyyyyyyyyyyyyyyyyyy NP6820 Copyright 1997, 1998, Intermec Technologies Corporation. All Rights Reserved. Serial# MFG Date Hardware Check Repairs...
- Page 79 12345 12345 12345 12345 12345 12345 12345 12345 12345 12345 12345 12345 12345 12345 12345 12345 12345 12345 12345 12345 12345 12345 12345 12345 12345 12345 12345 12345 12345 12345 12345 12345 12345 12345 12345 12345 Second Page of Self-Test !”#$%’()*+,–./0123456789:;<=>?@ABCDEFGHIJKLMNOPQRSTUVWXYZ[\]^_’abcdefghijklmnopqr- stuvwxyz{|}~!”#$%’()*+,–./0123456789:;<=>?@ABCDEFGHIJKLMNOPQRSTUVWXYZ[\]^_’abcdef- ghijklmnopqrstuvwxyz{|}~!”#$%’()*+,–./0123456789:;<=>?@ABCDEFGHIJKLMNOPQRSTUVW- XYZ[\]^_’abcdefghijklmnopqrstuvwxyz{|}~!”#$%’()*+,–./0123456789:;<=>?@ABCDEFGHIJKL 6820 Printer User’s Guide...
- Page 80 If a partial report generates and a printer error " occurs during printing, If the printer does not generate a report: " " " Possible Printer Problems Table 5 1 Possible Printer Problems Symptom Test or Cause Solution 6820 Printer User’s Guide...
- Page 81 All manuals and user guides at all-guides.com SECTION 5 Troubleshooting Table 5 1 (Continued) Possible Printer Problems Symptom Test or Cause Solution " " (Note: Error lights do not flash if voltage is too high) 6820 Printer User’s Guide...
- Page 82 All manuals and user guides at all-guides.com Troubleshooting SECTION 5 Table 5 1 (Continued) Possible Printer Problems Symptom Test or Cause Solution Test: Cause: " " " " 5-10 6820 Printer User’s Guide...
- Page 83 Test: " Test: " Cause: away from the paper. Cause: (portable, fixed mount printers) " NOTE: In paper jams or head jams, press the SET PAGE button to clear the printer before printing can resume. 6820 Printer User’s Guide 5-11...
- Page 84 1. Press nut 2. Pivot frame Figure 5 1 Print Head to Far Left " NOTE: The print head replacement is sold separately. See “Inside Sales” in Section 1 for ordering information and part number. 5-12 6820 Printer User’s Guide...
- Page 85 The left side must NOT touch the pivot frame. curely 3 Top Left 1 Top Right Push mechanism to the back 2 Bottom Left 4 Bottom Right Push mechanism to the right. Figure 5 2 Four Position Screws that Hold Printer Mechanism 6820 Printer User’s Guide 5-13...
- Page 86 All manuals and user guides at all-guides.com Troubleshooting SECTION 5 Indicators SET PAGE Table 5 2 Printer Failure Indicators PAPER HEAD Sets of Beeps BATT Meaning 5-14 6820 Printer User’s Guide...
- Page 87 All manuals and user guides at all-guides.com SECTION 5 Troubleshooting POST Diagnostics PAPER OUT, HEAD JAM, LOW BATT Table 5 3 POST Error Codes Long Short PAPER HEAD Beep Beep BATT Power Meaning Operational 6820 Printer User’s Guide 5-15...
- Page 88 All manuals and user guides at all-guides.com Troubleshooting SECTION 5 6920 Printer Technical Reference Communications or Host Computer 5-16 6820 Printer User’s Guide...
- Page 89 DSR (Data Set Ready) DTR (Data Terminal Ready) CTS (Clear To Send) RTS (Ready To Send) RXD (Receive Data) TXD (Transmit Data) 25-Pin DSUB Male 15-Pin DSUB Male Figure 5 3 15-Pin to 25-Pin Cable P/N: 216-605-XXX 6820 Printer User’s Guide 5-17...
- Page 90 CTS (Clear To Send) RTS (Ready To Send) RXD (Receive Data) TXD (Transmit Data) * Signals are not available on the 6100 Dock 25-Pin DSUB Female 25-Pin DSUB Male Figure 5 4 25-Pin to 25-Pin Cable P/N: 216-771-XXX 5-18 6820 Printer User’s Guide...
- Page 91 DSR (Data Set Ready) DTR (Data Terminal Ready) SG (Signal Ground) shield Chassis Ground shell shell Chassis Ground Terminal Charge out to computer 9-Pin DSUB Female 15-Pin DSUB Female Figure 5 5 9-Pin to 15-Pin Cable P/N: 226-016-XXX 6820 Printer User’s Guide 5-19...
- Page 92 CTS (Clear To Send) DSR (Data Set Ready)* SG (Signal Ground) shield open shell * Signal is not available on the 6100 Dock 25-Pin DSUB Male 15-Pin DSUB Female Figure 5 6 25-Pin to 15-Pin Cable P/N: 226-162-XXX 5-20 6820 Printer User’s Guide...
- Page 93 All manuals and user guides at all-guides.com SECTION 5 Troubleshooting Printer Pin # Pin # RJ-11 Jack 9-Pin DSUB Male Figure 5 7 Data Communications Cable P/N: 226-270-00X 6820 Printer User’s Guide 5-21...
- Page 94 All manuals and user guides at all-guides.com Troubleshooting SECTION 5 Table 5 4 Printer Communications Connector Pin-Outs 15 Pin 25 Pin Signal Name Type Description DSUB DSUB 5-22 6820 Printer User’s Guide...
- Page 95 5 20 1 13 2 14 1 10 5 22 2 18 2 18 5 13 5 17 1 12 5 20 2 15 5 18 1 13 5 19 1 13 2 16 2 20 6820 Printer User’s Guide Index-1...
- Page 96 All manuals and user guides at all-guides.com INDEX 1 13 2 13 2 16 5 12 2 17 3 14 5 14 3 10 5 13 3 11 3 13 2 16 Index-2 6820 Printer User’s Guide...
- Page 97 All manuals and user guides at all-guides.com INDEX 2 11 5 15 2 13 5 14 2 13 2 13 3 14 2 11 3 15 3 16 6820 Printer User’s Guide Index-3...
- Page 98 All manuals and user guides at all-guides.com INDEX Index-4 6820 Printer User’s Guide...
Need help?
Do you have a question about the 6820 and is the answer not in the manual?
Questions and answers