Advertisement
DIAPHRAGM PUMP MANUAL
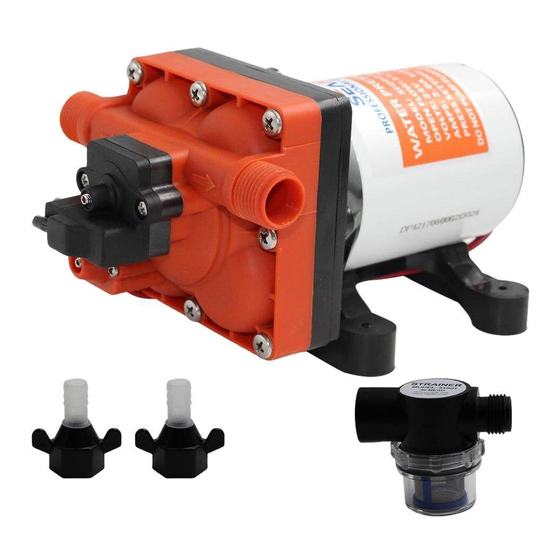
42 & 43 series retains the raw power and pressure of its predecessors, but also can adapt to situations
where huge flow is not needed. Compact but capable, it is a great fit for tight spaces. It also may be
configured with different inlet types, each with their own unique fittings, to be sure that it fits any
application you can find.
APPLICATIONS
•
Yacht/RV/caravan pressurized water system
•
Sprayer fixtures (vehicle-mounted sprayers, electric sprayers)
•
Cleaning machines, humidifier, water purification, medical apparatus
•
Food beverage filling & liquid transfer
•
Solar water system
•
Any other pressurization system
INSTALLATION
Materials
1
diaphragm pump with related accessories
2
(at least) pieces of flexible, reinforced hose piping, with collapsing strength of twice the inlet collapsing pressure, hose must be
minimum 1/2" ID(42 series) or 3/4" ID(43 series)
4 stainless steel hose clamps and screws
4 screws to fasten the pump to the mounting surface
1 electrical cutoff switch
1 fuse
1 screwdriver
1 strong cutting implement for tubing
(if desired) Teflon tape or sealant
Setup
1 .The pump may be mounted in any position. If mounted vertically, the pump head should be in the down position to avoid leakage
into the motor casing in the event of a malfunction.
2.Secure the feet, but do not compress them. Overtightening the securing screws may reduce their ability to dissipate noise and
vibration.
3.Intake hose must be minimum 1/2" (13 mm) ID (42 series) or 3/4" (19 mm) ID (43 series) reinforced hose. Main distribution line
from pump outlet should also be 1/2" (13mm) ID (42 series) or 1/2" (13 mm) ID (43 series) with branch and individual supply lines
to outlets no smaller than 3/8" (10 mm).
4. Plumb the system using high pressure (2 x pump rating), braided, flexible tubing to minimize vibration/noise.
42 & 43 Series
Advertisement
Table of Contents

Related Manuals for Seaflo 42 Series


Summary of Contents for Seaflo 42 Series
- Page 1 3.Intake hose must be minimum 1/2" (13 mm) ID (42 series) or 3/4" (19 mm) ID (43 series) reinforced hose. Main distribution line from pump outlet should also be 1/2" (13mm) ID (42 series) or 1/2" (13 mm) ID (43 series) with branch and individual supply lines to outlets no smaller than 3/8"...
- Page 2 5. Do not apply inlet pressure in excess of 30psi. In general, try to avoid any inlet pressure completely. 6. Avoid any kinks or fittings which could cause excessive restrictions. 7.Strainer should be attached to the inlet side. 8. The fittings must be secured to avoid leakage. 9.
- Page 3 ELECTRICAL INFORMATION Ft.(m) AWG(mm2) 0-20 (0-6) AWG16 20-30(6-9) AWG14 30-50(9-15) AWG12 50-65(15-19) AWG10 REPAIR KITS 42 Series Description Quantity Pump Head Assembly © Valve Assembly Diaphragm Assembly Motor Assembly Pressure switch Diaphragm of Pressure Switch Pump Head Diaphragm Rubber Feet...
- Page 4 Description Quantity Pump Head Assembly © Valve Assembly Diaphragm Assembly © Motor Assembly Pressure switch Diaphragm of Pressure Switch Quick Attach Clip Pump Head Diaphragm Rubber Feet Motor TROUBLESHOOTING PULSATING FLOW- PUMP CYCLES ON AND OFF • Check lines for kinks. •...
- Page 5 • Initial amp supply is not enough to sufficiently start the motor. • Debris clogged in the valves. • Crack in pump housing. MOTOR FAILS TO TURN ON • Loose or improper wiring. • Pump circuit has no power. • Blown fuse or thermal protection tripped.
Need help?
Do you have a question about the 42 Series and is the answer not in the manual?
Questions and answers
The pump stopped working while using it. Pump is 18 months old and has never failed. Wiring is correct and the battery management system has no “error” or “fault” signal