Dräger Medical Fabius Tiro Instructions For Use Manual
Inhalation anesthesia machine. software 3.0n.
Hide thumbs
Also See for Fabius Tiro:
- Technical & service manual (366 pages) ,
- Service procedure (8 pages)
Advertisement
Quick Links
Advertisement
Chapters

Related Manuals for Dräger Medical Fabius Tiro


Summary of Contents for Dräger Medical Fabius Tiro
- Page 1 .ﻣراﺟﻌﮫ ﻓرﻣﺎﯾﯾدWWW.ELM-FAN.IRﺑرای داﻧﻠود ﻣوارد ﺑﯾﺷﺗر ﺑﮫ ﺳﺎﯾت Fabius Tiro ® Inhalation Anesthesia Machine Software 3.0n Instructions for Use Because you care Emergency Care · Perioperative Care · Critical Care · Perinatal Care · Home Care To download more items, go to ELM-FAN.IR...
- Page 2 .ﻣراﺟﻌﮫ ﻓرﻣﺎﯾﯾدWWW.ELM-FAN.IRﺑرای داﻧﻠود ﻣوارد ﺑﯾﺷﺗر ﺑﮫ ﺳﺎﯾت To download more items, go to ELM-FAN.IR...
-
Page 3: Table Of Contents
Typical Fabius Tiro Configuration ........ - Page 4 Scavenger System for Fabius Tiro ........
- Page 5 .ﻣراﺟﻌﮫ ﻓرﻣﺎﯾﯾدWWW.ELM-FAN.IRﺑرای داﻧﻠود ﻣوارد ﺑﯾﺷﺗر ﺑﮫ ﺳﺎﯾت Contents Routine Maintenance..............139 Disassembling .
- Page 6 .ﻣراﺟﻌﮫ ﻓرﻣﺎﯾﯾدWWW.ELM-FAN.IRﺑرای داﻧﻠود ﻣوارد ﺑﯾﺷﺗر ﺑﮫ ﺳﺎﯾت To download more items, go to ELM-FAN.IR...
-
Page 7: Contents
For Your Safety and that of Your Patients ..............3 Safety Features ......................4 Copyright and Trademark ..................4 Intended Use ......................5 Symbol Definition ...................... 6 Abbreviations ......................10 General Warnings and Cautions ................11 Fabius Tiro Operator’s Manual To download more items, go to ELM-FAN.IR... - Page 8 .ﻣراﺟﻌﮫ ﻓرﻣﺎﯾﯾدWWW.ELM-FAN.IRﺑرای داﻧﻠود ﻣوارد ﺑﯾﺷﺗر ﺑﮫ ﺳﺎﯾت To download more items, go to ELM-FAN.IR...
-
Page 9: Chapter 1. Introduction
The warranty and liability provisions of the terms of sale and delivery of Dräger are likewise not modified by the recommendations given above. Dräger Medical AG & Co. KG Fabius Tiro Operator’s Manual To download more items, go to ELM-FAN.IR... -
Page 10: Safety Features
Risk of fire. Adequate ventilation must be ensured if highly inflammable substances are used for disinfection. CAUTION ! Do not use Fabius Tiro in the environment of NMR Copyright and Trademark tomography equipment. Malfunctions may result, thereby endangering the patient. -
Page 11: Intended Use
Spontaneous Breathing (SPONT) devices such as but not limited to PCs, Printers, etc. be mounted exclusively by trained personnel. Fabius Tiro is equipped with an electrically driven and electronically controlled ventilator and monitors for The system must meet the requirements about medical... -
Page 12: Symbol Definition
.ﻣراﺟﻌﮫ ﻓرﻣﺎﯾﯾدWWW.ELM-FAN.IRﺑرای داﻧﻠود ﻣوارد ﺑﯾﺷﺗر ﺑﮫ ﺳﺎﯾت Chapter 1 – Introduction Symbol Definition Symbol Definition The following symbols appear on the labels on the back of the Fabius Tiro and are defined below. Caution: Refer to accompanying documents before operating equipment. CSA Test Mark... - Page 13 .ﻣراﺟﻌﮫ ﻓرﻣﺎﯾﯾدWWW.ELM-FAN.IRﺑرای داﻧﻠود ﻣوارد ﺑﯾﺷﺗر ﺑﮫ ﺳﺎﯾت Symbol Definition Chapter 1 – Introduction The following symbols are used on other locations of the Fabius Tiro to provide quick and easy recognition of product functions. Oxygen Concentration Sensor Port Breathing Pressure Sensor Port...
- Page 14 Cylinder Gauge, Remote Cylinder Inlet Do Not Oil Do Not Use O Cylinder In This Position The following symbols are used on the Fabius Tiro monitoring user interface. Table Top Light Upper and Lower Alarm Limits Return to Home Screen...
- Page 15 Risk of electric shock, do not remove cover. Refer servicing to a DrägerService representative. Degree of protection against electric shock: Class 1 Type B. Fuse Heater Power DC Voltage AC Voltage Fabius Tiro Operator’s Manual To download more items, go to ELM-FAN.IR...
-
Page 16: Abbreviations
SPONT Spontaneous breathing TI:TE Ratio of inspiratory to expiratory time Tip:Ti Ratio of inspiratory pause time to inspiratory time Uninterruptible power supply Vacuum (e.g., for secretion aspiration) Tidal volume Fabius Tiro Operator’s Manual To download more items, go to ELM-FAN.IR... -
Page 17: General Warnings And Cautions
General Warnings and Cautions The following list of warnings and cautions apply to WARNING ! general operation and maintenance of the Fabius Tiro. Warnings and cautions about installing and operating Exercise special care so that the machine does not tip specific parts appear with those topics. - Page 18 CAUTION ! Do not place more than 15 pounds (6.8 kilograms) in any drawer. CAUTION ! Although the Fabius Tiro is designed to minimize the effects of ambient radio-frequency interference, CAUTION ! machine functions may be adversely affected by the...
-
Page 19: Contents
.ﻣراﺟﻌﮫ ﻓرﻣﺎﯾﯾدWWW.ELM-FAN.IRﺑرای داﻧﻠود ﻣوارد ﺑﯾﺷﺗر ﺑﮫ ﺳﺎﯾت Contents Chapter 2 – Configurations and Components Configurations and Components Contents Typical Fabius Tiro Configuration ................15 Components ......................15 Vaporizer (Optional) ....................15 Semi-Open Adapter ....................15 Heated Breathing System (Optional) ..............15 Selectatec®... - Page 20 .ﻣراﺟﻌﮫ ﻓرﻣﺎﯾﯾدWWW.ELM-FAN.IRﺑرای داﻧﻠود ﻣوارد ﺑﯾﺷﺗر ﺑﮫ ﺳﺎﯾت To download more items, go to ELM-FAN.IR...
-
Page 21: Typical Fabius Tiro Configuration
The fresh gas flow rate must be adjusted higher than the patient’s minute volume. Heated Breathing System (Optional) The Fabius Tiro can be configured with an optional heated breathing system to reduce condensation of moisture in the system. See “Installation of HBSPS... - Page 22 4) can be mounted on the left side of the flowmeter bank. This flowmeter can be used when the machine is turned off. A zero stop prevents damage to the flow control valve seat. Fabius Tiro Operator’s Manual To download more items, go to ELM-FAN.IR...
- Page 23 Components Chapter 2 – Configurations and Components Second Communications Port (Optional) Figure 5. Second Communications Port The Fabius Tiro can be configured with a second communications port that, like the standard communications port, supports Vitalink and Medibus communications (1 in...
- Page 24 Figure 9) to Fabius Tiro COM2 (2 in Figure 2. Connect anesthesia record keeper (3 in Figure 9) to Fabius Tiro COM1 (4 in Figure OP00531 Note: Data Pass Through (gas analysis data) must be enabled by DrägerService. Fabius Tiro Operator’s Manual...
- Page 25 .ﻣراﺟﻌﮫ ﻓرﻣﺎﯾﯾدWWW.ELM-FAN.IRﺑرای داﻧﻠود ﻣوارد ﺑﯾﺷﺗر ﺑﮫ ﺳﺎﯾت Components Chapter 2 – Configurations and Components Fabius Tiro with One or Two COM Ports Figure 10. Recommended Device Configuration 5 Multi Parameter Monitor with One COM Port Automatic Anesthesia Record Keeper 1. Connect monitor (1 in...
- Page 26 .ﻣراﺟﻌﮫ ﻓرﻣﺎﯾﯾدWWW.ELM-FAN.IRﺑرای داﻧﻠود ﻣوارد ﺑﯾﺷﺗر ﺑﮫ ﺳﺎﯾت To download more items, go to ELM-FAN.IR...
-
Page 27: Contents
Selecting/Setting Ventilation Parameters ............. 41 Fresh Gas Control ....................44 Fresh Gas Flow Monitoring Resolutions ..............46 Standard Resolution ..................... 46 High Resolution ....................46 APL Valve ........................ 47 Fabius Tiro Operator’s Manual To download more items, go to ELM-FAN.IR... - Page 28 .ﻣراﺟﻌﮫ ﻓرﻣﺎﯾﯾدWWW.ELM-FAN.IRﺑرای داﻧﻠود ﻣوارد ﺑﯾﺷﺗر ﺑﮫ ﺳﺎﯾت To download more items, go to ELM-FAN.IR...
-
Page 29: Overview
This function is indicated in the examples and instructions of this manual by “confirm”. Tabletop Light Key The Tabletop Light key (4 in Figure 12) turns on the tabletop light. Fabius Tiro Operator’s Manual To download more items, go to ELM-FAN.IR... -
Page 30: Cross-Functional Controls And Displays
35). Pressed During Standby Mode Figure 15. Standby Setup Screen The Standby Setup screen (Figure 15) appears. The Standby Setup screen enables you to define site defaults and configuration. Fabius Tiro Operator’s Manual To download more items, go to ELM-FAN.IR... -
Page 31: Status Bar
Displays the time remaining for alarm silence when the Silence Alarms key is pressed. Battery Power Level (3) Displays the status of the reserve power. Time (4) Displays the time. Fabius Tiro Operator’s Manual To download more items, go to ELM-FAN.IR... -
Page 32: Monitoring
18), which appears in the same location on all mode screens. Setup Key The Setup key (4 in Figure 17) is a cross-functional control. See “Setup Key” on page Fabius Tiro Operator’s Manual To download more items, go to ELM-FAN.IR... -
Page 33: Monitoring Windows
(PEEP), mean airway pressure (MEAN) or plateau airway pressure (PLAT), and peak airway pressure (PEAK). Breathing Pressure Trace Window The Breathing Pressure Trace window (5) displays a trace, or waveform, of the patient's breathing pressure. Fabius Tiro Operator’s Manual To download more items, go to ELM-FAN.IR... -
Page 34: Selecting/Setting Monitoring Functions
Figure 21. Standby Setup Screen (1 in Figure 22) will deselect the Default Settings column and reselect the Default Settings label as in Figure Figure 22. Standby Setup Screen Default Settings Selected Fabius Tiro Operator’s Manual To download more items, go to ELM-FAN.IR... - Page 35 20 to 25). 6. Confirm the new value for the alarm limit. The new alarm limit value is saved and the cursor moves over the return arrow. Fabius Tiro Operator’s Manual To download more items, go to ELM-FAN.IR...
-
Page 36: Ventilation
When the ventilator settings for Volume Control cause the ventilator to operate at its limits of performance, it is not possible for the Fabius Tiro to apply compliance compensation. If the ventilator's performance limit is reached, it is not possible to increment the Vt setting via the Volume Control Settings window. -
Page 37: Ventilation Screens
The factory default value is 10%. • PEEP (positive end expiratory pressure). The range for PEEP is 0 to 20 cmH O (mbar, hPa). The factory default value is 0 cmH O (mbar, hPa). Fabius Tiro Operator’s Manual To download more items, go to ELM-FAN.IR... - Page 38 Freq Min setting to a value other than “OFF”. If the detected patient spontaneous breathing rate falls below the set value, the ventilator automatically delivers a Pressure Support breath. Fabius Tiro Operator’s Manual To download more items, go to ELM-FAN.IR...
- Page 39 It is not intended as a primary mode of ventilation. When delivering Apnoea Ventilation, the Fabius Tiro uses the Pressure Support settings for PPS, Freq Min, Insp Flow, and PEEP.
- Page 40 O or OFF. The factory default value is 10. • PEEP (positive end expiratory pressure). The range for PEEP is 0 to 20 cmH The factory default value is 0 cmH Fabius Tiro Operator’s Manual To download more items, go to ELM-FAN.IR...
- Page 41 ON/OFF label on the bottom of the ManSpont screen. See Figure 32. Pressing the ON/OFF soft key turns the applicable alarm(s) “ON” or “OFF”. Fabius Tiro Operator’s Manual To download more items, go to ELM-FAN.IR...
- Page 42 Figure 34. Flow Meter Monitor Window The Flow Meter Monitor window is a graphical display of the flow rates of O , Air, and N O (L/min) (1 in Figure 34). Fabius Tiro Operator’s Manual To download more items, go to ELM-FAN.IR...
-
Page 43: Changing Ventilation Modes
After the mode change is confirmed, the Pressure Control key LED switches from blinking to constantly on, the ventilator switches to the selected operating mode, and the waveform is restored. Fabius Tiro Operator’s Manual To download more items, go to ELM-FAN.IR... - Page 44 Trigger is either the last used value or the site default value. When switching between Volume Control mode and SIMV/PS mode, the PMAX and PEEP settings shall automatically be transferred from the previous mode to the new mode. Fabius Tiro Operator’s Manual To download more items, go to ELM-FAN.IR...
- Page 45 4. Set the appropriate fresh gas flow. Note: The ManSpont screen enables you to turn the Apnoea Pressure alarm and Volume alarms ON or OFF. “APL Valve” on page 47 for more information. Fabius Tiro Operator’s Manual To download more items, go to ELM-FAN.IR...
- Page 46 (see “APL Valve” on page 47). 4. Press the O flush button, as required, to inflate the bag. 5. Set the fresh gas flow. 6. Start manual ventilation. Fabius Tiro Operator’s Manual To download more items, go to ELM-FAN.IR...
-
Page 47: Selecting/Setting Ventilation Parameters
Support key. The Pressure Support Ventilation Settings Window ( Figure 43) replaces the Waveform window. Figure 42. Pressure Control Ventilator Settings Window Figure 43. Pressure Support Ventilator Settings Window Fabius Tiro Operator’s Manual To download more items, go to ELM-FAN.IR... - Page 48 Figure 44. SIMV/PS Ventilator Settings Window (Screen 1) The SIMV/PS Ventilation Settings Window (1 in Figure 44 Figure 45) replaces the Waveform window. Figure 45. SIMV/PS Ventilator Settings Window (Screen 2) Fabius Tiro Operator’s Manual To download more items, go to ELM-FAN.IR...
- Page 49 If the Home key is pressed, the Ventilator Settings window will return to the Waveform window. In either case, the ventilation parameter will remain as it was before it was activated in the Ventilator Settings window. Fabius Tiro Operator’s Manual To download more items, go to ELM-FAN.IR...
-
Page 50: Fresh Gas Control
20 psi (1.4 bar). The cylinder gauges (13: trolley mount only; 14: on pressure reducer, wall mount only) display the pressure measurement of each gas entering the Fabius Tiro from pin index-type cylinders. Fabius Tiro Operator’s Manual To download more items, go to ELM-FAN.IR... - Page 51 .ﻣراﺟﻌﮫ ﻓرﻣﺎﯾﯾدWWW.ELM-FAN.IRﺑرای داﻧﻠود ﻣوارد ﺑﯾﺷﺗر ﺑﮫ ﺳﺎﯾت Fresh Gas Control Chapter 3 – Operating Concept Figure 47. Flowmeter and Pressure Gauge Assembly Fabius Tiro Operator’s Manual To download more items, go to ELM-FAN.IR...
-
Page 52: Fresh Gas Flow Monitoring Resolutions
Fresh Gas Flow Monitoring Resolutions Fresh Gas Flow Monitoring Resolutions The Fabius Tiro can be configured by DrägerService Figure 48. Standard Resolution Fresh Gas Flow Monitoring to display fresh gas flow rates either in a standard resolution mode or in a high resolution mode. -
Page 53: Apl Valve
Lifting the top of the APL valve knob will temporarily relieve pressure. Note: The APL valve is automatically excluded from the breathing circuit whenever an automatic ventilator mode is selected. Fabius Tiro Operator’s Manual To download more items, go to ELM-FAN.IR... - Page 54 .ﻣراﺟﻌﮫ ﻓرﻣﺎﯾﯾدWWW.ELM-FAN.IRﺑرای داﻧﻠود ﻣوارد ﺑﯾﺷﺗر ﺑﮫ ﺳﺎﯾت To download more items, go to ELM-FAN.IR...
-
Page 55: Contents
Contents Chapter 4 – Preparation Preparation Contents Mounting the Fabius Tiro Onto A Wall ..............51 Activating the Battery ....................52 Gas Supply ......................53 Medical Gas Pipeline Supply of O2, N2O, and AIR ..........53 Cylinders with Threaded Connectors ..............54 Cylinders with Pin-index Mounting ................ - Page 56 .ﻣراﺟﻌﮫ ﻓرﻣﺎﯾﯾدWWW.ELM-FAN.IRﺑرای داﻧﻠود ﻣوارد ﺑﯾﺷﺗر ﺑﮫ ﺳﺎﯾت To download more items, go to ELM-FAN.IR...
-
Page 57: Mounting The Fabius Tiro Onto A Wall
(2), into the wall-mounted female dovetail assembly (3). 2. Tighten the retaining screw (4). 3. Place the Fabius Tiro Core Module (5) on top of the two swivel plate pins (6) so that the pins enter into the applicable Fabius Tiro Core Module pin holes. -
Page 58: Activating The Battery
8. Insert and tighten the two screws (2) into the bottom of the swivel plate (3). Activating the Battery Figure 54. Battery Fuse The Fabius Tiro anesthesia machine is shipped with the battery fuse disconnected in order to prevent discharge during shipment and storage prior to installation. -
Page 59: Gas Supply
Figure 1. Connect the N O hose (1) to the connector on the Fabius Tiro and to the wall terminal unit (4) of the medical gas pipeline system. 2. Connect the AIR hose (2) to the connector on the Fabius Tiro and to the wall terminal unit (4) of the medical gas pipeline system. -
Page 60: Connectors
4. Open the cylinder valves. Warning: cylinders are not to be installed in the Figure 57. Cylinder Holders right-side position when facing the rear of the machine. Fabius Tiro Operator’s Manual To download more items, go to ELM-FAN.IR... -
Page 61: Cylinders With Pin-Index Mounting
6. Verify that the washer is in place, the index pins are engaged, and the cylinder hangs vertically. 7. Tighten the yoke firmly. When required, the cylinder valve (8) is opened using the cylinder wrench (9) that is provided. Fabius Tiro Operator’s Manual To download more items, go to ELM-FAN.IR... -
Page 62: Electrical Supply
Figure 60. Ambu Ventilation Bag Ventilation Bag Hang the fully prepared and tested bag (1) on a wall rail (wall mounted Fabius Tiro) or on a trolley rail (trolley mounted Fabius Tiro). Fabius Tiro Operator’s Manual To download more items, go to ELM-FAN.IR... -
Page 63: Preparing The Ventilator
Such dust and particles can cause leaks in the system. 3. Tighten the absorber by turning it to the right into the compact breathing system. Fabius Tiro Operator’s Manual To download more items, go to ELM-FAN.IR... -
Page 64: Attaching The Inspiratory Valve
APL valve adjustment knob could interfere with proper functioning of this valve. Tighten the APL valve (9 in Figure 64) securely into place with the retaining nut. OP50001 Fabius Tiro Operator’s Manual To download more items, go to ELM-FAN.IR... -
Page 65: Inserting The Flow Sensor
Figure 67. Hose Connections for Compact Breathing breathing system until the plunger locks into System position. 4. Screw the fresh gas hose from the Fabius Tiro OP50011 (3) to the compact breathing system (4). 5. Screw the ventilation hose to the ventilator (5) and attach it to the conical connector ventilator port on the compact breathing system (6). -
Page 66: Installation Of Hbsps (Optional)
The following numbers in boldface refer to Figure 1. Install the power supply onto the left rear GCX rail of the Fabius Tiro by sliding the mounting plate of the power supply through the opening of the rail (1) and then sliding it upward. Tighten the knob (2) against the rail when the power supply is in the desired position. - Page 67 Figure 69. HBSPS Installation on Machine with Right Mount COSY – Step 1 (Trolley) (Trolley) 1. Install the power supply onto the left rear GCX rail of the Fabius Tiro by sliding the mounting plate of the power supply through the opening of the rail (1 in Figure 68) and then sliding it upward.
- Page 68 3. Clamp the power supply onto the rear area of the Figure 73. HBSPS Installation on Wall Mounted Machine – left hand Dräger rail (1 in Figure 73). Step 3 Fabius Tiro Operator’s Manual To download more items, go to ELM-FAN.IR...
- Page 69 Figure 75. HBSPS Installation on Wall Mounted Machine (Left Mount COSY) 2 Fabius Tiro Operator’s Manual To download more items, go to ELM-FAN.IR...
- Page 70 COSY (3 in Figure 76). Orient the connector so that the red mark on the connector plug aligns with the red mark on the receptacle. Fabius Tiro Operator’s Manual To download more items, go to ELM-FAN.IR...
-
Page 71: Connecting The Breathing Hoses
2. Remove the new sensor capsule from its packaging. 3. Insert the capsule (2) in the housing, with the ring-shaped conductors against the contacts in the housing. 4. Screw the cap (1) on firmly by hand. Fabius Tiro Operator’s Manual To download more items, go to ELM-FAN.IR... -
Page 72: Accessing The Connector Panel
Figure 81. Loosening The Swivel Plate Retention Knob 2. Turn the swivel plate retention knob (1) clockwise to loosen the Fabius Tiro module. 3. Rotate the Fabius Tiro module counterclockwise. Fabius Tiro Operator’s Manual To download more items, go to ELM-FAN.IR... -
Page 73: Connecting The O2 Sensor
Connect the pressure measuring line hose to the bacterial filter (2) and plug it firmly onto the port on the connector panel where the pressure label is shown: OP50025 Fabius Tiro Operator’s Manual To download more items, go to ELM-FAN.IR... -
Page 74: Connecting The Breathing Pressure Gauge (Optional)
“APL” on the connection panel (4). Note: The control hoses are connected together near the end of each hose. The APL bypass hose is larger than the PEEP/P hose. OP50023 Fabius Tiro Operator’s Manual To download more items, go to ELM-FAN.IR... -
Page 75: Connecting The Flow Sensor
A second transfer hose is required for the Semi-open compact breathing system. Note: Transfer hose with AGS (M33300) will be connected via cone adapter (30 mm) to waste gas port. OP50004 Fabius Tiro Operator’s Manual To download more items, go to ELM-FAN.IR... -
Page 76: Scavenger System For Fabius Tiro
Figure 90. Disconnecting the Compact Breathing System Adapter The following numbers in boldface refer to Figure 1. Disconnect the Fabius Tiro from the mains supply. 2. Disconnect the Fabius Tiro from the central pipeline gas supply. 3. Close all gas cylinders (if applicable). - Page 77 16. Connect all hoses, sensors, and control lines. 17. Install the APL valve. 18. Connect Fabius Tiro to the mains supply, and central pipeline gas supply. Fabius Tiro Operator’s Manual To download more items, go to ELM-FAN.IR...
-
Page 78: Removing The Semi-Open Adaptor And Installing The Co Absorber
12. Connect all hoses, sensors, and control lines. 13. Install the APL valve. 14. Connect Fabius Tiro to the mains supply and central pipeline gas supply. 15. Install the absorbent canister. Ensure that it is filled with fresh CO absorbent. -
Page 79: Additional Equipment
Prepare additional equipment as specified in the specific Instructions for Use. Caution: If monitors and other equipment are placed on top of Fabius Tiro, the risk of tipping over the unit is increased, especially when rolling over thresholds etc. Remove all monitors and other equipment from the top of the Fabius Tiro before moving the unit. - Page 80 .ﻣراﺟﻌﮫ ﻓرﻣﺎﯾﯾدWWW.ELM-FAN.IRﺑرای داﻧﻠود ﻣوارد ﺑﯾﺷﺗر ﺑﮫ ﺳﺎﯾت To download more items, go to ELM-FAN.IR...
-
Page 81: Contents
Switching Off the Ventilator .................. 87 Remove the O2 Sensor ..................87 Switching Off HBSPS (Optional) ................87 Switch Off System Power ..................88 Disconnect the Central Gas Supply ..............88 Fabius Tiro Operator’s Manual To download more items, go to ELM-FAN.IR... - Page 82 .ﻣراﺟﻌﮫ ﻓرﻣﺎﯾﯾدWWW.ELM-FAN.IRﺑرای داﻧﻠود ﻣوارد ﺑﯾﺷﺗر ﺑﮫ ﺳﺎﯾت To download more items, go to ELM-FAN.IR...
-
Page 83: Operation
Every component of the monitoring system is in satisfactory operational order. After a brief delay, the Standby screen appears. CONDITIONALLY FUNCTIONAL A noncritical fault was detected. The Fabius Tiro may be used, but call DrägerService (see “Daily and Preuse Checkout Form”... -
Page 84: Power-Up Standby Screen
96) and provides instructions on starting the operation of the Fabius Tiro. Ventilation Monitor Screen Figure 97. Ventilation Monitor Screen and System Controls When the Fabius Tiro is in use, monitoring information is displayed on the Ventilation Monitor screen. “Operating Concept” on page 21... -
Page 85: O2 Flush
) remains in the compact breathing system (and in the patient's lungs). If the unit will be used for a low-flow anesthesia case, press the O Flush to remove this N Fabius Tiro Operator’s Manual To download more items, go to ELM-FAN.IR... -
Page 86: Replacing Co2 Absorbent
Warning: Absorbent is caustic and is a strong irritant to the eyes, skin, and respiratory tract. When replacing the absorbent, take care not to spill its caustic contents. Fabius Tiro Operator’s Manual To download more items, go to ELM-FAN.IR... -
Page 87: Power Failure Backup
Plus or Drägersorb FREE. Power Failure Backup When AC power is interrupted from the Fabius Tiro, the internal battery backup will provide full operation of the ventilator and internal monitors for up to two hours after the power interruption. The battery depletion rate... -
Page 88: Ventilator Fail State
Ventilator Fail State The ventilator automatically switches to ManSpont Mode if the Fabius Tiro detects an internal fault. The clinician is alerted that ManSpont Mode has been initiated by a VENTILATOR FAIL warning message and audible alarm. -
Page 89: Overriding The Ventilator
If the diagnostic tests result in “FUNCTIONAL”, the Fabius Tiro will automatically switch to ManSpont mode if fresh gas flow is detected. Fabius Tiro respiratory monitoring is available. If the diagnostic tests result in NON- FUNCTIONAL, Manual ventilation is still possible but Fabius Tiro respiratory monitoring is not available. -
Page 90: Operation Of Hbsps (Optional)
These reactions can result in danger to the patient in the form of CO intoxication, insufficient depth of anesthesia and airway burns. Fabius Tiro Operator’s Manual To download more items, go to ELM-FAN.IR... - Page 91 (4 in Figure 107) is plugged into the power supply properly. 3. Check the two fuses in the power inlet assembly (3 in Figure 107). Replace them if they are blown. Fabius Tiro Operator’s Manual To download more items, go to ELM-FAN.IR...
-
Page 92: Preparation For Transport Or Storage
Switch Off the Anesthetic Agent Figure 108. Closing the Vaporizer Vaporizer (Dräger Vapor) Turn the handwheel (1 in Figure 108) to 0 until the button engages. Fabius Tiro Operator’s Manual To download more items, go to ELM-FAN.IR... -
Page 93: Switching Off The Ventilator
The HEATER POWER LED will darken (2 in Figure 110). 2. Unplug the power cord (3 in Figure 110) from the mains power outlet on the wall. Fabius Tiro Operator’s Manual To download more items, go to ELM-FAN.IR... -
Page 94: Switch Off System Power
Figure 112. Central Gas Supply 1. Remove all plug-in couplings from the wall terminal units. 2. Close gas cylinders. 3. Press the O Flush to depressurize the entire system. OP50012 Fabius Tiro Operator’s Manual To download more items, go to ELM-FAN.IR... -
Page 95: Contents
Breathing Pressure Monitoring Displays ............104 Breathing Pressure Monitor Controls ..............105 Setting the Pressure and Threshold Alarm Limits ..........105 Breathing Pressure Alarm Messages ..............106 Problem Resolution .................... 108 Fabius Tiro Operator’s Manual To download more items, go to ELM-FAN.IR... - Page 96 .ﻣراﺟﻌﮫ ﻓرﻣﺎﯾﯾدWWW.ELM-FAN.IRﺑرای داﻧﻠود ﻣوارد ﺑﯾﺷﺗر ﺑﮫ ﺳﺎﯾت To download more items, go to ELM-FAN.IR...
-
Page 97: Overview
Alarm Text Display Convention • Warnings are followed by three exclamation marks (!!!). • Cautions are followed by two exclamation marks (!!). • Advisories are followed by one exclamation mark (!). Fabius Tiro Operator’s Manual To download more items, go to ELM-FAN.IR... -
Page 98: Oxygen Monitoring
Oxygen Monitoring Oxygen Monitoring Monitoring Disabled The following oxygen monitoring functions are Figure 115. “No Integrated O2 Monitoring” Message disabled if the Fabius Tiro is configured by DrägerService to run using the “O Monitoring Disabled” option. • “Oxygen Monitor Window” on page 93 •... -
Page 99: Oxygen Monitor Window
Oxygen High Limit. The factory default value for Oxygen Low Limit is 20%. Procedure “Alarms” on page 91 to change the high or low alarm limit. Fabius Tiro Operator’s Manual To download more items, go to ELM-FAN.IR... -
Page 100: Calibrating The Oxygen Sensor
O2 SENSOR FAIL! Advisory message appears in the Alarm window, the calibration was not successful. An unsuccessful calibration can be caused by several conditions as described in Table 2 on page Fabius Tiro Operator’s Manual To download more items, go to ELM-FAN.IR... - Page 101 Fabius Tiro will not complete an attempted calibration; however, if the calibration gas is rich or lean but is within certain limits, the Fabius Tiro will complete the calibration. As a result, when displaying sensor measurements, the Fabius Tiro displays an oxygen percentage either higher or lower than the actual oxygen percentage.
-
Page 102: Oxygen Alarm Messages
If the O supply pressure fails and O is not being used by the Fabius Tiro, the circuit will remain pressurized and the O SUPPLY LOW alarm will not annunciate immediately. If pressure is reduced in this circuit by the use of O flush, etc., the alarm will annunciate when the... -
Page 103: Oxygen Monitoring Problem Resolution
Allow a waiting period equal to duration housing for a prolonged period. of capsule removal. New capsule not given proper waiting Allow 15 minute waiting period. period. Exhausted or faulty sensor capsule. Replace sensor capsule. Fabius Tiro Operator’s Manual To download more items, go to ELM-FAN.IR... -
Page 104: Respiratory Volume Monitoring
The flow sensor output is converted into meaningful readings for minute volume, tidal volume, and respiratory rate displays. Caution: Although the Fabius Tiro is designed to minimize the effects of ambient radio- frequency interference, the functioning of the respiratory volume monitor may be... -
Page 105: Respiratory Volume Monitor Display
The numeric data is displayed in units of liters/minute (L/min). • Minute Volume Alarm Low Limit ( Indicates the volume below which an alarm condition occurs. The numeric data is displayed in units of liters/minute (L/min). Fabius Tiro Operator’s Manual To download more items, go to ELM-FAN.IR... -
Page 106: Respiratory Volume Monitor Controls
While the ventilator is off and the system is in ManSpont mode, these alarms are generated at 30 seconds (Caution) and 60 seconds (Warning). The Fabius Tiro's volume alarms are automatically enabled when the ventilator is switched from Standby to a ventilation mode. -
Page 107: Respiratory Volume Alarm Messages
APNOEA FLOW (Warning/Caution) The Fabius Tiro continuously monitors the expiratory flow in the patient breathing system. By processing the expiratory flow pattern, the monitor can determine whether a valid breath has occurred. A valid breath has a tidal volume of 20 mL or greater. - Page 108 Expiratory volume during inspiration is greater than 15 mL. MINUTE VOLUME HIGH (Caution) Whenever the Fabius Tiro measures a minute volume higher than the high minute volume alarm limit, the Caution message MINUTE VOLUME HIGH!! appears in the Alarm window, and an intermittent audible alarm sounds.
-
Page 109: Respiratory Volume Monitoring Problem Resolution
External agent analyzer providing Check agent analyzer. Check inaccurate data through the communications cable. Disconnect communications port. analyzer from the Fabius Tiro and set “Des Comp” appropriately. Fabius Tiro Operator’s Manual To download more items, go to ELM-FAN.IR... -
Page 110: Breathing Pressure Monitoring
Configuration screen (see “Configuration” on page 130). Note: The Fabius Tiro can be configured by DrägerService to display mean pressure (MEAN) instead of plateau pressure (PLAT). The following numbers in boldface refer to Figure 126. Breathing Pressure Monitor Window Figure 126. -
Page 111: Breathing Pressure Monitor Controls
4 cmH O (mbar, hPa) below the plateau pressure. Procedure “Alarms” on page 91 to change the pressure high alarm limit. Fabius Tiro Operator’s Manual To download more items, go to ELM-FAN.IR... -
Page 112: Breathing Pressure Alarm Messages
Note: When the system is in ManSpont Mode, the APNOEA PRESSURE alarm defaults to OFF. Fabius Tiro Operator’s Manual To download more items, go to ELM-FAN.IR... - Page 113 Alarm window and an intermittent audible alarm sounds. PEEP HIGH (Advisory) During ManSpont Mode (Advisory) Alarm annunciation occurs when the measured PEEP is greater than 4 cmH O (mbar, hPa). Fabius Tiro Operator’s Manual To download more items, go to ELM-FAN.IR...
-
Page 114: Problem Resolution
SIMV/PS mode, the Advisory message INSP PRES NOT REACH! appears in the Alarm window. PRESSURE SENSOR FAIL (Advisory) If the Fabius Tiro detects a faulty or miscalibrated sensor, the Advisory message PRESSURE SENSOR FAIL! appears in the Alarm window. If this happens, call DrägerService (see... -
Page 115: Contents
Calibrate O2 Sensor ....................112 Activate Desflurane Compensation ............... 113 Automatic Desflurane Compensation ..............114 Access Alarm Log ....................114 Access Alarm Volume ................... 115 Window Deactivation ..................... 115 Fabius Tiro Operator’s Manual To download more items, go to ELM-FAN.IR... - Page 116 .ﻣراﺟﻌﮫ ﻓرﻣﺎﯾﯾدWWW.ELM-FAN.IRﺑرای داﻧﻠود ﻣوارد ﺑﯾﺷﺗر ﺑﮫ ﺳﺎﯾت To download more items, go to ELM-FAN.IR...
-
Page 117: Overview
The following soft key labels appear in the Setup Figure 129. Setup Window window: • Volume Alarms On/Off • Auto Set • Calibrate O2 Sensor • Des Comp On/Off • Access Alarm Log • Access Alarm Volume Fabius Tiro Operator’s Manual To download more items, go to ELM-FAN.IR... -
Page 118: Volume Alarms On/Off
“Inserting A New O2 Sensor Capsule” on page If the O sensor still can not be calibrated, call DrägerService (see “Daily and Preuse Checkout Form” for DrägerService contact information). Fabius Tiro Operator’s Manual To download more items, go to ELM-FAN.IR... -
Page 119: Activate Desflurane Compensation
Note: Desflurane has characteristics that affect the sensitivity of the Fabius Tiro flow sensor. To help assure that the volume measurements from the monitor are accurate, activate Desflurane compensation when Desflurane is used in the breathing circuit. -
Page 120: Automatic Desflurane Compensation
Automatic Desflurane Figure 135. Automatic Desflurane Compensation Compensation Des auto If Desflurane concentration data is communicated to the Fabius Tiro by an external agent analyzer, the following occurs: • "Des auto" appears at the top of the Setup window (1 in... -
Page 121: Access Alarm Volume
15 seconds, the Setup window is deactivated and the Waveform window is activated. Another way to deactivate the Setup window and activate the Waveform window is to press the Home key. Fabius Tiro Operator’s Manual To download more items, go to ELM-FAN.IR... - Page 122 .ﻣراﺟﻌﮫ ﻓرﻣﺎﯾﯾدWWW.ELM-FAN.IRﺑرای داﻧﻠود ﻣوارد ﺑﯾﺷﺗر ﺑﮫ ﺳﺎﯾت To download more items, go to ELM-FAN.IR...
-
Page 123: Contents
Calibrate O2 Sensor ................... 121 Leak / Compliance Test ..................122 Access Alarm Log ....................123 Restore Site Defaults ..................123 Standby Setup Screen ................... 123 Default Settings ....................124 Configuration ...................... 130 Fabius Tiro Operator’s Manual To download more items, go to ELM-FAN.IR... - Page 124 .ﻣراﺟﻌﮫ ﻓرﻣﺎﯾﯾدWWW.ELM-FAN.IRﺑرای داﻧﻠود ﻣوارد ﺑﯾﺷﺗر ﺑﮫ ﺳﺎﯾت To download more items, go to ELM-FAN.IR...
-
Page 125: Overview
(Figure 139). Once all gas flow control valves are shut off, the flow detection alarm message disappears (Figure 140). Figure 140. Standby Screen Fabius Tiro Operator’s Manual To download more items, go to ELM-FAN.IR... -
Page 126: Sleep Mode
If the Flow sensor can not be calibrated, retry the calibration. If the Flow sensor still can not be calibrated, call DrägerService (see “Daily and Preuse Checkout Form” for DrägerService contact information). Fabius Tiro Operator’s Manual To download more items, go to ELM-FAN.IR... -
Page 127: Calibrate O2 Sensor
A New O2 Sensor Capsule” on page 65). If the O sensor still can not be calibrated, call DrägerService (see “Daily and Preuse Checkout Form” for DrägerService contact information). Fabius Tiro Operator’s Manual To download more items, go to ELM-FAN.IR... -
Page 128: Leak / Compliance Test
Figure 152. Leak / Compliance Test Instruction Screen Instruction screen. Upon completion of the instructions, the Leak / Compl Test Results screen appears (Figure 153 on page 122). Figure 153. Leak / Compliance Test Results Screen Fabius Tiro Operator’s Manual To download more items, go to ELM-FAN.IR... -
Page 129: Standby Setup Screen
In Standby mode, press the Setup key. The Standby Setup screen (Figure 156) replaces the Standby Screen. The cursor, which appears over “Default Settings”, enables you to select “Default Settings” or “Configuration”. Fabius Tiro Operator’s Manual To download more items, go to ELM-FAN.IR... -
Page 130: Default Settings
156). The Default Settings Items are: • Volume Settings • Pressure Settings • Pressure Support Settings • SIMV/PS settings • Alarm Limits • Alarm Volume • Restore Factory Defaults Fabius Tiro Operator’s Manual To download more items, go to ELM-FAN.IR... - Page 131 Pressure, Pressure Support, or SIMV/PS Settings Use the process example in “Volume Settings (IPPV)” and change the parameters associated with each ventilator mode. Fabius Tiro Operator’s Manual To download more items, go to ELM-FAN.IR...
- Page 132 4. Confirm the new setting value. The new setting is saved and the cursor appears over the return arrow. 5. Repeat steps 2 through 4 for setting other setting values. Fabius Tiro Operator’s Manual To download more items, go to ELM-FAN.IR...
- Page 133 Apnoea Pressure Threshold – The Apnoea Pressure Threshold Limit range is from 5 to 30 cmH O (mbar, hPa). The factory default value is 8 cmH O (mbar, hPa). Fabius Tiro Operator’s Manual To download more items, go to ELM-FAN.IR...
- Page 134 The new alarm volume value is saved and the Default Alarm Volume Setting window disappears. Note: The value “1” is the minimum and the value of “10” is the maximum. Fabius Tiro Operator’s Manual To download more items, go to ELM-FAN.IR...
- Page 135 TIP:TI = 10 Alarm Default Settings for O • High = 100 • Low = 20 Alarm Default Settings for MV • High = 12.0 • Low = 3.0 Fabius Tiro Operator’s Manual To download more items, go to ELM-FAN.IR...
-
Page 136: Configuration
The Configuration Items are: • Time Set • Time Format • Date Set • Date Format • Language • Pressure Units • Acoustic Confirmation • Alarm Tone Sequence • Waveform Display Fabius Tiro Operator’s Manual To download more items, go to ELM-FAN.IR... - Page 137 The new time values are saved, the Time Set window disappears, and the cursor in the Configuration column appears over “Time Set”. Note: This three-step process also applies to “Date Set” on page 132. Fabius Tiro Operator’s Manual To download more items, go to ELM-FAN.IR...
- Page 138 “Time Set” and “Date Set”. Date Set Figure 173. Standby Setup Screen Configure Date Set Select The values that can be selected are numerical values applicable to day, month, and two-digit year. Fabius Tiro Operator’s Manual To download more items, go to ELM-FAN.IR...
- Page 139 Select Pressure Unit Figure 176. Standby Setup Screen Configure Pressure Units The values that can be selected are hPa (Hecto Pascal), cmH O (centimeters of water), and mbar (millibar). Fabius Tiro Operator’s Manual To download more items, go to ELM-FAN.IR...
- Page 140 Alarm Tone Sequence Figure 178. Standby Setup Screen Alarm Tone Sequence Select The values that you can select are ”Dräger” and “EN 740”. Fabius Tiro Operator’s Manual To download more items, go to ELM-FAN.IR...
- Page 141 The values that you can select are “Normal” and “Filled”. If “Normal” is selected, the waveform is not filled with a solid pattern, but appears as a line (1 in Figure 180). Figure 180. Normal Waveform Display Fabius Tiro Operator’s Manual To download more items, go to ELM-FAN.IR...
- Page 142 .ﻣراﺟﻌﮫ ﻓرﻣﺎﯾﯾدWWW.ELM-FAN.IRﺑرای داﻧﻠود ﻣوارد ﺑﯾﺷﺗر ﺑﮫ ﺳﺎﯾت To download more items, go to ELM-FAN.IR...
- Page 143 Recommended Infectious Patient Equipment Schedules ........144 Maintenance Intervals ................... 145 When Required ....................145 Every 6 Months ....................145 Annually ......................145 After 3 Years ....................... 145 Checking Readiness for Operation ............... 145 Fabius Tiro Operator’s Manual To download more items, go to ELM-FAN.IR...
- Page 144 .ﻣراﺟﻌﮫ ﻓرﻣﺎﯾﯾدWWW.ELM-FAN.IRﺑرای داﻧﻠود ﻣوارد ﺑﯾﺷﺗر ﺑﮫ ﺳﺎﯾت To download more items, go to ELM-FAN.IR...
-
Page 145: Routine Maintenance
Preparing the Compact Breathing System 1. Remove all breathing hoses. 2. Remove the breathing bag. 3. Remove both microbial filters and prepare in accordance with the specific Instructions for Use. Fabius Tiro Operator’s Manual To download more items, go to ELM-FAN.IR... -
Page 146: Dismantling The Inspiratory Valve
Warning: Absorbent is caustic and is a strong irritant to the eyes, skin, and respiratory tract. When replacing the absorbent, take care not to spill its caustic contents. Fabius Tiro Operator’s Manual To download more items, go to ELM-FAN.IR... -
Page 147: Dismantling Parts Of The Ventilator
2. Disconnect the ventilator chamber pressure sensor line (2) from the ventilator chamber pressure sensor line port (3). 3. Unlock the three clasps (4) to remove the cover (5). 4. Remove the diaphragm (6). Fabius Tiro Operator’s Manual To download more items, go to ELM-FAN.IR... -
Page 148: Disinfecting/Cleaning/Autoclaving
.ﻣراﺟﻌﮫ ﻓرﻣﺎﯾﯾدWWW.ELM-FAN.IRﺑرای داﻧﻠود ﻣوارد ﺑﯾﺷﺗر ﺑﮫ ﺳﺎﯾت Chapter 9 – Routine Maintenance and Cleaning Disinfecting/Cleaning/Autoclaving Disinfecting/Cleaning/Autoclaving Clean and autoclave the Fabius Tiro Anesthesia Workstation and its parts according to the guidelines below. Follow your institution's policies regarding specific methods and agents for cleaning and sterilization. -
Page 149: Recommended Non-Infectious Patient Equipment Schedules
1 = Per patient; 2 = Daily; 3 = Weekly; 4 = Monthly; * = Front daily, other surfaces weekly Caution: Ensure that subsystems have been thoroughly aerated following cleaning and disinfection activities. Table 6. Schedules for Fabius Tiro Anesthesia Workstation with Non-infectious Patients With Filter on Inspiratory Components Processed... -
Page 150: Recommended Infectious Patient Equipment Schedules
Warning: When used with infectious patients, all parts in contact with breathing gas must additionally be autoclaved after cleaning and disinfection. Table 7. Schedules for Fabius Tiro Anesthesia Workstation with Infectious Patients With Filter on Inspiratory Components Processed With Filter on Y-Piece... -
Page 151: Maintenance Intervals
Replace the diaphragm and O-rings of the ventilator (piston). • Replace breathing system canister assembly and associated seals. Checking Readiness for Operation Refer to “Daily and Preuse Checkout Form” Appendix A. Fabius Tiro Operator’s Manual To download more items, go to ELM-FAN.IR... - Page 152 .ﻣراﺟﻌﮫ ﻓرﻣﺎﯾﯾدWWW.ELM-FAN.IRﺑرای داﻧﻠود ﻣوارد ﺑﯾﺷﺗر ﺑﮫ ﺳﺎﯾت To download more items, go to ELM-FAN.IR...
-
Page 153: Chapter 10. Troubleshooting
.ﻣراﺟﻌﮫ ﻓرﻣﺎﯾﯾدWWW.ELM-FAN.IRﺑرای داﻧﻠود ﻣوارد ﺑﯾﺷﺗر ﺑﮫ ﺳﺎﯾت Contents Chapter 10 – Troubleshooting Troubleshooting Contents Table 8. Alarm Message, Probable Cause, and Remedy ........149 Fabius Tiro Operator’s Manual To download more items, go to ELM-FAN.IR... - Page 154 .ﻣراﺟﻌﮫ ﻓرﻣﺎﯾﯾدWWW.ELM-FAN.IRﺑرای داﻧﻠود ﻣوارد ﺑﯾﺷﺗر ﺑﮫ ﺳﺎﯾت To download more items, go to ELM-FAN.IR...
- Page 155 Leak or disconnect the breathing circuit. Check breathing circuit. Spontaneous patient breaths are not A spontaneous patient breath is detected by the detected by the Fabius Tiro. Fabius Tiro. Pressure Support settings are incorrect. Check Pressure Support settings. BATTERY LOW AC failure and battery <...
- Page 156 External monitor cable disconnected from Check monitor interface cable. External Communication Port 1. RS232 COM2 FAIL External monitor cable disconnected from Check monitor interface cable. External Communication Port 2. Fabius Tiro Operator’s Manual To download more items, go to ELM-FAN.IR...
- Page 157 Check diaphragm and close cover. Check PEEP/PMAX line for disconnect or leak. Select Standby Mode and switch back to the previous ventilation mode. VOLUME ALARMS OFF Volume alarms turned off by operator. Fabius Tiro Operator’s Manual To download more items, go to ELM-FAN.IR...
- Page 158 .ﻣراﺟﻌﮫ ﻓرﻣﺎﯾﯾدWWW.ELM-FAN.IRﺑرای داﻧﻠود ﻣوارد ﺑﯾﺷﺗر ﺑﮫ ﺳﺎﯾت To download more items, go to ELM-FAN.IR...
-
Page 159: Contents
Contents Chapter 11 – Components Components Contents Front View ......................155 Compact Breathing System (Top View) ..............156 Rear View (Connector Panel) ................157 Gas Supply Connections ..................158 Fabius Tiro Operator’s Manual To download more items, go to ELM-FAN.IR... - Page 160 .ﻣراﺟﻌﮫ ﻓرﻣﺎﯾﯾدWWW.ELM-FAN.IRﺑرای داﻧﻠود ﻣوارد ﺑﯾﺷﺗر ﺑﮫ ﺳﺎﯾت To download more items, go to ELM-FAN.IR...
-
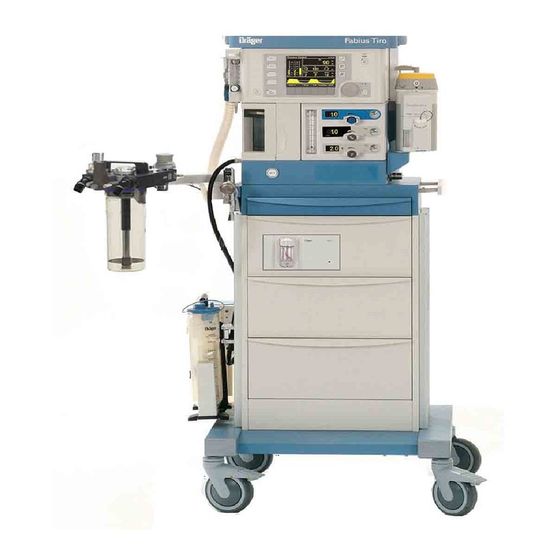
Page 161: Front View
3 Dräger Vapor anesthetic agent vaporizer 4 Oxygen flush 5 Total fresh gas flowmeter 6 Ventilator 7 Ventilator control panel (settings for ventilation parameters and airway monitoring) 8 Ventilator hose Fabius Tiro Operator’s Manual To download more items, go to ELM-FAN.IR... -
Page 162: Compact Breathing System (Top View)
APL Bypass valve connection port PEEP/PMAX valve connection port Inspiratory valve Expiratory valve Inspiratory port Connector for breathing bag Sample gas return port Expiration port 10 Airway Pressure Gauge (Optional) Fabius Tiro Operator’s Manual To download more items, go to ELM-FAN.IR... -
Page 163: Rear View (Connector Panel)
Figure 184. Connector Panel at Back of Machine OP00692 T 2.5A TA 3.15A 1 COM1 RS-232 port 2 COM2 RS-232 port (optional) 3 Power cable connection 4 On/off switch 5 Battery fuse Fabius Tiro Operator’s Manual To download more items, go to ELM-FAN.IR... -
Page 164: Gas Supply Connections
Figure 185. Gas Supply Connections 1 Connectors for medical gas pipeline supply (central supply) 2 Connector for O cylinder with threaded connector 3 Connector for gas cylinder supply (reserve supply) (trolley mount only) Fabius Tiro Operator’s Manual To download more items, go to ELM-FAN.IR... -
Page 165: Contents
Low Oxygen Supply Pressure Alarm ..............169 S-ORC (Sensitive Oxygen Ratio Controller) ............169 Fresh Gas Flow Indicators (O2, N2O, Air) ............169 Serial Interface ....................170 Diagrams ....................... 171 Fabius Tiro Operator’s Manual To download more items, go to ELM-FAN.IR... - Page 166 .ﻣراﺟﻌﮫ ﻓرﻣﺎﯾﯾدWWW.ELM-FAN.IRﺑرای داﻧﻠود ﻣوارد ﺑﯾﺷﺗر ﺑﮫ ﺳﺎﯾت To download more items, go to ELM-FAN.IR...
-
Page 167: Chapter 12. Technical Data
C at ambient temperature Dew point <0.1 mg/m Oil content Particles –6 dust-free air (filtered with pores <1 x10 70 psi (4.8 bar) Internal Regulator Safety Relief Valve Pressure Fabius Tiro Operator’s Manual To download more items, go to ELM-FAN.IR... - Page 168 26.0 lbs. / 11.8 kg Fabius Tiro Wall Mount Total 105.5 lbs. / 47.8 kg Fabius Tiro Trolley Mount Fabius Tiro Core Module with two pin index cylinder yokes 69.5 lbs. / 31.5 kg COSY 15.5 lbs. / 7.0 kg Trolley 120.0 lbs.
-
Page 169: Fuses
EN 60601-1-2 and IEC 60601-1-2. Electrical Safety Conformance Conforms to: • UL2601 • IEC 60601-1, 1996 • CAN/CSA No. 601-1 • CAN/CSA-C22.2 No. 601.1-M90 • EN 740, 1998 • IEC 60601-2-13 Fabius Tiro Operator’s Manual To download more items, go to ELM-FAN.IR... -
Page 170: Ventilator
Inspiration pause ±25% of setting PEEP End-expiratory pressure ±2 cmH O* or ±20% of setting, whichever is greater High Pressure Safety Relief Valve 75 ±5 cmH O (hPa, mbar) Fabius Tiro Operator’s Manual To download more items, go to ELM-FAN.IR... -
Page 171: Anesthesia Gas Supply Module
1.0 L/min from 2 to 10 L/min flush (bypass): at 55 psi (3.8 bar): max. 50 L/min at 50 psi (3.4 bar): min. 35 L/min Common Gas Outlet Pressure Limit: 13 psi (0.9 bar), maximum Fabius Tiro Operator’s Manual To download more items, go to ELM-FAN.IR... -
Page 172: Anesthetic Agent Vaporizer Interface
O, whichever is greater. † At standard test conditions per EN740 Annex DD and fresh gas flow = 2 times Ve. ‡ ATPS = Ambient Temperature Pressure Saturated Gas Fabius Tiro Operator’s Manual To download more items, go to ELM-FAN.IR... -
Page 173: Breathing System
Pressure Required to Open a Wet Unidirectional Valve Moist: 1.5 cmH (Tested in accordance with EN740) Pressure Generated by a Wet Unidirectional Valve Moist: 3.1 cmH O (Tested in accordance with EN740) Fabius Tiro Operator’s Manual To download more items, go to ELM-FAN.IR... -
Page 174: Hbsps Technical Data (Optional)
.ﻣراﺟﻌﮫ ﻓرﻣﺎﯾﯾدWWW.ELM-FAN.IRﺑرای داﻧﻠود ﻣوارد ﺑﯾﺷﺗر ﺑﮫ ﺳﺎﯾت Chapter 12 – Technical Data Technical Data HBSPS Technical Data (Optional) The Fabius Tiro can be configured with a heated breathing system to reduce condensation of moisture in the system. Electrical AC Input Voltage and Current 100 to 240 VAC, 50 to 60 Hz nominal, single phase, 0.6 Amps max. -
Page 175: Low Oxygen Supply Pressure Alarm
Range: 0.0 to 12.0 L/min, minimum Resolution: 0.1 L/min Accuracy (into an ambient atmosphere of 14.7 psi (101.3 kPa): ±10% or 0.12 L/min, whichever is greater. at 20 °C. Fabius Tiro Operator’s Manual To download more items, go to ELM-FAN.IR... -
Page 176: Serial Interface
Serial Interface Type: RS-232 Baud Rates: 1200, 2400, 4800, 9600, 19.2K, 38.4K Parity: Odd, Even, None Data Bits: 7 or 8 Stop Bits: 1 or 2 Protocol: Vitalink. Medibus Fabius Tiro Operator’s Manual To download more items, go to ELM-FAN.IR... -
Page 177: Diagrams
Chapter 12 – Technical Data Diagrams Figure 187. Gas flow diagram (Compact Breathing System) OP50013 Ventilator setting Pmax/ Peep Fresh Gas Decoupling Fresh gas APL- APL Bypass Valve Absorber Scavenging Fabius Tiro Operator’s Manual To download more items, go to ELM-FAN.IR... - Page 178 Chapter 12 – Technical Data Diagrams Figure 188. Gas Flow Diagram (Semi-Open Compact Breathing System) OP50018 Ventilator setting Pmax/ Peep Fresh Gas Decoupling Fresh gas Semi-Open APL- APL Bypass Adapter Valve Scavenging Scavenging Fabius Tiro Operator’s Manual To download more items, go to ELM-FAN.IR...
- Page 179 .ﻣراﺟﻌﮫ ﻓرﻣﺎﯾﯾدWWW.ELM-FAN.IRﺑرای داﻧﻠود ﻣوارد ﺑﯾﺷﺗر ﺑﮫ ﺳﺎﯾت Diagrams Chapter 12 – Technical Data Figure 189. Schematic Diagram of Internal Gas Flow Fabius Tiro Operator’s Manual To download more items, go to ELM-FAN.IR...
- Page 180 .ﻣراﺟﻌﮫ ﻓرﻣﺎﯾﯾدWWW.ELM-FAN.IRﺑرای داﻧﻠود ﻣوارد ﺑﯾﺷﺗر ﺑﮫ ﺳﺎﯾت To download more items, go to ELM-FAN.IR...
-
Page 181: Appendix. Daily And Preuse Checkout Form
Appendix – Daily and Preuse Checkout Form Daily and Preuse Checkout Form Before operating the Fabius Tiro, the following checkout verification form must be completed to ensure that the machine is ready for use. Do not insert any additional components into or modify the anesthesia system after the checkout procedure is started. - Page 182 .ﻣراﺟﻌﮫ ﻓرﻣﺎﯾﯾدWWW.ELM-FAN.IRﺑرای داﻧﻠود ﻣوارد ﺑﯾﺷﺗر ﺑﮫ ﺳﺎﯾت To download more items, go to ELM-FAN.IR...
- Page 183 Tiro. The clinician need only use those areas that apply ❐ Visually inspect all gas supplies from the to their specific Fabius Tiro configuration. medical gas pipeline system and cylinders to All checks must be carried out daily before equipment make sure that they connect properly and fit is used.
- Page 184 Key-indexed filling system; Sealing key or pin inserted and closed tight. (when present) Filler opening locked shut. ❐ Quik Fil or Funnel filling system; Locking screw tight (when present) Fabius Tiro Operator’s Manual To download more items, go to ELM-FAN.IR...
- Page 185 In the following checklist, please note that there are ❐ Disconnect the fresh gas hose. three boxes for each item to be checked. Box A = Fabius Tiro, No Vaporizers ❐ Put the test adapter on the fresh gas hose Box B = Fabius Tiro, Single Vaporizer and connect to the patient Y-piece.
- Page 186 Ensure that the underside of the COSY is warm (approximately 35-40°C) after ❐ Check the anesthetic agent monitor and 30 minutes have elapsed since the “HEATER alarm module. POWER ON” LED was illuminated. Fabius Tiro Operator’s Manual To download more items, go to ELM-FAN.IR...
- Page 187 Preuse Checkout Signature (the bag is in place and all hoses are connected properly) Name Date If any check can not be carried out satisfactorily, the machine must not be used. Fabius Tiro Operator’s Manual To download more items, go to ELM-FAN.IR...
- Page 188 Preuse Checkout Signature Preuse Checkout Signature Name Name Date Date Preuse Checkout Signature Preuse Checkout Signature Name Name Date Date Preuse Checkout Signature Preuse Checkout Signature Name Name Date Date viii Fabius Tiro Operator’s Manual To download more items, go to ELM-FAN.IR...
- Page 189 .ﻣراﺟﻌﮫ ﻓرﻣﺎﯾﯾدWWW.ELM-FAN.IRﺑرای داﻧﻠود ﻣوارد ﺑﯾﺷﺗر ﺑﮫ ﺳﺎﯾت To download more items, go to ELM-FAN.IR...
- Page 190 These Instructions for Use apply only .ﻣراﺟﻌﮫ ﻓرﻣﺎﯾﯾدWWW.ELM-FAN.IRﺑرای داﻧﻠود ﻣوارد ﺑﯾﺷﺗر ﺑﮫ ﺳﺎﯾت Fabius Tiro with Serial No.: If no Serial No. has been filled in by Dräger these Instructions for Use are provided for general information only and are not intended for use with any specific machine or device.
Need help?
Do you have a question about the Fabius Tiro and is the answer not in the manual?
Questions and answers