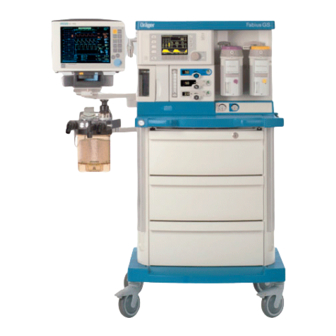
Dräger Medical Fabius GS Assembly And Installation Manual
Auxiliary fresh gas outlet
Hide thumbs
Also See for Fabius GS:
- Technical & service manual (76 pages) ,
- Technical & service manual (366 pages) ,
- Technical & service manual (350 pages)
Advertisement
Field Service Procedure
Assembly and Installation of Auxiliary Fresh Gas Outlet on Fabius GS®
Australia/New Zealand
Anesthesia
Emergency Care • OR/ Anesthesia • Critical Care • Home Care
RETURN TO SERVICE PROCEDURE TABLE OF CONTENTS
RETURN TO CD-ROM TABLE OF CONTENTS
Revision -
11/18/03
SP00298
Because you care
Advertisement
Table of Contents

Related Manuals for Dräger Medical Fabius GS


Summary of Contents for Dräger Medical Fabius GS
- Page 1 RETURN TO SERVICE PROCEDURE TABLE OF CONTENTS RETURN TO CD-ROM TABLE OF CONTENTS Field Service Procedure Assembly and Installation of Auxiliary Fresh Gas Outlet on Fabius GS® Australia/New Zealand Anesthesia Revision - 11/18/03 SP00298 Because you care Emergency Care • OR/ Anesthesia • Critical Care • Home Care...
- Page 2 In order to accommodate either left side mounted or right side mounted tions breathing systems on the Fabius GS, the Auxiliary Fresh Gas Outlet need to be assembled to match mounting location. The provided material and design allows for either configuration.
- Page 3 RETURN TO SERVICE PROCEDURE TABLE OF CONTENTS RETURN TO CD-ROM TABLE OF CONTENTS Auxiliary Fresh Gas Outlet Service Procedure Fig. 1 Auxiliary Fresh Gas Outlet Assembly 1. Using two button head screws (4), two lock washers (6), and two acorn nuts (5), mount the Auxiliary Fresh Gas Bracket (2) to the GCX Slide Plate (3) as shown in Fig.
- Page 4 RETURN TO SERVICE PROCEDURE TABLE OF CONTENTS RETURN TO CD-ROM TABLE OF CONTENTS Service Procedure Auxiliary Fresh Gas Outlet Fig. 3 Right Side Assembly Configuration 4. Verify the Machine is in Standby mode and all flow control valves are closed. Remove gas supplies and depressurize system. 5.
- Page 5 RETURN TO SERVICE PROCEDURE TABLE OF CONTENTS RETURN TO CD-ROM TABLE OF CONTENTS Auxiliary Fresh Gas Outlet Service Procedure Installation Instruc- tions NOTE: If you are using an A-Cone switch, install it on the Auxiliary Fresh Gas Out- let and connect the Fresh Gas Hose to one of the A-Cone ports. Set the selector lever for the appropriate port.
- Page 6 RETURN TO SERVICE PROCEDURE TABLE OF CONTENTS RETURN TO CD-ROM TABLE OF CONTENTS Service Procedure Auxiliary Fresh Gas Outlet Fig. 4 Auxiliary Fresh Gas Outlet Left Side Mount Dräger Medical, Inc. SP00298 Revision - Released...
- Page 7 RETURN TO SERVICE PROCEDURE TABLE OF CONTENTS RETURN TO CD-ROM TABLE OF CONTENTS Auxiliary Fresh Gas Outlet Service Procedure Fig. 5 Auxiliary Fresh Gas Outlet Right Side Mount Dräger Medical, Inc. SP00298 Revision - Released...
- Page 8 Tel: (++49) (0) 1805-3723437 (800) 543-5047 Fax: (++49) 451/882 - 3779 Fax: (215) 721-5785 Assembly and Installation of Auxiliary Fresh Gas Outlet on Fabius GS® Australia/New Zealand en SP00298 Subject to change without notice. Will not be replaced in the event of modifications.
Need help?
Do you have a question about the Fabius GS and is the answer not in the manual?
Questions and answers