Advertisement
Quick Links
Advertisement

Related Manuals for Neoline G-TECH X50


Summary of Contents for Neoline G-TECH X50
- Page 1 NEOLINE G-TECH X50 TWO-CHANNEL DASHBOARD CAMERA User Manual...
-
Page 2: Table Of Contents
Dear customer! Thank you for purchasing NEOLINE G-TECH X50 car digital video recorder (DVR)! Please read this manual carefully and all through to ensure proper use and longer service life of the device. Keep the user manual to consult it when necessary. -
Page 3: Operation Conditions
1. Operation Conditions • Please read the warranty terms carefully. • In case of any inadequate operation of your Neoline DVR, please be sure to have the device software updated before contacting your service centre/vendor/other authorized institution. The latest FW version is available at http://neoline.com/update/ and here you can also find how to get the update. - Page 4 • Install the DVR in such a way as to get the maximum field of view. DO NOT place the DVR in a place where it can block the view and compromise your safe driving. Neoline and its authorized partners take NO responsibility for any data lost or damaged due to improper installation of the holder.
-
Page 5: Specifications
This user manual is valid at the time of printing. Please check for any updates at www.neoline.com You may download this manual by pressing Download button on product page. -
Page 6: Package Contents
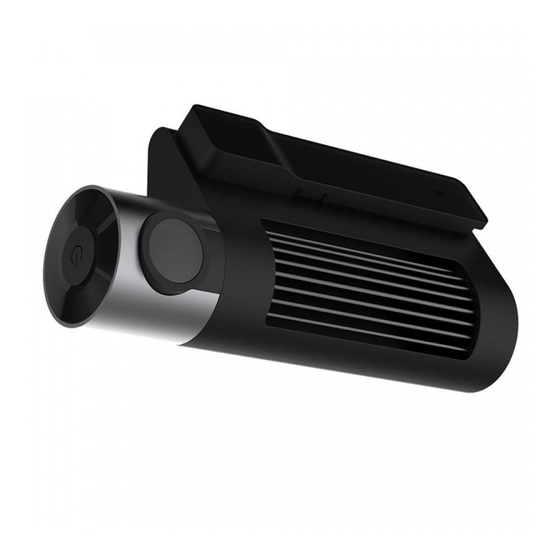
3. Package Contents • 4G Cloud Dash Camera Neoline G-Tech X50 • 3M Stick Base Bracket • Power Adapter Cable • GPS Antenna • Manual • Warranty • Rear Camera 4. Product Description Main key: Wi-Fi ON&OFF / Restart (Press 3 seconds to disable / enable Wi-Fi. -
Page 7: Dvr Installation
Note: Insert SIM Card only when the device is power off. 5. DVR Installation Installation on the windshield - Choose the installation location in advance, as the adhesive tape on the mount is of single use. - Degrease the mounting location and warm it up to ensure strong adhesion. - Sit the DVR onto the mount and turn the DVR on. - Page 8 Adjusting the viewing angle NOTE! Adjusting the viewing angle can only be done along the vertical line, so be sure to position the device correctly on the windshield along the horizontal line as close as possible to the windshield's center. While pulling or pushing the device in the holder, ensure that the camera captures the image in proportion of 30% sky / 70% road.
-
Page 9: Device Operation
6. Device Operation Loop recording 1) Please insert the microSD card into the memory card slot; the Loop Recording mode turns on automatically. 2) It is recommended to set a 3-minute cycle (see Settings). 3) The device will automatically replace the oldest video file with the newest one when there is no more space left on the memory card;... -
Page 10: App Settings And Applications
7. APP settings and Applications APP download and installation Please scan QR code by smart phone (iOS & ANdroid), download and install APP “iCloudCar”, or search “iCloudCar” from App Store and Google Play to download and install directly. Main Interface Open APP, when the device isn’t conecetd, the main interface is as in the picture:... - Page 11 Real-time Video Preview Wi-Fi connect/Remotely connect and Bind Device: 1. Wi-Fi connect: Press the main key for 3 second to enable Wi-Fi, searching Wi-Fi on phone, find the Wi-Fi hotspot named by the last four digits of the device IMEI number.
- Page 12 Preview: After connection, click the play button in the video preview window then it shows (as below image), the functions corresponding to the icons are illustrated as below: 1. SIM Card Signal 2. Cloud Server Icon 3. Micro SD Card Icon 4.
- Page 13 Monitor Click “Position” on the main interface. User can get the current GPS location information of the device. 1. Access to the real-time image. 2. Access to the real-time video, video of 5 / 15 / 30 seconds optional. 3. User can set up voice broadcast, while enter text in the input box, then transmit to the device by voice broadcast.
- Page 14 Note: User can playback the video in both wi-Fi and Remote mode. Track Click “Track” on the main interface. User can view the track record of driving. Save track records for up to one month. Geo-Fence Click “Fence” on the main interface, to access to the interface of setting fence.
- Page 15 Message Click “Message” on the main interface. User can view all the alarm message of the device, including Anti-theft alarm / ACC ON&OFF / Geo-fence alarm / Over-speed. Setting Menu Click “ ” on the main interface, then user can modify device parameter.
- Page 16 Wi-Fi Password: To modify default Wi-Fi hotspot password. Device Info: Check device GPS information, Device IMEI number, Device version information. Self-Checking: Check the configuration of the device, Including Sim Card/SD Card/GPS/GSM Signal/Cloud Server/ACC. SD Card Formatting: Format Micro SD Card. Restore Factory Setting: Yes / No.
- Page 17 User Center User Login It require to login the account for remotely connect. Two-ways login 1. Loging with Facebook Account, 2. Login with Registered Account. As shown in the picture: Note: Need to register the account if there is no account. 1.
-
Page 18: Troubleshooting
4. Wi-Fi / Remote Video Size: Wi-Fi / Remote preview video resolution setting. Bind/Unbind: Bind/Unbind device IMEI number. Modify Password: To modify the password of the login account. About: To check the version information of the APP. 8. Troubleshooting This section helps you to eliminate problems the device may have under normal operation. - Page 19 Manufacturered for "Neolainas" LTD Vilnius, Lithuania Made in PRC Official site: www.neoline.com Tech.Support: support@neoline.com Limited Warranty: 24 month Operation environment temperature: -10 ° C. .. +60 ° C Importer and authorized service organization: see individual packaging...
Need help?
Do you have a question about the G-TECH X50 and is the answer not in the manual?
Questions and answers