Advertisement
Quick Links
Advertisement

Related Manuals for Neoline G-TECH X81


Summary of Contents for Neoline G-TECH X81
- Page 1 NEOLINE G-TECH X81 CAR DIGITAL VIDEO RECORDER User Manual...
-
Page 2: Table Of Contents
Dear customer! Thank you for purchasing the Neoline G-Tech X81 car digital video recorder! Please read this manual carefully and all through to ensure proper use and longer service life of the device. Keep the user manual to consult it when necessary. -
Page 3: Operating Conditions
• Do not disassemble or modify the product. • Neoline is not responsible for any data loss and/or direct or indirect damage caused to the user or a third party by incorrect use of the device or software, their incorrect installation, or the use of accessories not included in the package. -
Page 4: Specifications
DVR in a place where it can block the view and compromise your safe driving. Neoline and its authorized partners ARE NOT responsible for any damage or data loss due to improper installation of the holder. • The built-in supercapacitor helps you finish your recording correctly. Normal operation of the device requires an external power source. -
Page 5: List Of Equipment
This user manual is valid at the time of printing. The current version of the instructions can be found at www.neoline.com in the Download section 3. List of Equipment: • Neoline G-Tech X81 DVR •... -
Page 6: Dvr/Buttons Description
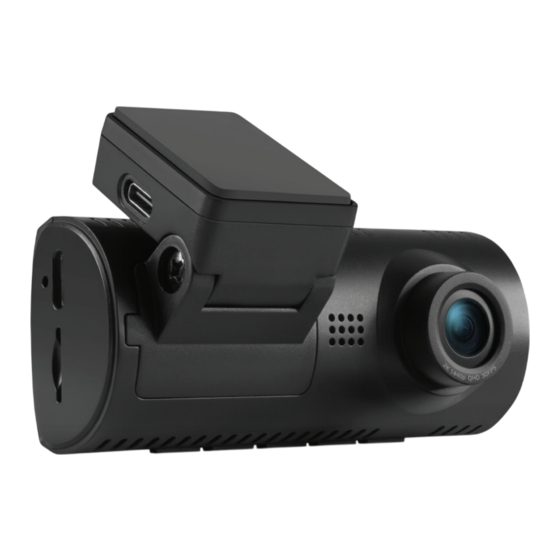
4. DVR/Buttons Description 1. Lens 10. DOWN/LEFT button. 2. Speaker 11. Menu button 3. USB Type-C connector 12. UP/RIGHT button. 4. Memory card slot. 13. Confirmation button (OK) 5. Operation indicator 14. ON/OFF button 6. Display. 7. USB Type-C connector 8. - Page 7 Description of the Buttons Button Description Press it in Video Recording mode to lock the file from ON/OFF (It is active being overwritten. Press and hold to turn the device only when external power is connected) on/off. Press in Standby mode to enter the Setting List. Press it to move to the previous menu level when navigating MENU through the settings.
-
Page 8: Mounting The Dvr
5. Mounting the DVR Installation on the windshield - Please determine the location of the video recorder in advance. - Hold the bracket base firmly and secure it to the windshield. CAUTION! Adjusting the viewing angle can only be done along the vertical line, so be sure to position the device correctly on the windshield along the horizontal line as close as possible to the windshield's centre. - Page 9 Adjusting the Viewing Angle 1. Adjust the viewing angle along the vertical line. 2. Fix the position with a screwdriver. To get the best record, ensure that the camera captures the image in a proportion of 30% sky / 70% road. Power connection Use only the power adapter included to power the device and to charge the battery.
-
Page 10: Dvr Operation
Note: For the best view, the device should be installed near the rear-view mirror in the centre top of the windshield. To get the best record, ensure that the camera captures the image in a proportion of 30% sky / 70% road. 6. - Page 11 Turning the Device ON/OFF When the car engine starts, the device turns on automatically. Turning ON/OFF and Resetting Manually Press and hold the power button for 3 seconds to turn on the device manually. To turn the device off, press and hold the power button for 3 seconds.
- Page 12 Event folder. Updating the firmware 1) Please download the firmware file at www.neoline.com and extract the file. 2) Then format the memory card and move the extracted file(s) to the microSD memory card.
- Page 13 CAUTION! The device can be used in Parking mode when it is connected to the vehicle's auxiliary power outlet using the Neoline Fuse Cord X81/X83. You can purchase this cable at the official online store www.neoline.com or any authorized retailer.
- Page 14 For example, if the Loop recording setting is set to 1 minute, then when the G-sensor is triggered, the 30-second video is recorded into the Event folder and the next 30 seconds of the recording are stored in the VIDEO folder. In this case, if the G-sensor re-triggers at 25 seconds, a file with a length of 55 seconds (30 seconds + 25 seconds) will be recorded into the VIDEO folder.
- Page 15 Unlock (for the Event folder). When entering this menu item, the user can unlock the current file, i.e. make it recordable. In this case, such a file will be moved to the Video folder. Please follow the instructions on the screen and press the OK button to confirm the operation Note: Deleted files cannot be restored.
-
Page 16: Troubleshooting
- Auto power off - Reset - System information View Files - Event - Video - Photo 7. Troubleshooting - Cannot take pictures/record video Check if there is enough free space on the microSD card and if it is not blocked. - Spontaneous stop at recording Too many video files are stored. - Page 17 Manufactured for “Neolainas” LTD Vilnius, Lithuania Made in PRC Official site: www.neoline.com Tech.Support: support@neoline.com Warranty: 24 month 5V DC, 1.5A Operation environment temperature: -10˚C...+60˚C Importer and authorized service organization: please see the package...
Need help?
Do you have a question about the G-TECH X81 and is the answer not in the manual?
Questions and answers