Advertisement
Quick Links
User's Manual
STORM PRO
STORM ULTRA
DEHUMIDIFIER
INSTALLATION AND OPERATIONS MANUAL
- READ AND SAVE THESE INSTRUCTIONS -
AlorAir SolutionslNC.
Add: 2048 E.Francis st Ontario Ca91761
Tel: 1-888-990-7469
E-mail: sales@alorair.com
Note: as we keep upgrading our product, we reserve the right to modify the product without notice in advance.
Advertisement

Related Manuals for ALORAIR STORM PRO


Summary of Contents for ALORAIR STORM PRO
- Page 1 User’s Manual STORM PRO STORM ULTRA DEHUMIDIFIER INSTALLATION AND OPERATIONS MANUAL - READ AND SAVE THESE INSTRUCTIONS - AlorAir SolutionslNC. Add: 2048 E.Francis st Ontario Ca91761 Tel: 1-888-990-7469 E-mail: sales@alorair.com Note: as we keep upgrading our product, we reserve the right to modify the product without notice in advance.
- Page 3 Safety Notes The Storm Pro / Storm Ultra dehumidifier must always be connected using a grounded elect- rical connection as required for all electrical appliances. The warranty is voided and all respon- sibility for the operation transfers to the owner if non-grounded wiring is utilized.
-
Page 4: Table Of Contents
Table of Contents Introduction..................Unit Overview .................. LCD Display Introduction ............... Preparing the Unit for Use ............................Maintenance & Repair Storing Your Dehumidifier ..............Troubleshooting ................Warranty .................. -
Page 5: Introduction
Introduction Identification Congratulations on purchasing a Storm Pro / Storm Ultra dehumidifier! The Storm Pro / Storm Ultra comes with an extensive warranty plan. To ensure you are eligible, be sure to note the serial number and date of purchase. The serial number can be found on the data on the back of the unit. - Page 6 How Your Storm Dehumidifier Works The Storm Pro dehumidifier /The Storm Ultra dehumidifier utilize its integral humidistat to monitor the conditioned space. Once conditions are outside the desired setpoint, the compressor energizes and air is drawn across an evaporator coil. The evaporator coil is cooler than the dew point of the air so water vapor will turns into liquid condensation.
-
Page 7: Unit Overview
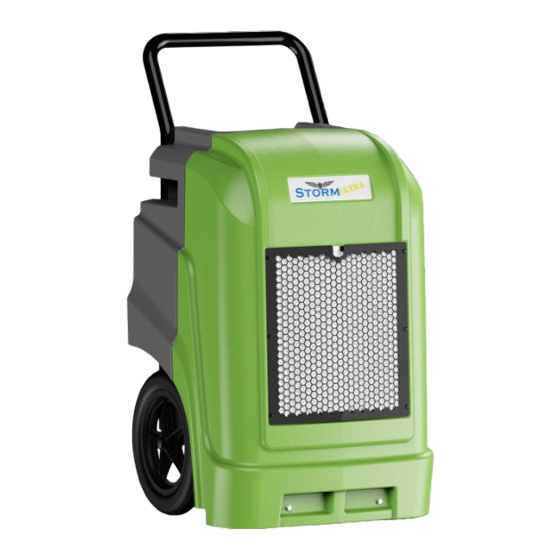
Unit Overview Storm Pro Dehumidifier Front View Rear View Handle Front Cover LCD Display Air Outlet Air Filter Air Inlet Wheel Storm Ultra Dehumidifier Front View Rear View Handle Front Cover Air Outlet LCD Display Air Filter Tubing & Cord Rack... - Page 8 LCD Display Instructions PURGE PURGE PURGE PURGE PURGE PURGE 1. When the machine is powered on but not working: ( After power on, the buzzer makes a sound ) Boot display: The LOGO interface The machine displays when it is not will disappear after 2 seconds.
- Page 9 000 LIFE HRS: Refers to the total working time, i.e. the total working time (hours), which is in hours. (Press the mode key + select the confirmation key, and the total working time will be cleaned after 3 seconds.) IN/OUT 00℉ 00% 00 gr / lb: Indicates the temperature, humidity and moisture content of the air inlet and outlet {GPP - grain per pound (gr/lb)}.
- Page 13 Quick Connection to Drain Tube Quick Connection...
-
Page 15: Maintenance & Repair
Maintenance and Repair Cleaning the Machine Body Use a soft, damp cloth to clean the exterior parts of the unit. Do not use any soap or solvents. Procedure for filter maintenance The dust and obstacles on the filter should be removed regularly. You may need to clean and replace the filter. - Page 16 Accessing Internal Components WARNING Always unplug unit prior to performing any maintenance. 1. Remove the bottom two screws on the front of the machine. Remove the bottom two screws on the front of the machine. 2. Remove the upper two screws on the back of the machine. Remove the upper two screws on the back of the machine.
- Page 17 Access screws for electrical compartment Cover Pump Integral Pump Maintenance NOTE: This pump requires routine maintenance that is not covered by your 1 year parts warranty. Only a defective pump will be repaired or replaced under the warranty. As with all pumps, preventative maintenance is necessary to prevent issues from dirt and slime that may accumulate in the drain system.
- Page 18 Advanced Pump Cleaning: 1. a. Use the manual pump button (PURGE), to drain any water from reservoir. b. Unplug the unit, and remove pump from reservoir (see page 13). c. Use a wet dry vac or paper towels to remove any remaining water from the pump reservoir.
-
Page 19: Storing Your Dehumidifier
Storing Your Dehumidifier If you plan on storing your dehumidfier for an extended period of time: 1. Turn unit off and allow to dry. 4. Clean the filter. 2. Manually drain pump reservoir. 5. Store in clean,dry environment. 3. Wrap and secure the power cord. Troubleshooting Symptom Cause... - Page 20 If an E4 code appears on the display: 1. Reset the unit by disconnecting the power cord and then reconnecting it. NOTE: The unit will not function until the code has been cleared. 2. Manually check to see if pump is operational by pressing the drain button. Verify that the pump energizes and de-energizes properly.
-
Page 21: Warranty
Limited Warranty This limited warranty starts from the date of purchase. Alorair Solutions Inc. warrants to the original purchaser that this ALORAIR product is free from manufacturing defects in material or workmanship for the limited warranty period of: Six (6) Month parts and labor. This includes the shipments charges for replacement parts or unit.
Need help?
Do you have a question about the STORM PRO and is the answer not in the manual?
Questions and answers