
Related Manuals for ALORAIR Storm LGR Extreme


Summary of Contents for ALORAIR Storm LGR Extreme
- Page 1 Storm LGR Extreme Installation and Operations Manual READ AND SAVE THESE INSTRUCTIONS Seaira Global LLC 14021 NC Highway 50 Surf City, NC 28445 910-660-0962 sales@seairaglobal.com...
-
Page 2: Table Of Contents
DEHUMIDIFIER DEHUMIDIFIER Table of Contents Safety Instructions Identification Electrical Supply How the Extreme Works Guidelines Parts Diagram Using the Display- Main Screen Using the Display- Submenus Maintenance Instructions Error Codes Troubleshooting Dehumidifier Storage Warranty... -
Page 3: Safety Instructions
Prior to installation of the unit,write down the serial number and date of purchase. You will need this information if you need assistance in the future. The data label on the side of your unit has the necessary information. Model Number: Storm LGR Extreme Serial Number: Date of Purchase: For additional questions concerning your dehumidifier: •... -
Page 4: How The Extreme Works
DEHUMIDIFIER DEHUMIDIFIER How the Storm Extreme Works The Storm Extreme dehumidifier utilizes its integral humidistat to monitor the conditioned space. Once conditions are outside the desired setpoint, the compresser energizes and air is drawn across an evaporator coil. The evaporator coil is cooler than the dew point of the air so the water vapor will turns into liquid condensation. -
Page 5: Parts Diagram
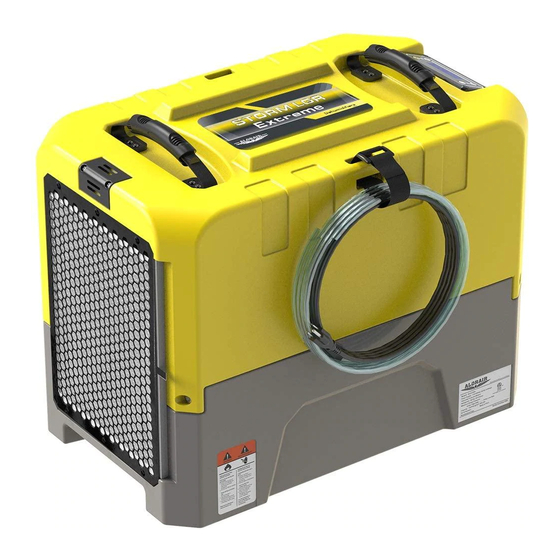
DEHUMIDIFIER Parts Diagram Handle Temp/RH sensor Air outlet Air inlet Air Filter Control Panel Condensate Drain Line Quick Connect Power Socket - - 3... -
Page 6: Using The Display- Main Screen
DEHUMIDIFIER DEHUMIDIFIER Control Panel Guide Power Button Use this button to turn the dehumidifier on and off. You can also press this button while on a sub-menu if you wish to return to the main screen. Confirm Button This button is used to confirm your selected setting, as well as set the humidity level. Each time you press the button, the humidity level will increase 5% (between 35% and 90%). - Page 7 DEHUMIDIFIER DEHUMIDIFIER 2. Setting Up the Unit • Once the machine has powered on, you will see the following display: H R S a. UNIT ON- means the unit is powered on b. 00.0HRS- describes any time the machine is running from power on to power off. It includes defrosting time, but does not include the standby time once the set point is reached.
-
Page 8: Using The Display- Submenus
DEHUMIDIFIER DEHUMIDIFIER Using the Display Sub-Menus 1. Job hours E T ? > • This screen allows you to clear the job hours. To clear the hours select “>” . This will clear the hours on the main screen, and “RESET” will no longer display on the sub menu. - Page 9 DEHUMIDIFIER 5. Humidity Setpoint • This screen is used to select your humidity setpoint. Press the “>” button to set the humidity value between 35% to 90%. Each time you press the button, it will increase S E T P O I N T 0 0 % 6.
-
Page 10: Maintenance Instructions
DEHUMIDIFIER Maintenance Instructions Before Use • Check the power cord for signs of damage such as fraying. Replace the cord before use if there is any damage. • Check the filter for signs of dirt or obstructions. Clean or replace the filter as necessary. •... -
Page 11: Error Codes
DEHUMIDIFIER DEHUMIDIFIER Error Codes If there is an issue with the dehumidifier, one of the following error codes will appear: • E1 Error An E1 error code will appear if the humidity sensor has an error. The unit will not work with an E1 code, however, you can still use the manual pump button •... -
Page 12: Troubleshooting
DEHUMIDIFIER Troubleshooting Symptom Cause Solution Poor Connection Verify that both ends of the power cord are plugged in Display is Blank Power Outage Reset power Filter is Dirty Clean the filter No Airflow Air Inlet or Outlet is Blocked Clear the blockage Humidity Sensor or Check to ensure that the sensor Communication Error... -
Page 13: Warranty
DEHUMIDIFIER DEHUMIDIFIER Limited Warranty All warranty benefits apply to the original owner only. Warranty cannot be transferred or assigned. 1 YEAR (FROM DATE OF PURCHASE): Seaira Global warrants the dehumidifier will operate free of defects in workmanship and materials. At it’s discretion, Seaira will repair or replace any malfunctioning components, free of charge (excluding transportation costs) 3 YEARS (FROM DATE OF PURCHASE): Seaira Global warrants the refrigeration circuit (compressor, condenser and evaporator) will operate free of defects in material or workmanship. - Page 14 DEHUMIDIFIER EXCLUSIONS: DAMAGE DUE TO THE FOLLOWING IS NOT COVERED UNDER WARRANTY 1. ACTS OF NATURE- INCLUDING BUT NOT LIMITED TO: • FLOODING • FIRE • WATER DAMAGE • HURRICANE/STORM DAMAGE 2. IMPROPER USAGE- INCLUDING BUT NOT LIMITED TO: • POOL/SPA/TUB APPLICATIONS •...
Need help?
Do you have a question about the Storm LGR Extreme and is the answer not in the manual?
Questions and answers