
Related Manuals for Flight Model SU-31


Summary of Contents for Flight Model SU-31
- Page 1 CAUTION:This plane is not a toy! Before use, please carefully read this manual. Weight:1020-1280g Wing span:35.5in/903mm Wing area:15.4sq.dm Engine:2cycle 15-25 Radio:4channels 4servos Length:31.1in/790mm Glow & electric RC model...
-
Page 2: Main Wings
ALL PARTS LISTED MAIN WINGS Gather the wings, joiner and other parts together. - Page 3 Insert the arm into the aileron, and glue it into the aileron by A.B. glue. Connect the aileron and the main wing by hings. Be sure to apply instant type glue to both sides of each hinges. Connect the wings by joiner and glue them by A.B.
- Page 4 Put the servo mount on the right position, and cut away covering film for the servo. (Main wing upper side) Surely glue the servo support onto the wings. Put the servo into the hole and pull out the servo extension from main wing. Fixup the servo with two pieces of TP screws.
- Page 5 Adjust the rod length to the servo. Bend the servo rod shown. Link the servo and the horn with pushrod . Landing Gears Fixup the screws to the landing gear as shown.
- Page 6 Install the wheels to the landing gear. Fixup the landing gear to the fuselage by two screws. Adjust and bent the tail landing gear as shown.
- Page 7 Tail wings Gather the elevator, rudder and other parts together shown. Find out the holes on each sides of the fuselage as shown. Insert the stabilizer. Measure the right position, and along the fuselage edge, remove the film each side of the stalilizer.
- Page 8 Firstly insert the elevator with the rod shown. Surely glue the stablilizer to the fuselage. Connect the aileron and the stabilizer by hings, and glue them.
- Page 9 Insert the arm into the elevator, and glue it into the elevator by A.B. glue. Measure the right position and remove the film of the vertical fin along the edge of the fuselage. Surely apply instant glue between fuselage and vertical fin.
- Page 10 Connect the rudder to the vertical fin by hings. Insert the tail wheel landing gear into the rudder. Fixup the tail wheel amount to the fuselage by TP screws. Install the elevator servo, fixup the tri-horn onto the elevator by TP screws, and connect the servo and elevator by pushrod.
- Page 13 Measure and sign a line for the bolt hole, be sure the line is across the centre of the bolts. Put the presser onto the wing cover, mark the position of the hole on the line, and drill holes for the wing bolt holes.
- Page 14 Use instant type glue to glue the presser. Surely glue the wing cover to wings by instant type glue. ENGINE AND MOTOR Install the fuel tank as shown, and put the fuel tank in the right position.
- Page 15 Fixup the engine amount onto the fire board by 4 bolts. Install the engine to the engine amount, make sure the distance from airscrew to the fire board is 84cm. Fixup the the motor box by 4 bolts.
- Page 16 Install the motor by 4 TP screws. Canopy and Cowling Fixup the canopy with TP screw on each side of the fuselage. Install the cowling with four TP screws.
- Page 17 ADJUSTMENT Warning: Never jump this step before flight.
- Page 18 CG & Control Throws...
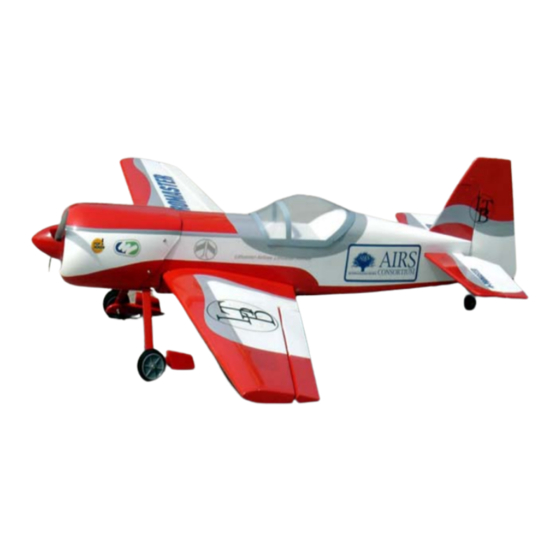
- Page 19 Finished Photo...
Need help?
Do you have a question about the SU-31 and is the answer not in the manual?
Questions and answers