Advertisement
Quick Links
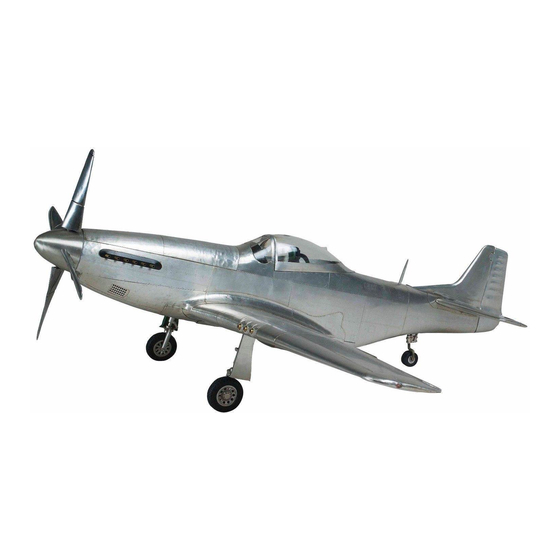
Wing Span:96in/2438mm;
Wing Area:101.2sq.dm;
Length:77in/1954mm;
CAUTION
CAUTION : : : : this
CAUTION
CAUTION
children
children
under
under
children
children under
under 16
this
this
manual.
manual.
this
this manual.
manual.
●First-time builders should seek advice from people having building
experience in order to assemble the model correctly and to produce its
performance to full extent .
●Assemble this kit only in places out of children's reach!
●Take enough safety percautions prior to operating this model.
You are responsible for this model's assembly and safe operation!
●Always keep this instruction manual ready at hand for quick
reference,even after completing the assembly.
this
this
plane
plane
plane is is is is not
not
not a a a a toy
not
this plane
16
16
years
years
years of of of of age!
age!
age!
16 years
age! Before
Weight:11kg-15kg/24.2-33lbs
Radio:6Channels 8-12Servos;
Engine:80-100CC Gas
toy
toy
and
and
should
should
toy and
and should
should be
Before
Before
use
use
use , , , , please
please
please
Before use
please carefully
P.1
be
be
kept
kept
away
away
be kept
kept away
away
carefully
carefully
read
read
carefully read
read
Advertisement

Related Manuals for Flight Model P-51 Mustang


Summary of Contents for Flight Model P-51 Mustang
- Page 1 Wing Span:96in/2438mm; Weight:11kg-15kg/24.2-33lbs Wing Area:101.2sq.dm; Radio:6Channels 8-12Servos; Length:77in/1954mm; Engine:80-100CC Gas CAUTION CAUTION CAUTION : : : : this this this plane plane plane is is is is not not a a a a toy should should kept kept away away CAUTION this plane toy and...
- Page 2 MAIN MAIN WING WING MAIN MAIN WING WING Connect the aileron and the main wing by hinges. Be sure to apply instant type glue to both sides of each hinges. Apply epoxy into hinge hole of the wing flap Link the servo arms and aileron with pushrod...
- Page 3 Link the servo arms and wing flap with pushrod INSTALL INSTALL RETRACT RETRACT LANDING LANDING GEAR GEAR INSTALL INSTALL RETRACT RETRACT LANDING LANDING GEAR GEAR Drill some small hole according to the retract landing gear mount. Install wing and wing fairing wing two wing blot.
- Page 4 Mark the wing blot position as the show. Follow the mark the drill two 6mm hole Follow the 6mm hole to Drill four 8mm hole .Install the M6 Blind nets under the wing mount block. M6(tail plane join)
- Page 5 Fix the wing with two M6 screw Parts need : M6 X120mm screw X 2pcs.(tail plane join) 6X 20mmWasher X 2pcs Fix the Air intake as the show. Parts need.wing in take fairing X 1 2X 10 mm TP. Screw X 3pcs. WING IN TAKE FAIRING STABILIZER STABILIZER...
- Page 6 Glue the F3 to the servo lead side after you put out the servo lead. F3 X 2PCS. Install Install the servo pad on the Elevator servo box with four Screw. Install the servo linkage as show.
- Page 7 Install the anti roll pin in to the pair of Stabilizer. Then install tail plane join in to one side of Stabilizer. Glue them in piece with Epoxy. Install Stabilizer in the Fuselage. Then check the Stabilizer. As the show. Check the Stabilizer are fit on Fuselage.and attack angle was 0 degree with thrust line.
- Page 8 Cut out four slot as show. Glue four hinges with Epoxy Install a Heavy duty control horn as. Cut 4 slot at same place as Rudder hinges.Install Rudder and glue the hinges with Epoxy. Notice: made sure Rudder and Fin Top has 1mm gap.
- Page 9 According your retract gear size to drill some small hole to open the retract tail gear door. door part part to to to to two piece piece , , , , if if if if you want want to to to to Cut the the door door...
- Page 10 Install the retract tail gear as the show. ENGINE ENGINE ENGINE ENGINE The motor off set are 4.5mm from center line. Install the motor according to your motor mount. Made sure the motor drive hub have at least 5-6mm from cowl end. P.10...
- Page 11 Check the two piece of GRP. Exhaust. Notice : they have R/L.side Glue the GRP. Exhaust as the show. Drill some small hole, Fix the cowl with screw as the show. P.11...
- Page 12 Trim fit the canopy as the show. Install the canopy with TP.Screw Install Antenna on to the Fuselage. Top as the show. P.12...
- Page 13 FUEL FUEL TANK TANK FUEL FUEL TANK TANK Install the fuel tank into the fuselage, and fixup it with belt. Install the fuel tank mounting ties under the fuel tank floor. Install the battery,receiver and switch in place as shown. CANOPY CANOPY COWL...
- Page 14 Before you install all wing and tail plane,please check them all in right position as follow fig. P.14...
- Page 15 Dong Dong Guang Guang Flight Flight Model Model CO.,Ltd CO.,Ltd Dong Dong Guang Guang Flight Flight Model Model CO.,Ltd CO.,Ltd ADD:No.10,Fu Ning Street,Xian Xi Industrial,Chang An Town, DongGuan City,Guang Dong Province,China Tel: +86-769-85070618 Fax: +86-769-85091868 E-mail:info@flight-model.com Web: http://www.flight-model.com/product/eindex.asp http://flight-model.preview.alibaba.com/ P.15...
- Page 16 P.16...
- Page 17 P.17...
- Page 18 P.18...
- Page 19 P.19...
- Page 20 P.20...
- Page 21 P.21...
- Page 22 P.22...
- Page 23 P.23...
- Page 24 P.24...
- Page 25 P.25...
- Page 26 P.26...
- Page 27 P.27...
- Page 28 P.28...
- Page 29 P.29...
- Page 30 P.30...
- Page 31 P.31...
- Page 32 P.32...
- Page 33 P.33...
- Page 34 P.34...
- Page 35 P.35...
- Page 36 P.36...
- Page 37 P.37...
- Page 38 P.38...
- Page 39 P.39...
- Page 40 P.40...
- Page 41 P.41...
- Page 42 P.42...
- Page 43 P.43...
- Page 44 P.44...
- Page 45 P.45...
- Page 46 P.46...
Need help?
Do you have a question about the P-51 Mustang and is the answer not in the manual?
Questions and answers