DeLorme Earthmate GPS PN-60 User Manual
Delorme handheld gps receiver user manual
Hide thumbs
Also See for Earthmate GPS PN-60:
- Quick start manual (50 pages) ,
- User manual (72 pages) ,
- User manual (109 pages)

Subscribe to Our Youtube Channel
Related Manuals for DeLorme Earthmate GPS PN-60


Summary of Contents for DeLorme Earthmate GPS PN-60
- Page 1 LORME Earthmate ® PN-60 GPS User Manual Updated Oct 22, 2010 Updated July 21, 2010...
- Page 2 A large searchable knowledge base of detailed technical information about current and past DeLorme products. support.delorme.com News and Real-Life Examples Catch up with news about what we are working on, real-life examples using PN-Series devices, and more at the DeLorme Weblog. blog.delorme.com SPOT Satellite Communicator Account & Subscription Information Visit the SPOT website to sign up and manage your account and learn more about the SPOT Satellite Communicator.
-
Page 3: Table Of Contents
Table of Contents Introduction ...4 Using the PN-60 ...6 Using the SPOT Communicator ... 13 The Home Page ... 16 The Activities Page ... 17 The Satellites Page ... 18 The Map Page ... 21 The Compass Page ...32 The Trip Info Page ...35 The SPOT Communicator Page ... - Page 4 The Profi le Page ... 71 The Sun/Moon Page ... 74 The Tides Page ... 76 The Hunt/Fish Page ... 78 The Settings Page ... 79 Additional Information ...85 Info Fields Table ...95 Index ... 101...
-
Page 6: Introduction
Introduction This manual is for use with DeLorme Earthmate PN-60/PN-60w GPS and SPOT Satellite Communicator devices. Note References to "PN-60" include both devices unless otherwise indicated. Welcome The Earthmate PN-60/60w is a complete out-of-the-box handheld GPS solution for all your outdoor activities. - Page 7 To complete a series of steps—an arrow ( > ) indicates the sequence. Note that the sequences do not include ENTER and QUIT button presses described above. Visit the DeLorme Wiki at wiki.delorme.com for more information. The latest version of the User Manual is always available for download.
-
Page 8: Using The Pn-60
Quick Start Guide. Batteries and SD Card Use two AA batteries (Lithium is recommended; you can also use NiMH or alkaline) or a DeLorme rechargeable Lithium-ion (Li-ion) battery. When the PN-60 is using battery power, the battery indicator on the Home Page displays the percentage of battery life remaining. - Page 9 System > GPS Setting > Power Saving. For more information, see To change system settings on page 79. Turn off the GPS receiver when inside. Go to Settings > System > GPS Setting > Off from the Satellites Page, go to MENU > Turn Off GPS.
-
Page 10: Using The Buttons
Using the Buttons Power Use the Power button to turn the PN-60 on and off, lock the buttons, or to change the backlight settings. To turn on the device, press and hold the Power button until the Welcome screen displays. ... - Page 11 reorder pages, go to Settings > Page Order (for more information, see Page Order on page 84). The default page sequence is: Home Satellites Map Compass Trip Info Directions (when navigating) Menu Press the MENU button to access functions for the page or screen you are using.
-
Page 12: Using The Keyboard
Enter Press the ENTER button to: Complete the selection of a menu option, entry, fi eld, or screen button. Get detailed information about a point on the map, if available. Quit The function of the QUIT button depends on the status of the PN-60;... -
Page 13: Special Keys
Special Keys Move the cursor one space to the left without deleting a letter or number. Move the cursor one space to the right without deleting a letter or number. Change the case of the next letter (the active case is shown in the keyboard). - Page 14 GPS fi x. You can turn off track recording, but the device is still in tracking mode. When you follow a route on the device, you are navigating. Visit the DeLorme Wiki at wiki.delorme.com for more information. The latest version of the User Manual is always available for download.
-
Page 15: Using The Spot Communicator
Using the SPOT Communicator The SPOT Satellite Communicator has two buttons and fi ve light indicators that provide access to power, the SOS message, and device status information. It can operate alone to send emergency messages when the PN-60w is not available. For information about setting up the SPOT Communicator for fi rst time use and how to set up your account at fi ndmespot.com, see the Quick Start Guide. - Page 16 Communicator or by the paired PN-60w. Note The SOS button should be used only for life- threatening or other critical situations. Light Indicators The SPOT Communicator uses lights to tell you what it’s doing. Every time you turn the SPOT Communicator on, it performs an automatic self-test.
- Page 17 For more information about device pairing and initial setup, see the The SPOT Communicator Page section starting on page 37 and the Quick Start Guide. Visit the DeLorme Wiki at wiki.delorme.com for more information. The latest version of the User Manual is always available for download.
-
Page 18: The Home Page
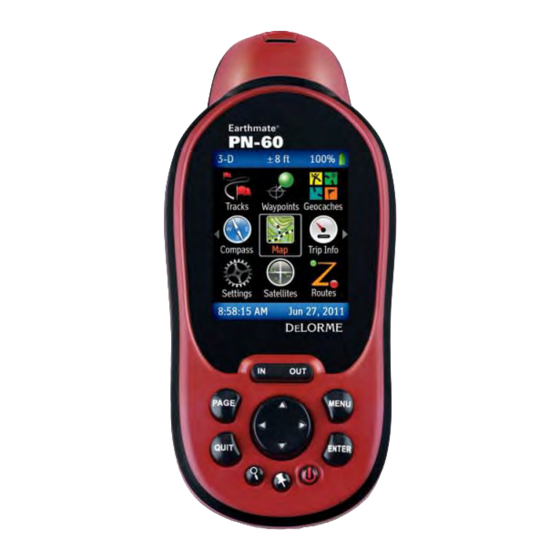
Home Page Icons Tracks Waypoints Geocaches Compass Trip Info Settings Satellites SPOT (PN-60w only) Tides Hunt/Fish Sun/Moon Routes Profi le Activities Visit the DeLorme Wiki at wiki.delorme.com for more information. The latest version of the User Manual is always available for download. -
Page 19: The Activities Page
With the activity you want to reset highlighted on the Activities Page, go to MENU > Restore Default Settings. Visit the DeLorme Wiki at wiki.delorme.com for more information. The latest version of the User Manual is always available for download. -
Page 20: The Satellites Page
The Satellites Page The Satellites Page displays GPS and satellite information, time, and elevation. Constellation and Signal Graph Both the satellite constellation and the satellite signal graph display visible satellites and their identifying numbers. The satellite constellation depicts each satellite’s position and the signal graph bars indicate the strength of each satellite signal. - Page 21 ENTER. To turn off GPS You can use many features on the PN-60 without a GPS fi x. When the GPS receiver is turned off, "GPS OFF" displays on the screen and all satellites are removed from the satellite constellation.
-
Page 22: Gps Accuracy
& Altimeter option on the Settings Page has additional sensor settings. For more information, see Compass and Altimeter on page 82. Visit the DeLorme Wiki at wiki.delorme.com for more information. The latest version of the User Manual is always available for download. -
Page 23: The Map Page
The Map Page The Map Page centers the map on your current location when the PN-60 has a 2-D or 3-D fi x. When it does not have a GPS fi x, the map displays your last GPS position, or, if panning the map, the map cursor position. For more information, see GPS and WAAS Status on page 18. -
Page 24: Info Fields
Automatic panning–When GPS tracking or navigating, the map automatically pans in the direction of travel. The map does not automatically pan when the map cursor is visible. Press QUIT to remove the map cursor and return to automatic panning. ... -
Page 25: Measure Distance
tracking (regular GPS use). To access the Info Fields options, go to MENU > Info Fields. For more information, see Info Fields on page 11 and The Activities Page on page 17. Measure Distance Use the measurement tool to measure the distance of a line or the perimeter and area of a polygon on the map. - Page 26 NOAA Nautical Charts (NOAA Charts) Satellite Imagery (SAT10) XMap Topographic Data (XMap only) DeLorme Topographic Data (Topo North America 9.0) DeLorme World Base Map 7 (XMap only) To layer data Use the Data Layering option to select the types of data you want to view on your PN-60 and the order in which you want data to display.
-
Page 27: Data Management
After you add a map—also called a map package or a map fi le—from a compatible DeLorme mapping program or the DeLorme Online Map Center to the PN-60, you can show or hide it on the device; view details about it, including where it is stored;... - Page 28 PN-60 vary by application. For more information, see the mapping application’s Help. Map Library–Use the NetLink tab in your DeLorme mapping software or the DeLorme Online Map Center (data.delorme.com) to download many types of imagery and data, such as satellite imagery, aerial...
-
Page 29: Map Style
Navionics on page 29. Tip A map package is a dataset you create for an area of interest that you can layer with DeLorme map data and other map datasets available from the NetLink Map Library. Map Setup Options Orientation You can set the map to rotate as you move. - Page 30 Bar–Represents a given length on the map compared to an actual length. Zoom–The DeLorme term for map detail level. Each time the zoom level increases, the scale doubles. Ratio–Shows a ratio of a unit on the device compared to the actual unit.
-
Page 31: General Information
Navionics SD card in your device. You cannot save maps or data to a Navionics SD card—the memory on the card is unavailable. The Navionics data overlays the DeLorme maps on device—the DeLorme maps are used for routing and Find. - Page 32 displays; if it doesn't, select it from the Chart list on the Navionics Setup page. From the Map Page, go to MENU > Turn Charts On or Turn Charts Off. Note This menu option controls the Show Charts and Show Boundaries check boxes on the Navionics Setup page.
- Page 33 To restore the default settings To restore the default Navionics Setup settings, select Restore Default Settings. Visit the DeLorme Wiki at wiki.delorme.com for more information. The latest version of the User Manual is always available for download. The Map Page...
-
Page 34: The Compass Page
The Compass Page Use the Compass Page’s graphic compass to help you fi nd your destination. The PN-60 uses GPS to determine compass readings when the device is moving. It also has an electronic compass for use when the device is stationary or moving below 1.5 mph. -
Page 35: Route Options
want to calibrate the compass unless you know the inaccuracy is caused by a temporary event, such as being near power lines or near a magnetic fi eld caused by a car. You may want to turn off the electronic compass when you are in an area with magnetic interference. - Page 36 Go to MENU > Route Options and select Stop Navigating, Back on Track, or Switch to Hiking/Driving (the option you can switch to displays). Visit the DeLorme Wiki at wiki.delorme.com for more information. The latest version of the User Manual is always available for download.
-
Page 37: The Trip Info Page
The Trip Info Page The Trip Info Page displays info fi elds that you can customize to manage your trips. Info Fields You can change which info fi elds display depending on your activity. For each activity, the info fi eld types change for navigating or tracking (regular GPS use). - Page 38 For more information about route options, see Route Settings on page 61. Visit the DeLorme Wiki at wiki.delorme.com for more information. The latest version of the User Manual is always available for download.
-
Page 39: The Spot Communicator Page
The SPOT Communicator Page PN-60w only The SPOT Satellite Communicator uses GPS signals and communication satellites to relay your message—no cell phone coverage necessary—giving you peace of mind. The SPOT Communicator Page on the PN-60w gives you an easy way to use and manage your SPOT Communicator. ... -
Page 40: Message Types
Message Priority Levels Each type of message you can send is assigned a priority so that if you have multiple messages to send, each one is sent in order of importance. Critical–An SOS message is the highest priority message type and is sent to the GEOS Rescue Coordination Center for emergency response. - Page 41 will send your message without coordinates while continually trying to obtain a GPS fi x. If the PN-60w loses communication with the SPOT Communicator, the SPOT Communicator will continue to send messages using its own GPS every fi ve minutes until the PN-60w is turned on and a new command is issued or the SPOT Communicator batteries are depleted.
- Page 42 be sent three times within a 20 minute window. Important To increase the probability of a successful message transmission from the fi eld and out to contact lists, allow your SPOT Communicator to transmit until the message cycle is complete. ...
- Page 43 To Track Progress From the SPOT Communicator Page, select Track Progress. You can press QUIT to exit the page and the messages will continue to be sent. Sharing Reference Point Information Use the SPOT Communicator to send information about a reference point (defi ned as any point on the map other than where you are), geocache, Find search result, or map point from the PN-60w to your contacts.
- Page 44 full three message transmission to complete gives the highest probability of a successful delivery. Time Started–The time the message was initiated. Time to Next Send–Displays the amount of time remaining until the SPOT Communicator sends the next message. ...
- Page 45 Message History. All the messages in the history are cleared and the message waypoint icons are removed from the map. Visit the DeLorme Wiki at wiki.delorme.com for more information. The latest version of the User Manual is always available for download.
-
Page 46: The Find Page
The Find Page Use the Find Page to search for addresses, roads, cities, points of interest (POIs), waypoints, geocaches, coordinates, and more. To view the Find Page, press the Find button Search Methods There are two ways to search—near map center or by name;... -
Page 47: Searching For A Location
Points of Interest Category State/Country/City/Name (Find by Name only) Natural Features Category State/Country/City/Name (Find by Name only) DeLorme Atlas & Gazetteer Points Category State/Country/City/Name (Find by Name only) Addresses State/Country/City/Building Number/Street Name (Find by Name only) - Page 48 Coordinates Coordinates can be edited. Streets/Trails State/Country/City/Name (Find by Name only) Cities State/Country/Name (Find by Name only) To edit/change search fi elds When a fi eld is highlighted, you can edit or change it. To edit a fi eld, press ENTER and use the available option (drop-down list, arrow keypad, or keyboard) to make changes.
- Page 49 3. Select Hike or Drive. The route calculates and the Map Page opens in navigation mode. Visit the DeLorme Wiki at wiki.delorme.com for more information. The latest version of the User Manual is always available for download. The Find Page...
-
Page 50: The Waypoints Page
Bearing and Distance info fi elds display measurements as follows: From the GPS position when the device has a GPS fi x. From the cursor location if you are manually panning the map. From the map center if the GPS receiver is turned off. -
Page 51: File Menu
Symbols The waypoint symbols available on the PN-60 match the PN-Series symbol set in your DeLorme mapping application. The symbol set includes geocaching symbols (these are at the end of the symbol list). To ensure a waypoint displays on the Waypoints Page, use a waypoint symbol. -
Page 52: Managing Waypoints
When you press Mark, the waypoint is saved and a waypoint details page opens where you can edit the waypoint details. For more information, see To edit waypoint details. You can also mark waypoints using the on-screen Mark option on Find search result details and route point details pages. - Page 53 To edit a fi eld, use the arrow keypad to highlight it and press ENTER. Use the available option (drop-down list, arrow keypad, or keyboard) to make changes. When you are fi nished editing, press ENTER. To view comment details From the waypoint details page, go to MENU >...
-
Page 54: Projecting A Waypoint
3. Select Move to move the existing waypoint or Create New to mark a new waypoint at the projected location. Then, press ENTER. Visit the DeLorme Wiki at wiki.delorme.com for more information. The latest version of the User Manual is always available for download. -
Page 55: The Geocaches Page
From the GPS position when the device has a GPS fi x. From the cursor location if you are manually panning the map. From the map center if the GPS receiver is turned off. The Geocaches Page... - Page 56 Geocache symbols come from Geocaching.com and are also available in the PN-Series symbol set in your DeLorme mapping application. For a printable list of symbols on the device, see the DeLorme Wiki (wiki. delorme.com). When you change a geocache symbol, be aware that it may affect how the geocache is displayed on the device.
- Page 57 To use the Send to GPS plugin With the DeLorme Send to GPS plugin, you can send one geocache at a time to a PN-60. You must be logged in to Geocaching.com to use this feature. Please note that geocache descriptions and hints are available only for premium members of Geocaching.com.
- Page 58 From the Geocaches Page, select a geocache and press ENTER. The geocache details page opens. Tip The Last Logged fi eld on the geocache details page displays the fi rst two lines of the most recent log entry. To edit geocache details You can edit the symbol, label, and coordinates.
- Page 59 message, select Yes. The geocache’s location information will update to the current GPS location. To delete a geocache From the geocache details page, go to MENU > Delete Geocache. When you see the confi rmation message, select Yes. To delete geocaches by symbol From the Geocaches Page, go to MENU >...
- Page 60 Geocaching Out in the fi eld, pick a geocache to start with and then use the PN-60 to navigate to, log, and write fi eld notes for one geocache or a series of geocaches. To navigate to a geocache Navigate from your current location to the fi rst geocache on your list.
- Page 61 Geocaching.com with the Earthmate GPS Sync dialog in Topo North America, a SPOT Communicator paired with your PN-60w, Cache Register, or the DeLorme Field Notes page on Geocaching.com. See the Help for each application for complete instructions. For the SPOT Communicator, select the option to log your fi nd with SPOT and follow the instructions on the PN-60w.
- Page 62 USB drives connected to the computer. Visit the DeLorme Wiki at wiki.delorme.com for more information. The latest version of the User Manual is always available for download.
-
Page 63: The Routes Page
The Routes Page The Routes Page displays a list of routes you have created on the device and routes you have sent to the device with a DeLorme mapping application. Using DeLorme Topo ® North America™ or XMap to plan routes on the desktop for transfer to the PN-60 ensures you take exactly the road route you want and is the best way to create long routes. -
Page 64: Create A Route
Select Off if you do not want to use Back on Track. Also, select Off for trail routes sent to your device from DeLorme Topo North America or XMap—if the route recalculates, it will be converted to a direct route to the fi nish. -
Page 65: Manage Routes
Route fi eld, press ENTER, and use the keyboard to make changes. 3. Ensure Add Point is highlighted and press ENTER. 4. Select the method for adding the point. » Use Find–Opens the Find Page. Search for the point you want to add; from the search result details page, select Add. - Page 66 If the route name is in bold text, it is displaying on the map. To navigate with or view a saved route on the map 1. From the route details page, select Navigate or View. 2. If the route has never been calculated, select Hike or Drive.
- Page 67 For more information about route options, see Route Settings on page 61. Visit the DeLorme Wiki at wiki.delorme.com for more information. The latest version of the User Manual is always available for download.
-
Page 68: The Tracks Page
GPS status. 3-D fi x–Green line 2-D fi x–Yellow line No fi x or GPS receiver is off–No points are placed on the map. Points resume once a 2-D or 3-D fi x is established. -
Page 69: Track Settings
Track Settings To customize how tracks are recorded, from the Tracks Page, go to MENU > Edit Track Settings. Record points by–The method for logging points; select Time or Distance from the drop-down list. A short time interval gives you the most detailed results but quickly adds many points;... - Page 70 For more information about GPX fi les, see File Manage- ment on page 85. XMap users See the supplemental online help on the DeLorme Wiki (pn60.wiki.delorme.com/xmap) for information about using XMap with the Tracks Page. File Menu Use the File menu to manage track GPX fi les stored in the PN-60’s internal memory or on an SD card in the device.
- Page 71 Close–Close the open GPX fi le. Move to Internal/Move to SD Card–Move the open fi le from the current stored location to the alternate location. For example, you can open a fi le from an SD card and move it to the device’s internal memory. To view details for the open track Open a saved track fi le using the File menu.
- Page 72 MENU > Show Track Area. Note Do not cross your path as you record the track or it will not calculate correctly. Visit the DeLorme Wiki at wiki.delorme.com for more informa- tion. The latest version of the User Manual is always available for download.
-
Page 73: The Profi Le Page
The Profi le Page A track is a recording of points along the path you travel. Viewing a profi le of a track gives you valuable information about the track’s elevation—you can view the profi le over track distance or time recorded while traveling. When the profi le changes while you are stationary and tracking by time, the profi le indicates changes in pressure that you can use to monitor weather changes. -
Page 74: Gps Indicator
Scale Switching the type of scale used to measure changes in elevation gives you different views of the graph. To change the scale type, go to MENU > Switch to Static Scale or Switch to Dynamic Scale. Static–The static scale adjusts the profi le graph based on the maximum and minimum elevation;... -
Page 75: Panning And Zooming
Info Fields options, go to MENU > Info Fields. For more information, see Info Fields on page 11 and The Activities Page section on page 17. Visit the DeLorme Wiki at wiki.delorme.com for more information. The latest version of the User Manual is always available for download. -
Page 76: The Sun/Moon Page
The Sun/Moon Page Use the Sun/Moon Page to view the sunrise/sunset and moonrise/moonset information and the moon phase information for a specifi c time, date, and location. The Sun/Moon Page shows information for the current map center at the time and date indicated. For example, if you are in Maine and you pan the map to California, you see the position of the sun and moon in California for the time and date displayed. - Page 77 From the Sun/Moon Page, go to MENU > Reset Time/Date. Visit the DeLorme Wiki at wiki.delorme.com for more information. The latest version of the User Manual is always available for download.
-
Page 78: The Tides Page
The Tides Page Use the Tides Page to view tide (for oceans) or current (for tidal rivers) information for a specifi c time, date, tide station, and location. The fi elds in the middle of the screen (above the graph) display the high/low tide (ocean) or maximum ebb/minimum fl ood current (tidal river) based on the current time, date, and location. - Page 79 From the Tides Page, go to MENU > Reset Time/Date. Visit the DeLorme Wiki at wiki.delorme.com for more information. The latest version of the User Manual is always available for download.
-
Page 80: The Hunt/Fish Page
To reset the date To reset the date to the device’s date, from the Hunt/Fish Page, go to MENU > Reset Date. Visit the DeLorme Wiki at wiki.delorme.com for more information. The latest version of the User Manual is always available for download. -
Page 81: The Settings Page
Note about Li-ion batteries Use only DeLorme Li-ion batteries. When you remove a Li-ion battery, the Battery Type will switch automatically to Lithium. - Page 82 USB Power–From the drop-down list, select On to allow the device to be powered by a USB port on your computer. Select Off if you don’t want to allow USB power. To view memory use You can view how much space is available on the device's internal memory or an SD card in the device.
- Page 83 Use XMap 7 Mode–Allows you to use a PN-60 with XMap. For specifc information about fi le management with XMap, visit the Delorme Wiki (pn60.wiki.delorme.com/xmap). Use Serial Port–Select the check box to use a serial port connection for NMEA out only.
- Page 84 Compass and Altimeter Use the Compass & Altimeter options to activate or deactivate the electronic compass, the barometric altimeter, and the auto calibrate altimeter feature. You can also calibrate the electronic compass and the barometric altimeter. For more information, see Compass and Altimeter starting on page 82.
- Page 85 From the drop-down list for each of the following options, select the sound you want to use or turn it off. » Sounds » Button Press » Message » Power » Turn Alert Volume–To adjust the volume, use the arrow keypad to move the slider right or left.
-
Page 86: Restore Factory Settings
Settings > Restore Factory Settings. Maps you have added to the device will not be deleted. Visit the DeLorme Wiki at wiki.delorme.com for more information. The latest version of the User Manual is always available for download. -
Page 87: Additional Information
For more information about Earthmate GPS Sync, see the Help in DeLorme Topo North America 9.0. DeLorme Cache Register™–Use Cache Register to sync Geocaching.com Pocket Query GPX fi les with your device. -
Page 88: Compass Calibration
Tip Use the SD card reader to quickly transfer large maps. Send maps you use frequently to the device’s internal memory. Compass and Altimeter The PN-60 comes equipped with two sensors; an electronic compass and a barometric altimeter. The electronic compass works when the PN-60 is moving at less than 1.5 miles per hour. -
Page 89: To Calibrate The Compass
To calibrate the compass 1. From the Satellite Page or the Compass Page, go to MENU > Calibrate > Calibrate Compass. From the Home Page, go to Settings > Compass & Altimeter > Calibrate > Calibrate Compass. 2. Follow the on-screen instructions to calibrate the compass. -
Page 90: Contact Information
DeLorme Customer Service For general questions about returns, your order status, or problems with shipments, phone 800-511-2459 (Monday through Friday) or send an email to sales@delorme.com. To place additional orders, phone 800-561-5105. SPOT Communicator For questions about the device, call DeLorme Customer Service. -
Page 91: Specifi Cations
If you have contacted DeLorme Technical Support and have been instructed to send the device in for warranty service, send the unit to: DeLorme Earthmate PN-Series Service Department 2 DeLorme Drive Yarmouth, ME 04096 USA You must use a shipping service that provides tracking information. - Page 92 3.5 GB available internal fl ash memory (SE model: 15.5 GB available internal fl ash memory) Supports SD and SDHC memory cards; up to 32 GB Uses 2 AA batteries or a DeLorme Li-on rechargeable battery. PN-60w Wireless Radio ...
-
Page 93: Limited Warranty
1 year from the date of purchase. If your Earthmate PN-60 GPS fails in normal use, DeLorme will, at its sole option, either repair or replace the unit. DeLorme reserves the right to either repair or replace the unit with a new or refurbished unit at its sole discretion. -
Page 94: Specifi Cations
REMINDER Be sure to retain the sales receipt proving the date of your original purchase. This will be needed if warranty service is ever required. DeLorme reserves the right to refuse warranty if a receipt is not provided or if the receipt is incomplete/illegible. -
Page 95: Troubleshooting
See fi ndmespot.com for more details regarding battery life. Operating Conditions and Specifi cations The SPOT Communicator must have an unobstructed view of the sky, either outdoors or in a glass enclosed area, such as a vehicle dashboard or sunroof. Visit fi ndmespot.com for more detailed information. - Page 96 WARRANTIES FOR THE PRODUCT, INCLUDING, WITHOUT LIMITATION, ANY IMPLIED WARRANTIES REGARDING THE CONDITION, DESIGN, SPECIFICATIONS, WORKMANSHIP, MERCHANTABILITY OR FITNESS FOR A PARTICULAR PURPOSE OF THE PRODUCT, OR ANY WARRANTIES THAT THE PRODUCT IS FREE FROM LATENT DEFECTS OR DEFICIENCIES, OR THAT THE PRODUCT IS FREE FROM INFRINGEMENT OF ANY PATENT, TRADEMARK, COPYRIGHT OR PROPRIETARY RIGHT OF ANY THIRD PARTY AND SUCH WARRANTIES...
-
Page 97: Info Fields Table
Info Fields Table Info fi elds are used to provide information you need when using the PN-60. On the Map, Compass, Trip Info, and Profi le Pages, you can customize the info fi elds. For more information, see Info Fields on page 11. Notes ... - Page 98 Info Field Coordinates: Primary Coordinates: Secondary Course Device Odometer Distance: Climbing Distance: Descending Distance: Linear Distance: Terrain Distance to Finish Distance to Next Stop Info Fields Table Description The primary coordinates format for the current GPS location, cursor position, or map center in the primary format.
- Page 99 Info Field Distance to Next Turn Elevation Elevation: Barometer Elevation: Climbing Elevation: Descending Elevation: GPS Elevation: Maximum Elevation: Minimum Elevation: Net Gain ETA at Finish ETA at Next Turn ETA at Next Stop Description The distance from the current location to the next turn in the route. (Units > Measure) The altitude (height) above or below sea level.
- Page 100 Info Field Finish GPS Accuracy GPS Status % Grade % Grade: Average Heading Moonrise/Moonset Next Stop Next Turn Next Turn Arrow Off Course Pressure: Ambient Pressure: MSL Info Fields Table Description The Finish label as it appears in the route directions. The calculated accuracy of the GPS;...
- Page 101 Info Field Speed Speed: Average Sunrise/Sunset Time/Date Time to Finish Time to Moonrise/set Time to Next Stop Time to Next Turn Time to Sunrise/set Trip: Odometer Description The current rate of travel for the device; expressed in distance/time. (Units > Measure and Time). An up arrow indicates you are going faster than the moving average, and a down arrow indicates you are going slower than the moving average.
- Page 102 Info Field Trip: Time Moving Trip: Time Stopped Trip: Time Total Velocity Made Good Vertical Speed Info Fields Table Description Total time GPS device has been moving since trip info was reset. (Units > Time) The total time the GPS has been tracking but not moving in the current trip, since the last time trip info was reset.
-
Page 103: Index
Index About this Device ... 84 Activities Page ... 17 Altimeter Calibrate ... 20, 82, 87-88 Elevation ... 20, 69 Settings ... 82 Average a geocache ... 57 Average a waypoint ... 52 Back on track ... 61-62 Base map ... 24-26, 90 Batteries Charge ... - Page 104 Find Page... 44-47 File management ... 85-86 Geocaches Add to device ... 55 Average ... 57 Comments/hints ... 56-57 Delete ... 57 Edit ... 56 Files ... 53-55 Field notes ... 59-60 Log fi nd ... 58 Move ... 56-57 Navigate to ...
- Page 105 Navigating ... 12 Navionics ... 29-31 Orientation, map ... 27 Owner Information ... 84 Page Order settings ... 84 Panning the map ... 21-22 POIs Find ... 44-46 Map ... 28 Power on/off ... 7 Profi le Active track ... 68, 72 Open track fi le ...
- Page 106 SPOT Communicator Batteries ... 15, 92-93 Buttons ... 13-14 Device pairing/connecting ... 15, 37 Lights... 14-15 Message history ... 42-43 Message types ... 38-40 Sending messages ... 15, 40-41 Send progress ... 41-42 Sun/Moon Page ... 74-75 Symbols Geocache ... 54 Waypoint ...
- Page 107 Navigate to ... 50 Project ... 52 Sort list ... 49 Symbols ... 49 View on map ... 51 Waypoints Page ... 48-52 Wireless settings ... 82 Zoom in/out Map ... 8 Profi le ... 73 Index...
- Page 108 Batteries The Earthmate PN-60 GPS devices can be powered by two AA ® batteries (NiMH, alkaline, or lithium), or a DeLorme-supplied Li-Ion rechargeable battery. You’ll find Earthmate PN-Series accessories at www.delorme.com. Rechargeable Lithium-Ion Battery Pack Caution Use only an Earthmate PN-Series Battery Type. Risk of explosion if battery is replaced by an incorrect type.
- Page 109 DeLorme not only embraced new technologies, it developed them. In the GPS field alone, DeLorme has been first to market with GPS for laptops, phones, and PDAs; voice-guided navigation, aerial imagery on a handheld receiver, and now, the integration of a handheld GPS with satellite navigation.
Need help?
Do you have a question about the Earthmate GPS PN-60 and is the answer not in the manual?
Questions and answers