Advertisement
Quick Links
Advertisement

Related Manuals for Parallax S2 ROBOT


Summary of Contents for Parallax S2 ROBOT
- Page 1 Propeller-powered and fully programmable! Open-source and user-hackable!
- Page 2 Boe-Bot and SumoBot are registered trademarks of Parallax Inc. Parallax, the Parallax logo, Propeller, S2, the S2 logo, and Stingray are trademarks of Parallax Inc. Sharpie is a registered trademark of Sanford, L.P. Copyright © 2010 Parallax Inc. All Rights...
-
Page 3: Package Contents
NiMH (nickel-metal- hydride) batteries. White poster board Serial Cable (#800-00003) for programming. If your computer lacks a serial port you would instead need a Parallax USB-to- Serial Adapter and cable Download the S2 Graphical User Interface (#28031). for Windows at www.parallax.com/go/s2. -
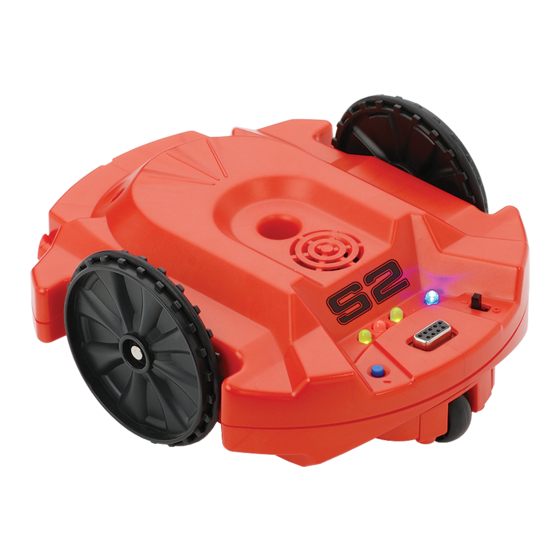
Page 4: Top View
toP VIew infrared emitters infrared detector light sensors pen port speaker bi-color indicator LED lights power switch power light programming port (for serial cable) reset button... -
Page 5: Bottom View
Bottom VIew line sensors wheel tire pen port battery cover tail wheel... -
Page 6: Battery Installation
Battery InstallatIon Step You need 6 (six) “AA” batteries. You may use 1.5V alkaline, 1.5V standard (carbon-zinc) or 1.2V rechargeable NiMH (nickel-metal-hydride) type batteries. •Do not mix different types of batteries. cautIon: •Do not mix old batteries with new batteries. •Do not store the S2 with batteries installed. Put the power switch in the “OFF” position. Step ”I” ”O” Place the S2 on a towel or other non- Step scratching surface, bottom side up. - Page 7 Look for polarity symbols (+/–) in Step battery compartment. Insert batteries to match up with polarity symbols. Replace the battery cover by inserting the tabs Step on the end closest to the tail wheel first and then pressing on the cover until it latches into place.
- Page 8 Demo 1: Light SenSorS button light sensors press The S2 has 3 light sensors. If you place your finger on a light sensor, the S2 can “see” it because you have blocked out the light shining on the sensor. Place your S2 on the floor in a brightly Step lit room.
- Page 9 Step Cover a light sensor hole with your finger. An LED will turn off. In this demo mode, the left light sensor controls the left LED, the center light sensor controls the center LED, and the right light sensor controls the right LED. Other Demos will use the indicator LEDs in a different way.
- Page 10 Demo 2: Light Seeking Behavior button presses The three light sensors can detect bright light in front of the S2. One sensor looks straight ahead, the other two look 30° to the right and left. Step While you cover the right light sensor, press and release the reset button. Step Listen for the beep, then uncover the light sensor.
- Page 11 The S2 plays a short song, then drives around the room seeking the brightest light within its view. extra Try this: In a dark room, hold a flashlight at floor level facing the S2. As you move the flashlight around the floor, the S2 will follow it!
- Page 12 Demo 3: oBject Detection button presses infrared emitters infrared detector Infrared light shines from the emitters, even though your eyes cannot see it. The S2 can detect the light after it reflects off an obstacle and bounces back to its infrared detector “eye.” Step While covering the center light sensor, press and release the reset button.
- Page 13 Step Place an object on the floor in front of the S2. If the S2 sees the object on its right, the right green LED turns on, and the speaker plays a tone. If no object is detected on the right side, the right LED turns red. If the S2 sees an object on its left, the left green LED turns on and the speaker plays a different tone.
- Page 14 Demo 4: avoiDing oBjectS Behavior button presses Step While holding your fingers on the center and right light sensors, press and release the reset button. Step When you hear the beep, uncover the light sensors. The S2 will drive around the room, turning to avoid objects.
- Page 15 The S2 has a stall sensor inside. If it gets stalled on an object it cannot see..it will back up, turn, and try driving forward again.
- Page 16 Print out a set of black lines from the “Tracks. Step pdf” (Download file from http://www.parallax. com/go/S2). For a view of what the printed tracks look like, see page 18 of this booklet.
- Page 17 Step While holding your finger on the left light sensor, press and release the reset button. Step When you hear the beep, uncover the light sensor. Place the S2 on the paper, and move it back and forth across the black line. If the Step right sensor sees the line, the right green LED will light up.
- Page 18 Make black lines on white paper as a track for the S2 to follow. Step Print out a set of black lines from the “Tracks. pdf” (Download file from http://www.parallax. com/go/S2). Do not use photograph printing ink, which reflects infrared light! Draw your own lines, ¾...
- Page 19 Step While holding your fingers on the left and right light sensors, press and release the reset button. Step Listen for the beep, then uncover the light sensor. The S2 turns from side to side to find the line, then starts following it. If the S2 loses the line on a tight corner, it will turn back and forth to look for...
- Page 20 Demo 7: ScriBBLe Behavior button presses Step Find: • white paper or poster board • a marker Place paper on the floor, and then place S2 on the paper. Step Place a marker in the pen port. The tip of marker must touch the paper.
- Page 21 Step While covering the left and center light sensors, press and release the reset button. Step Listen for the beep, then uncover the light sensors. The S2 will draw an approximate figure 8 and then beep. Pick up the S2 and put it down on another Step part of the paper.
- Page 22 Demo 8: amBuLance Behavior button presses Step While you cover all 3 light sensors, press and release the reset button. Step Listen for the beep, then uncover the light sensors. The S2 drives around blaring its siren and flashing its lights, while avoiding walls and obstacles.
- Page 24 This Propeller P8X32A-Q44 chip comes pre-programmed with the 8 Demo modes shown in this guide. You can also write your own custom programs on your PC, and download them to your S2 robot through a programming cable (sold separately, see Sys- tem Requirements).
- Page 25 Arrange them in the sequence you want, download the program, and your S2 robot will perform your routine. When you are done, you can press the Restore button on the tool bar to reload the original S2 Demo program.
- Page 26 With the Propeller’s multi-processing capability you will have more direct control over the mo- tors, sensors, speaker and lights. Parallax tools support Spin or assembly language under a Windows platform, but other suppliers offer C or PropBASIC on Mac, PC or Linux operating systems.
- Page 27 ProPeller ProgrammIng The S2 Robot Start-up Guide will get your S2 rolling, but there’s a tremendous amount of customizing that can be accomplished using the many available Propeller programming tools. You can program the S2 on a PC, a Mac, or in Linux using Spin, assembly language, C, or PropBASIC.
- Page 28 Please contact Parallax directly for help! Web site: www.parallax.com/go/S2 E-mail: support@parallax.com Toll free Tech Support in USA or Canada (888) 99-STAMP Toll free Sales & Information in USA or Canada (888) 512-1024 Our phone number: (916) 624-8333 Thank you for purchasing the S2 Robot! We want you to have the best possible robotics experience. learn about the whole family of Parallax robots at www.parallax.com/robots Boe-Bot Robot...
Need help?
Do you have a question about the S2 ROBOT and is the answer not in the manual?
Questions and answers