Table of Contents
Advertisement
Quick Links
Penguin Robot Kit
(Red #27313)
(Blue #27314)
(Clear #27315)
(Black #27316)
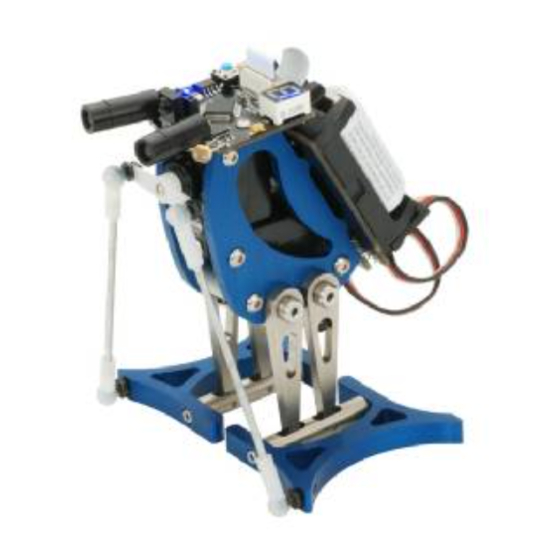
The Penguin Robot is a precision-machined 4" tall biped. The Penguin walks forward with a tilt-stride
action and turns by sweeping both feet on the ground in opposite directions. Individual movement
segments are linked together for this robot to walk. This basic biped design functions best in the
Penguin's small scale. The Penguin mechanics have a close-tolerance fit and are designed to provide
precise electronic control.
The Penguin's microcontroller is an embedded BASIC Stamp2px24 module, the fastest and most powerful
BASIC Stamp microcontroller model in the Parallax lineup. The Penguin requires three hours to assemble,
after which it is a PBASIC programming challenge to exploit all of the robot's capabilities.
Note: This document is for Penguin Robots Rev A or Rev B.
If your robot has a "REV B" label near the 7-segment display on the
PCB, please look out for assembly instruction differences specific to
Rev B.
(Note that Penguin Robots Rev A are not labeled.)
Copyright © Parallax Inc.
Web Site: www.parallax.com
Forums: forums.parallax.com
Sales: sales@parallax.com
Technical: support@parallax.com
Penguin Robot (#27313-27316)
Office: (916) 624-8333
Fax: (916) 624-8003
Sales: (888) 512-1024
Tech Support: (888) 997-8267
v1.4 2/16/2010 Page 1 of 23
Advertisement
Table of Contents

Related Manuals for Parallax Penguin


Summary of Contents for Parallax Penguin
- Page 1 (Clear #27315) (Black #27316) The Penguin Robot is a precision-machined 4” tall biped. The Penguin walks forward with a tilt-stride action and turns by sweeping both feet on the ground in opposite directions. Individual movement segments are linked together for this robot to walk. This basic biped design functions best in the Penguin’s small scale.
-
Page 2: Table Of Contents
1.0 INTRODUCTION 1.1. AUDIENCE The Penguin isn’t a beginner’s robot. The Penguin is a small desktop robot, not intended for long-distance adventuring. The Penguin’s electronics are fully assembled and wired to an assortment of I/O devices. Additionally, it has a fairly complex programming process which is more difficult to understand than a two-wheeled robot. -
Page 3: System And Software Requirements
If you encounter a missing part contact us immediately and we’ll put it in the mail for you. The best way to do this is by e-mail to sales@parallax.com, or you can call us at (888) 512-1024. Copyright © Parallax Inc. -
Page 4: Body Kit Mechanical Drawings
1.5. BODY KIT MECHANICAL DRAWINGS Copyright © Parallax Inc. Penguin Robot (#27313-27316) v1.4 2/16/2010 Page 4 of 23... -
Page 5: Assembly
2.1. TOOLS REQUIRED The Penguin kit includes a portion of the tools required to build the robot (the hex keys, drill bit, and screwdriver). You will need to provide these additional tools to finish assembly, which are not included in... - Page 6 This step centers the servos, so that further mechanical tuning will be minimized once the Penguin is assembled. It also ensures that you won’t need to take the Penguin apart once you start programming it. The servos need to be centered with a 1.5 ms pulse, following the directions below: a.
- Page 7 1/16” hex key. The picture shows how the servo splines are oriented: the stride (bottom) servo spline is near the rear of the Penguin; the tilt (top) servo spline is near the top of the Penguin. Tighten the screws.
- Page 8 The Penguin’s legs and ankles come pre-assembled since they required a specialized tool to properly insert small dowel pins through the round ankle. Each Penguin has a pair of left and right legs. Also notice that there’s a round machined recess with a diameter slightly larger than the shoulder screw head on each pair of legs.
- Page 9 Step 6: Mount Penguin feet to the ankles The Penguin kit has (4) 4-40 1/4" long, 0.149" diameter stainless shoulder screws which are used to attach the feet to the ankles. The head of these screws provides a bearing surface for the ankle so it may rotate freely within the foot when Penguin leans from side to side.
- Page 10 Step 7: Screw 2-56 ball links into feet The Penguin kit contains two different sizes of ball links. The 2-56 threaded ball links are used in this step (the 1/16” ball links are used in a subsequent step). Open the package and thread the 2-56 ball link post into the front of each foot.
- Page 11 Take your time and use a low drill speed. If you have secured the drill bit in a vise, gently twist the servo horn onto the bit to enlarge the hole. Do not press down, and be careful not to injure your hands. Copyright © Parallax Inc. Penguin Robot (#27313-27316) v1.4 2/16/2010 Page 11 of 23...
- Page 12 Step 11: Attach the servo horn to the tilt servo Press the assembled servo horn onto the tilt servo, positioning it cross-wise to the Penguin body. Do not over-tighten the screw; you may need to take off the horn and re-center the servo if it gets moved during the next step.
- Page 13 Step 12: Connect the tilt servo horn and feet with the threaded rods Now you’re ready to snap the two threaded rods onto the front of the Penguin. The ball joints can be snapped onto the feet by hand. Attaching them to the servo horn ball joints is a bit more difficult. For this you can use a small pair of pliers.
- Page 14 Step 13: Attach BASIC Stamp 2px24 board to the Penguin body The Penguin’s top board contains the BASIC Stamp 2px24 circuitry. It is mounted on the top of the Penguin using (2) 2-56 1/4" button socket cap stainless steel screws and the 0.050” hex key. You’ll need to fold the tilt servo’s wire over to tighten the board against the top of the Penguin.
- Page 15 Step 14: Attach Power Pack board to the Penguin body The Penguin’s power pack board is installed using (4) 2-56 ¼” long flathead screws and the 0.050” hex key. When you mount this board be sure that the servo wires are not preventing it from properly seating into position.
- Page 16 Coil up the servo wires behind the robot. It’s also possible to hide them in the Penguin’s body, but that requires substantial attention to detail considering the lack of free space.
-
Page 17: Mechanical Troubleshooting Guide
It is imperative that your Penguin operate smoothly and without friction to be an effective walker. Contact us if you have any problems. Below are examples of common Penguin assembly difficulties and solutions to them. -
Page 18: Programming The Penguin
3.1. PROGRAMMING CONCEPT Programming the Penguin to walk is a matter of shifting its center of gravity from side to side with the tilt servo, coordinated with moving the legs forward and backward with the stride servo. The BS2px24’s high speed and expanded memory and RAM are useful for storing motion sequences and for performing the computations needed in sensor-based autonomous navigation. -
Page 19: Example Programs
Penguin-7SegmentLEDTest-v1.3.bpx, page 21 Penguin-PhotoresistorTest.bpx, page 20 Penguin-CompassTest.bpx, page 22 Once you are familiar with the I/O capabilities of the Penguin, the following programs can be used to demonstrate all of the Penguin’s abilities. Download from the Penguin product page at www.parallax.com. Penguin-AutonomousNavigation.bpx Penguin-MigrateNorth.bpx... -
Page 20: Test Code Listings
3.7. TEST CODE LISTINGS ' Parallax Penguin Robot ' Penguin-SpeakerTest.bpx ' {$STAMP BS2px} ' {$PBASIC 2.5} Speaker Byte Freq Word 'Inverse of 12th root of 2 multiplied by 65536 'Used to divide by one semitone in a 12 note octave... - Page 21 ' Parallax Penguin Robot ' Penguin-IRTest.bpx ' {$STAMP BS2px} ' {$PBASIC 2.5} REmitter LEmitter IrInput LeftIr RightIr DEBUG CLS ' Prepare debug screen DEBUG "Infrared sensor status:", CR, "Left:", CRSRXY, 15, 1,"Right:" GOSUB ReadIr ' Update debug screen with DEBUG CRSRXY, 6, 1, DEC LeftIr...
- Page 22 ' Parallax Penguin Robot ' Penguin-CompassTest.bpx ' {$STAMP BS2px} ' {$PBASIC 2.5} Compass ' Transceives to/from Din/Dout Clock ' Sends pulses to HM55B's Clock Enable ' Controls HM55B's /Enable Reset %0000 ' Reset command for HM55B Measure %1000 ' Start measurement command...
-
Page 23: Electronics
The batteries we are selling (Rayovac and Panasonic) have approximately the same capacity as the more expensive ones and they’re sold by Parallax at less than half the price of retail outlets! Don’t be fooled into paying high prices for CR123 batteries. If you don’t buy your CR123 batteries from Parallax then check eBay for the same brand we are selling (usually Rayovac or Panasonic).
Need help?
Do you have a question about the Penguin and is the answer not in the manual?
Questions and answers