
Related Manuals for Argos Scandinavia


Summary of Contents for Argos Scandinavia
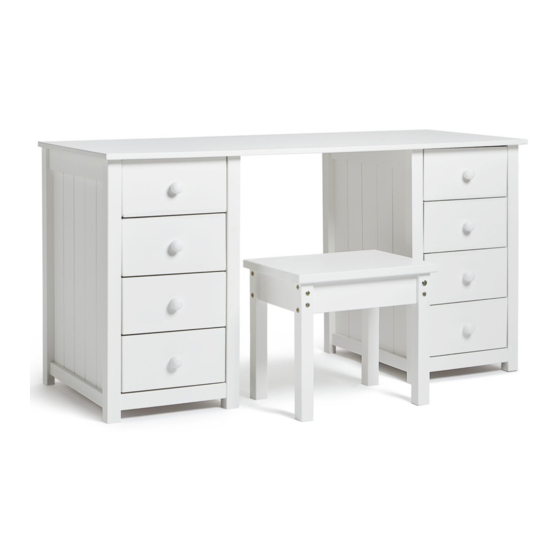
- Page 1 Scandinavia Dressing table w. 8 drawers + stool 580mm 1400mm 740mm Page 1 of 12 Scandinavia dressing table w. 8 drawers + stool...
- Page 2 Keep small components out of the reach of children. Fittings A, B, C, D, E, F, G, H, J, L and N are shown in their a ctual dimensions. Tools needed. Page 2 of 12 Scandinavia dressing table w. 8 drawers + stool...
- Page 3 439 x 297mm 2 pcs. Stool leg Side rail End rail 4 pcs. 2 pcs. 2 pcs. 340 x 90mm 194 x 90mm Seat 1 pcs. 450 x 350mm Page 3 of 12 Scandinavia dressing table w. 8 drawers + stool...
- Page 4 Place the cam into the Tighten: Turn the cam to with the attached bolt onto the right. wooden panel. hole, arrow pointing the other wooden panel. towards the bolt. Page 4 of 12 Scandinavia dressing table w. 8 drawers + stool...
- Page 5 2 Pcs. 4 Pcs. Side, right 2 Pcs. 3. Mounting the bolts to the top. Screw the bolts "C" into the holes indicated on the top "1". 8 Pcs. Page 5 of 12 Scandinavia dressing table w. 8 drawers + stool...
- Page 6 "3" onto the top "1". DONT fix the sides to the top until fig. 8. See page 7. Side, right Fig. 6.1 Side, right Rabbet = Back Rabbet = Back Fig. 6.2 Page 6 of 12 Scandinavia dressing table w. 8 drawers + stool...
- Page 7 See page 4 "Function of cam & bolt". Place the cam "A" into the hole indicated, arrow pointing towards the bolt. Tighten: Turn the cam to the right. 8 Pcs. Page 7 of 12 Scandinavia dressing table w. 8 drawers + stool...
- Page 8 NO GAP between the right hand side "3" and the back "11". Back Fasten the back with nails "G" Back along the sides. Use the nail guide. 24 Pcs. Page 8 of 12 Scandinavia dressing table w. 8 drawers + stool...
- Page 9 Place the drawer back "7" in between the drawer sides "8" and "9". Fix the drawer back using screws "F" into the holes indicated. 32 Pcs. 8 Pcs. Page 9 of 12 Scandinavia dressing table w. 8 drawers + stool...
- Page 10 8 Pcs. 18. Inserting the dowels to the end rail. Knock the dowels "J" into the holes indicated on the end rails "13". End rail 2 Pcs. 4 Pcs. Page 10 of 12 Scandinavia dressing table w. 8 drawers + stool...
- Page 11 Press the stool legs "12" onto the side rails "14". Fix the siderails using screws "L" and allen key "K" through the holes indicated. Side rail 4 Pcs. Page 11 of 12 Scandinavia dressing table w. 8 drawers + stool...
- Page 12 Any flexing that has occurred during transport will re-correct it self once this product is correctly assembled. Tighten all joints of the furniture after six months. Please keep these instructions in a safe place for future use. Page 12 of 12 Scandinavia dressing table w. 8 drawers + stool...
- Page 13 Scandinavia - Dressing table w. 8 Drws + stool Assembly Instruction - Please keep for future reference 642/3746 Dimensions Important - Please read these instructions fully before starting assembly If you need help or have damaged or missing parts, call the Customer Helpline: 08456 400800...
- Page 14 Safety and Care Advice Important - Please read these instructions fully before starting assembly Care and maintenance Only clean using a damp cloth From time to time check that This product should not be discarded with household and mild detergent, do no use there are no loose screws on waste.
- Page 15 Components - Panels Please check you have all the fittings listed below...
- Page 16 If you have damaged or missing components, Components - Fittings call the Customer Helpline: 08456 400800 Please check you have all the fittings listed below Tools required Ruler - Use this ruler to help correctly identify the screws...
- Page 17 Key Diagram. Function of cam & locking pin.
- Page 18 Assembly instructions Assembly of dressing table 1. Fixing the drawer runners to the sides. Fix the wood runners "4" to the sides "2" and "3", using screws "E". Screw the screw in until the screw head is sunk and flush with the wood. 2.
- Page 19 Assembly instructions 4. Inserting the dowels to the plinth. Knock the dowels "H" into the holes indicated on the plinths "5". 5. Mounting the plinth to the right hand side. Press the plinths "5" onto the right hand side "3". See page 5 "Function of cam and locking pin".
- Page 20 Assembly instructions 7. Mounting the left hand side to the plinth. Lower the left hand sides "2" onto the top "1". Press the sides onto the plinths "5". See page 5 "Function of cam and locking pin". Place the cams "A" into the hole indicated, arrow pointing towards the side / locking pins.
- Page 21 Assembly instructions 9. Nailing the back to the top and sides. Place the back into the rabbet of the top "1" and the side "3". See fig. 9.1 Ensure that there is NO GAP between the right hand side "3" and the back "11", NOR between the top and the back.
- Page 22 Assembly instructions 11. Mounting the drawer sides to the drawer front. Press the drawer sides "8" and "9" onto the drawer front "6". Place the cams "B" into the holes indicated, arrows pointing towards the drawer front / locking pins. Tighten: Turn the cam to the right.
- Page 23 Assembly instructions 14. Mounting the knobs to the drawer front. Fix the knob "K" to the drawer front using screws "F". 15. Adding the drawers to the table. Slide the drawers onto the drawer runners. Assembly of dressing stool 16. Mounting the locking pin to the stool legs.
- Page 24 Assembly instructions 18. Mounting the stool legs to the end rails. Press the stool legs "12" onto the end rail "13". See page 5 "Function of cam and locking pin". Place the cams "B" into the holes indicated, arrows pointing towards the locking pins.
- Page 25 Assembly instructions 21. Mounting the side rails onto the stool legs - 2. Press the stool legs "12" onto the side rails "14". Fix the side rails using screws "M" and allen key "J" through the holes indicated. 22. Adding the seat to the stool.
- Page 40 Dear Customer Dear Customer Please note that the product you have purchased is a natural living timber. Just like nature itself, wood varies in shape and colour. Knots, vein patterns, resin pockets and colour differences contribute to giving the piece of furniture its beauty and form - a natural part of solid wood.
Need help?
Do you have a question about the Scandinavia and is the answer not in the manual?
Questions and answers