Table of Contents
Advertisement
Advertisement
Table of Contents
Troubleshooting

Related Manuals for Gateway Profile Profile 5


Summary of Contents for Gateway Profile Profile 5
-
Page 1: User Guide
User Guide ™ Gateway Profile 5/5.5... -
Page 3: Table Of Contents
Gateway contact information ........ - Page 4 ......... . . 47 www.gateway.com...
- Page 5 Before calling Gateway Customer Care ........
- Page 6 ..............137 www.gateway.com...
-
Page 7: Getting Help
Chapter 1 Getting Help Using the Gateway Web site ■ Using Help and Support ■ Using BigFix ■ Using Your Computer guide ■ Using Do More With Gateway ■ Using online help ■ Contacting Gateway ■... -
Page 8: Thank You For Purchasing Our Computer
Thank you for purchasing our computer! You have made an excellent decision choosing Gateway. We are sure that you will be pleased with the outstanding quality, reliability, and performance of your new computer. Each and every Gateway computer uses the latest technology and passes through the most stringent quality control tests to ensure that you are provided with the best product possible. -
Page 9: Gateway Web Site
Gateway Web site Gateway's online support is available 24 hours per day, 7 days per week and provides the most current drivers, product specifications, tutorials, and personalized information about your computer. Visit the Gateway eSupport Web site at support.gateway.com. www.gateway.com... -
Page 10: Using Esupport
General Tutorials to get the latest software updates for BIOS and My Downloads to get a list of Gateway telephone numbers for both sales and “Telephone support” on page www.gateway.com to access product documentation,... -
Page 11: Help And Support
Your computer includes Help and Support, an easily accessible collection of help information, troubleshooters, and automated support. Use Help and Support to answer questions about Windows and to help you quickly discover and use the many features of your Gateway computer. To start Help and Support: ■... -
Page 12: Searching For A Topic
To learn more about using BigFix: ■ From the BigFix program, click box. Search box. You must be connected to the Search Search Results , then click Accessories System Tools , then click Help Tutorial www.gateway.com Search button. list. BigFix... -
Page 13: Using Your Computer Guide
You can search for information by viewing the help contents, checking the index, searching for a topic or keyword, or browsing through the online help. , then click Gateway Documentation menu or by clicking a Help www.gateway.com button. -
Page 14: Gateway Contact Information
Gateway contact information To help you locate Gateway contact information, you can find the Gateway Web site, Online Support, and technical support contact information on the label located on your computer case. www.gateway.com... -
Page 15: Checking Out Your Gateway Computer
Chapter 2 Checking Out Your Gateway Computer Identifying features ■ Locating your computer model and serial ■ number Locating the Microsoft Certificate of ■ Authenticity Locating the specifications for your ■ computer Purchasing accessories ■... -
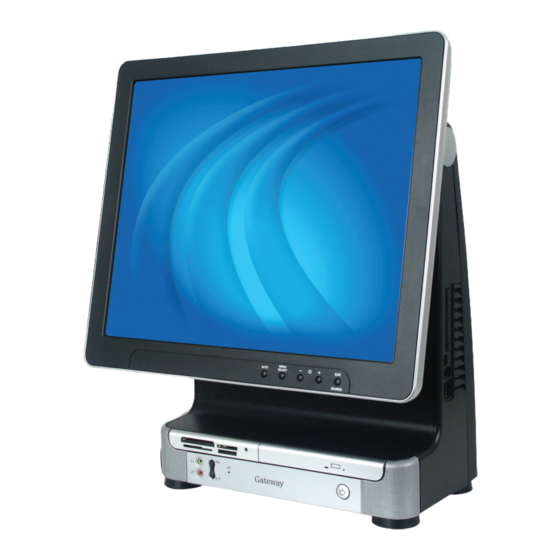
Page 16: Front
Front Speaker Headphone jack Microphone jack Memory card CD/DVD/ reader or Recordable diskette drive drive Volume control buttons www.gateway.com Display controls Speaker Power button... - Page 17 Settings” in Using Your Computer which has been included on your hard drive. To access this guide, click Start, All Programs, then click Gateway Documentation. Use these controls to enter the OSD (on-screen display) and adjust the computer display settings. For more information...
-
Page 18: Back
Monitor out port (optional) Modem jack (optional) USB ports PS/2 mouse port Audio Parallel line in port jack Microphone jack PS/2 keyboard Audio port line out Serial jack port www.gateway.com KB/Mouse Connect button (optional) Monitor in port Power connector... - Page 19 Plug a serial device (such as a digital camera) into this port. For more information, see “Installing a printer, scanner, or other peripheral device” on page Plug an external video source into this port. Plug the power cable into this connector. www.gateway.com “Connecting to a wired “Installing...
-
Page 20: Right Side
Plug USB (Universal Serial Bus) devices (such as a USB Iomega™ Zip™ drive, printer, scanner, camera, keyboard, or mouse) into these ports. For more information, see a printer, scanner, or other peripheral device” on page www.gateway.com PC Card slot IEEE 1394 port (4-pin) -
Page 21: Microsoft Certificate Of Authenticity
Finding your specifications For more information about your computer, such as memory size, memory type, and hard drive size, see visit Gateway’s eSupport page at support.gateway.com. The eSupport page also has links to additional Gateway documentation and detailed specifications. For more information, see “Using eSupport”... -
Page 22: Accessories
Accessories To order accessories, visit the Accessory Store at accessories.gateway.com. Memory Large programs, such as multimedia games or graphics programs, use a lot of memory. If your programs are running more slowly than you think they should, try adding more memory. -
Page 23: Getting Started
Chapter 3 Getting Started Using your computer safely ■ Protecting your computer from power ■ source problems Turning your computer on and off ■ Adjusting the volume ■ Using the keyboard and the mouse ■ Using the computer display ■ Installing peripheral devices ■... -
Page 24: Working Safely
■ Select a flat surface for your computer desk. Top of screen is not higher than eye level Feet are flat on the floor www.gateway.com Screen is perpendicular to your line of sight... -
Page 25: Setting Up Your Computer And Computer Accessories
Avoiding discomfort and injury from repetitive strain ■ Vary your activities to avoid excessive repetition. ■ Take breaks to change your position, stretch your muscles, and relieve your eyes. ■ Find ways to break up the work day, and schedule a variety of tasks. www.gateway.com... -
Page 26: Protecting From Power Source Problems
UPS, a UPS lets you run your computer long enough to save your work and shut down your computer normally. Starting your computer To start your computer: Connect the cables to your computer. See the setup poster for more information. Press the power button. Power button www.gateway.com... -
Page 27: Waking Up Your Computer
Tips & Tricks For more information about changing the power button mode, see “Changing Power-Saving Settings” in Using Your Computer which has been included on your hard drive. To access this guide, click Start, All Programs, then click Gateway Documentation. www.gateway.com... -
Page 28: Turning Off Your Computer
For more information about changing the power button mode, see “Changing Power-Saving Settings” in Using Your Computer which has been included on your hard drive. To access this guide, click Start, All Programs, then click Gateway Documentation. To turn off your computer: Click... -
Page 29: Restarting (Rebooting) Your Computer
As a part of the regular startup process, a program to check the disk status runs automatically. When the checks are finished, Windows starts. . The Task Manager window opens. tab, then click the program that is not responding. www.gateway.com... -
Page 30: Using The Cord Cover
To remove the cord cover: ■ Press the cord cover’s bottom tabs inward, then rotate the cord cover away from the computer. www.gateway.com... -
Page 31: Locking Your Computer
You can install a Kensington™ cable lock to prevent the theft of your computer or its internal components. While the cable lock is installed, the computer’s back panel cannot be removed. To lock your computer: ■ Install a cable lock into the Kensington lock slot on the back of your computer. www.gateway.com Kensington lock slot... -
Page 32: Adjusting The Volume
Tips & Tricks For instructions on how to adjust the volume in Windows, see “Adjusting the Volume” in Using Your Computer which has been included on your hard drive. To access this guide, click Start, All Programs, then click Gateway Documentation. www.gateway.com... -
Page 33: Using The Keyboard
Move the cursor up, down, right, or left. Numeric keypad Use these keys to type numbers when the numeric keypad ( is turned on. Function keys Windows keys Application (Search utility), (Run utility), and www.gateway.com Navigation keys Indicators Directional Numeric keys keypad , or keys are CROLL (Explorer utility). -
Page 34: Multifunction Keyboard
Move the cursor up, down, right, or left. Numeric keypad Use these keys to type numbers when the numeric keypad ( turned on. Function keys Windows keys Application , or (Explorer utility). www.gateway.com Navigation keys Indicators Directional Numeric keys keypad keys are activated. CROLL... - Page 35 Opens the My Documents folder. You can customize this button to open another program. Open online help. You can customize this button to open another program. Open your e-mail program. You can customize this button to open another program. www.gateway.com Next Search E-mail Internet...
-
Page 36: Wireless Keyboard
Function keys Icons Press to... Open online search. You can customize this button to open another program. Open your Web browser. You can customize this button to open another program. Special-function buttons Application www.gateway.com Navigation keys Directional Numeric keys keypad... -
Page 37: Using The Mouse
You can use the left and right buttons on the mouse to select objects on the display. You can use the scroll wheel on the mouse to move through a document. This feature is not available in all programs. www.gateway.com... - Page 38 “Changing the mouse or touchpad settings” in Using Your Computer which has been included on your hard drive. To access this guide, click Start, All Programs, then click Gateway Documentation. For instructions on how to clean the mouse, see Do this...
-
Page 39: Connecting The Modem
DSL modems, connect to your computer’s Ethernet jack. For more information, see “Using the Internet” in Using Your Computer which has been included on your hard drive. To access this guide, click Start, All Programs, then click Gateway Documentation. www.gateway.com... -
Page 40: Computer Display
You can adjust your computer display image by using external controls (located near the display itself) and software controls (accessible in Windows). For more information about software controls, see “Adjusting the screen and desktop settings” in Using Your Computer which has been included on your hard drive. To access this guide, click... -
Page 41: Osd Options
You may need to readjust brightness after the computer display has warmed up. Contrast. Adjusts the contrast of the computer display. www.gateway.com button. MENU/SELECT button to return to the EXIT Step 2 through... - Page 42 (This menu is unavailable on some models) Clock. Minimizes any vertical bars or stripes visible on the computer display background. The horizontal display size will also change. Phase. Removes any horizontal distortion and clears or sharpens the image of characters. www.gateway.com...
- Page 43 USER For more information about adjusting the color depth and screen resolution using software controls, see “Adjusting the screen and desktop settings” in Using Your Computer which has been included on your hard drive. To access this guide, click click...
-
Page 44: Installing A Printer, Scanner, Or Other Peripheral Device
Help and For more information about installing peripheral devices, click Start, Support then click Help and Support. Type the keyword installing devices in the Search box “Checking Out Your Gateway Computer” on , then click the arrow. www.gateway.com ®... -
Page 45: Using Drives And Ports
Chapter 4 Using Drives and Ports Using the diskette drive ■ Using the memory card reader ■ Using CD or DVD drives ■... -
Page 46: Using The Diskette Drive
(for example, the A: drive), then double-click the file name. To remove the diskette, make sure that the drive activity light is off, then press the diskette eject button. Diskette Diskette slot eject button , then click Start www.gateway.com . Double-click the My Computer... -
Page 47: Using The Memory Card Reader
Lower left ™ Lower left ™ Upper right ® Lower right ™ Lower right www.gateway.com Insert Label facing up Label facing up Label facing up Label facing down (gold contact area facing up) Label facing up Label facing up Label facing up... -
Page 48: Inserting A Memory Card
Do not use the remove hardware the memory card. If you use the remove hardware icon, your computer will not recognize your memory card reader until you restart the computer. , then click Start icon in the taskbar to remove www.gateway.com . Double-click My Computer... -
Page 49: Using The Cd Or Dvd Drive
You can use your computer to enjoy a wide variety of multimedia features. Identifying drive types Your Gateway computer may contain one of the following drive types. Look on the front of the drive for one or more of the following logos: If your drive has this logo... -
Page 50: Inserting A Cd Or Dvd
Inserting a CD or DVD Important Some music CDs have copy protection software. You may not be able to play these CDs on your computer. Manual eject hole Activity indicator Eject button www.gateway.com... - Page 51 When you place a single-sided disc in the tray, make sure that the label side is facing up. If the disc has two playable sides, place the disc so the name of the side you want to play is facing up. Gently push the tray in until it is closed. www.gateway.com...
-
Page 52: Playing A Cd
Tips & Tricks For more information about playing DVDs, see “Playing DVDs” in Using Your Computer which has been included on your hard drive. To access this guide, click Start, All Programs, then click Gateway Documentation. Creating CDs and DVDs... -
Page 53: Maintaining Your Computer
Chapter 5 Maintaining Your Computer Caring for your computer ■ Updating Windows ■ Protecting your computer from viruses ■ Cleaning your computer ■ Restoring your system ■ Opening the computer case ■ Adding memory and replacing the ■ battery... -
Page 54: Caring For Your Computer
Scan for Available Updates Help and For more information about Windows Update, click Start, then click Support Help and Support. Type the keyword Windows Update in the HelpSpot Search box , then click Windows Update , then click the arrow. www.gateway.com... -
Page 55: Protecting Your Computer From Viruses
Type the keyword viruses in the Search box then click the arrow. To scan for viruses: Click Start All Programs AntiVirus opens. Scan for viruses ® AntiVirus program to check files and programs that are on , then click Norton AntiVirus www.gateway.com . Norton Norton AntiVirus 2004... - Page 56 To remove a virus: If Norton AntiVirus finds a virus, follow all on-screen instructions to remove the virus. Turn off your computer and leave it off for at least 30 seconds. Turn on your computer and rescan for the virus. Scan www.gateway.com...
-
Page 57: Cleaning Your Computer
Use a damp, lint-free cloth to clean your computer and other parts of your system. Do not use abrasive or solvent cleaners because they can damage the finish on components. , then click Norton AntiVirus Finish www.gateway.com LiveUpdate - Norton AntiVirus . The... -
Page 58: Cleaning The Keyboard
If the mouse pointer begins moving erratically across the computer screen or becomes difficult to control precisely, cleaning the mouse will likely improve its accuracy. To clean your optical mouse: ■ Wipe the bottom of the mouse with a damp lint-free cloth www.gateway.com... - Page 59 Remove any dust, lint, or dirt from the mouse ball with a soft cloth. Clean the mouse rollers with a cotton swab dipped in isopropyl alcohol. Mouse rollers Replace the mouse ball and lock the retaining ring into place. www.gateway.com...
-
Page 60: Cleaning Cds Or Dvds
DVDs or you can restore from the backup files located on the hard drive. The instructions to use the Restore CDs or DVDs or hard drive backup files are including with the blank CDs or DVDs that came with your computer. www.gateway.com... -
Page 61: Preventing Static Electricity Discharge
Do not lay components on the outside of antistatic bags because only the inside of the bags provide electrostatic protection. ■ Always hold expansion cards by their edges or their metal mounting brackets. Avoid touching the edge connectors and components on the cards. Never slide expansion cards or components over any surface. www.gateway.com... -
Page 62: Opening The Case
Remove the four screws on the back of the computer case. Screw Screw With your hands positioned on each side of the case, swing the back panel up and away from the case and set the panel aside. www.gateway.com Screw Screw... -
Page 63: Closing The Case
Hook the back panel’s tabs into the notches on the top of the open computer’s back, then swing the back panel down and press it into place. Replace the four screws removed previously. Return your computer to an upright position, then reconnect the external cables and power cord. www.gateway.com... -
Page 64: Replacing The Hard Drive
To replace the hard drive: Open the case by following the instructions in Warning Make sure that you removed all external cables and the power cord. Press the drive cage release latch. “Opening the case” on page www.gateway.com... - Page 65 While holding the latch, pull the drive cage out of the computer. (Profile 5 shown) Disconnect the drive cable and power cable from the hard drive. www.gateway.com...
- Page 66 Remove the four screws that secure the hard drive to the hard drive cage. Screw Remove the drive. Screw Screw www.gateway.com Screw...
- Page 67 Insert the new drive into the drive cage and secure it with the four screws removed earlier. Connect the drive cable and power cable to the drive. Slide the drive cage into the computer until it clicks into place. Close the case by following the instructions in “Closing the case” on page www.gateway.com...
-
Page 68: Installing Memory
Find the memory module banks, sometimes called add-in slots, on your system board. If you are removing a memory module from the memory module bank, gently pull the plastic tabs away from the sides of the memory module and remove it. “Opening the case” on page www.gateway.com... - Page 69 The tabs on the sides of the memory module should secure the memory module automatically. When the module is secure, you hear a click. Close the case by following the instructions in Turn on your computer. Windows starts and the Windows desktop appears. Click , then click Start...
-
Page 70: Adding And Removing Pc Cards
Adding a PC Card To insert a PC Card: ■ Push the card firmly into the PC Card slot with the label side facing the front until the outer edge of the card is flush with the side of your computer. www.gateway.com... -
Page 71: Removing A Pc Card
If the remove hardware icon does not appear on the taskbar, click the show hidden icons Release the eject button by pressing the PC Card eject button once. Eject the PC Card by pressing the eject button again. icon in the taskbar, then select the PC Card name and button. www.gateway.com... - Page 72 www.gateway.com...
-
Page 73: Troubleshooting
Chapter 6 Troubleshooting Troubleshooting typical hardware and ■ software problems Getting telephone support ■ Using automated troubleshooting ■ systems Getting tutoring and training ■... -
Page 74: Safety Guidelines
■ If an error message appears on the screen, write down the exact message. The message may help Gateway Customer Care in diagnosing and fixing the problem. ■ If you added or removed peripheral devices, review the installation procedures you performed and make sure that you followed each instruction. -
Page 75: Troubleshooting
Make sure that the volume controls are turned up. For more information, see “Adjusting the volume” on page ■ Make sure that the mute controls are turned off. For more information, see the volume” on page “Identifying drive types” on page “Cleaning CDs or DVDs” on page www.gateway.com “Adjusting... -
Page 76: Computer
Make sure that the power cord is connected to an AC power source and your computer is turned on. Diskette drive The diskette drive is not recognized ■ Shut down and restart your computer. “Cleaning CDs or DVDs” on page “Cleaning CDs or DVDs” on page www.gateway.com “Identifying... -
Page 77: Display
Change the screen resolution from the Display Properties dialog box. Tips & Tricks For more information, see “Adjusting the color depth” in Using Your Computer which has been included on your hard drive. To access this guide, click Start, All Programs, then click Gateway Documentation. , then click Start All Programs www.gateway.com... -
Page 78: Dvd Drives
Tips & Tricks For more information, see “Adjusting the screen and desktop settings” in Using Your Computer which has been included on your hard drive. To access this guide, click Start, All Programs, then click Gateway Documentation. DVD drives “CD or DVD drives” on page , then click the arrow. -
Page 79: File Management
Delete unnecessary files from the hard drive using Disk Cleanup. For instructions on deleting unnecessary files, see “Using Disk Cleanup” in Using Your Computer which has been included on your hard drive. To access this guide, click then click Gateway Documentation ■ Empty the Recycle Bin by right-clicking the Recycle Bin Caution All deleted files will be lost when you empty the Recycle Bin. -
Page 80: Internet
Make sure that your account with your Internet service provider (ISP) is set up correctly. Contact your ISP technical support for help. , then click the arrow. Start All Programs to restart your computer. www.gateway.com , then click Gateway NTER “Back” on page 12 to make... -
Page 81: Keyboard
Clean the keyboard by using an aerosol can of air with a narrow, straw-like extension to remove dust and lint trapped under the keys. ■ Try a keyboard that you know works to make sure that the keyboard port works. ■ Reinstall the keyboard device driver. , then click the arrow. www.gateway.com... -
Page 82: Memory
Make sure that your computer is connected to the telephone line and the telephone line has a dial tone. ■ Make sure that the modem cable is less than 6 feet (1.8 meters) long. , then click the arrow. “Back” on page 12 to make sure that the connections have been www.gateway.com... - Page 83 If you can connect on this line, call your telephone service. . The Control Panel window opens. If your Control Panel Printers and Other Hardware icon, then click the www.gateway.com tab. Dialing Rules Edit...
- Page 84 Control Panel is in Category View, click Click the Phone and Modem Options “Internet” on page “Back” on page 12 . The Control Panel window opens. If your Control Panel Printers and Other Hardware icon, then click the www.gateway.com to make sure that the tab. Modems...
-
Page 85: Mouse
, then click the arrow. . The Control Panel window opens. If your Control Panel Printers and Other Hardware icon, then click the tab, then adjust the Speaker volume www.gateway.com . If information about the modem tab. Modems Properties control. -
Page 86: Networks
Make sure that the power cord is free from cuts or damage. Replace any damaged cables. “Cleaning the mouse” on page 87. For more information about troubleshooting , then click the arrow. is turned off, then retype the password. www.gateway.com 121. -
Page 87: Printer
. The Control Panel window opens. If your Control Panel Printers and Other Hardware icon. The Printers and Faxes window opens. . The Control Panel window opens. If your Control Panel Printers and Other Hardware icon. The Printers and Faxes window opens. www.gateway.com... -
Page 88: Sound
For more information about sound troubleshooting, click Start, then click Help and Support. Type the keyword sound troubleshooter Support in the Search box , click Use Printer Offline Use Printer Offline www.gateway.com to clear the check mark. , then click the arrow. “Adjusting , then click the arrow. -
Page 89: Telephone Support
If you have recently installed hardware or software, make sure that you have installed it according to the instructions provided with it. If you did not purchase the hardware or software from Gateway, see the manufacturer’s documentation and technical support resources. -
Page 90: Telephone Numbers
Telephone numbers Gateway offers a wide range of customer service, Customer Care, and information services. Automated troubleshooting system Service description Use an automated menu system and your telephone keypad to find answers to common problems. Telephone numbers You can access the following services through your telephone to get answers to your... -
Page 91: Self-Help
Type the keyword practice in the Search box then click the arrow. Tutoring For help on using hardware or software that came with your Gateway computer, contact Gateway's fee-based tutorial hotline: ■ 800-229-1103 (rate charged per minute; charged to a major credit card) ■... - Page 92 www.gateway.com...
-
Page 93: Networking Your Computer
Chapter 7 Networking Your Computer Introducing networking ■ Creating an Ethernet network ■ Testing your network ■ Sharing your resources ■ Troubleshooting your Ethernet network ■... -
Page 94: Introduction To Networking
With a network, you can store audio files (such as the popular .MP3 files) and video files on any networked computer, then play them on any of the other computers or devices connected to your network. This process is called streaming. www.gateway.com... -
Page 95: Selecting A Network Connection
Selecting a network connection The biggest decision you need to make when creating your network is what type of connection you will use. Gateway products support wired and wireless Ethernet networks. Use the following criteria as a guide when selecting a network connection. - Page 96 Compatible with ■ IEEE 802.11g networks Longer range (100 ■ to 150 feet) than IEEE 802.11a www.gateway.com Disadvantages Shorter range (25 ■ to 75 feet) than IEEE 802.11b and IEEE 802.11g Not compatible ■ with IEEE 802.11b or IEEE 802.11g...
- Page 97 Internet. Each of the computers or Ethernet-ready devices communicate with the access point using radio waves. If your computer does not have a built-in wireless Ethernet emitter, you need to add a wireless PCI card (desktop), PC card (notebook), or USB adapter.
- Page 98 Equipment you need for an access point wireless Ethernet network For an access point wireless Ethernet network you need: ■ Two or more computers with wireless Ethernet emitters ■ One access point ■ One broadband Internet connection (optional) Access point USB wireless adapter “Using a wired Ethernet network” www.gateway.com...
- Page 99 IP addresses . The Control Panel window opens. If your Control Control Panel Performance and Maintenance , click the tab, then click System Hardware . The wireless Ethernet device installed Network adapters www.gateway.com . The Device Device Manager...
- Page 100 The most common way to set up a wired Ethernet network is Dynamic Host Control Protocol (DHCP) using a router. A DHCP network configuration uses a router to automatically assign IP addresses to each computer or network device. www.gateway.com...
- Page 101 Equipment you need for a router-based wired Ethernet network For a wired Ethernet network you need: ■ Two or more computers with Ethernet jacks ■ One router ■ One broadband Internet connection (optional) ■ Ethernet cables connecting all of the network equipment “Using a wireless Ethernet www.gateway.com...
-
Page 102: Creating An Ethernet Network
Ethernet cards and drivers on the computers that do not have Ethernet already installed. To order wired or wireless Ethernet PCI or PC cards, visit the Accessories Store at accessories.gateway.com. Use the documentation that comes with your Ethernet cards for instructions on installing the card and any required drivers. -
Page 103: Making Sure Your Broadband Connection Works
. The Control Panel window opens. If your Control Control Panel Performance and Maintenance . The System Properties dialog box opens. System Computer name Workgroup www.gateway.com . The Performance and box. This name identifies the box. Use a workgroup name of up... -
Page 104: Configuring The Tcp/Ip Protocol
Start Panel is in Category View, click Internet Connections window opens. Click/Double-click . The Control Panel window opens. If your Control Control Panel Network and Internet Connections . The Network Connections window opens. Network Connections www.gateway.com . The Network and... - Page 105 If you do not see TCP/IP, drag the scroll bar to see more choices. following items Click The Internet Protocol (TCP/IP) Properties dialog box opens. Properties. , then click . The Local Area Connection Properties Create a new connection check box in the www.gateway.com and follow This connection uses the...
- Page 106 If you are setting up a wireless Ethernet, go to on page 101. -OR- If you are setting up a wired Ethernet, go to page 108. tab. “Setting up a wireless Ethernet network” “Setting up a wired Ethernet network” on www.gateway.com...
-
Page 107: Setting Up A Wireless Ethernet Network
Temporarily connect a computer to the wireless access point router using a straight-through cable and turn the computer on. From one of the computers plugged into your wireless access point router, open your Web browser. “Setting up a network using a router” on page www.gateway.com 108, then go to... - Page 108 - If your ISP assigns you a different IP address each time you to save the settings. Continue “Connecting to an access point network” on www.gateway.com NTER . The setup page opens. lets you automatically see the SSID makes your wireless Mandatory .
- Page 109 Network and Internet Connections . The Network Connections window opens. Network Connections icon, then click Choose a wireless network topic located in the Related Tasks area. www.gateway.com . The Network View available wireless list, then click Connect list, click Choose a wireless network...
- Page 110 To configure computer settings with WEP security for an access point wireless Ethernet network: With the Wireless Network Connection window open, click The Wireless Network Connection Properties dialog box opens. Click the Wireless Networks , then click the arrow. Choose a wireless network tab. www.gateway.com list, the Change advanced settings...
- Page 111 Start, then click Help and Support. Type the keyword wireless network in the Search box Preferred networks box. boxes to match those set on the access point. check box. 111. , then click the arrow. www.gateway.com list, then click The key is provided Network key...
- Page 112 With the Wireless Network Connection window open, click . The Wireless Network Connection Properties dialog box opens. networks Click the Wireless Networks Available networks . For more information, see 101. tab. www.gateway.com list, and you know the access Change order of preferred...
- Page 113 Go to “Testing your network” on page Network name (SSID) Network Authentication boxes to match those set on the access point. check box. 111. www.gateway.com box. list, then click the network Data encryption The key is provided Network key...
-
Page 114: Setting Up A Wired Ethernet Network
A router lets you access the Internet connection from any network computer. The router can assign IP addresses to the computers on the network and can provide firewall protection for your network as well. , then click the arrow. www.gateway.com... - Page 115 As each computer is connected to the router, the corresponding green indicator should light on the front of the router, indicating a good connection. Repeat Step 3 for each computer on the network. Cable/DSL modem Router WAN port www.gateway.com...
-
Page 116: Configuring Your Router
- If your ISP assigns you a different IP address each time you log , then type the values provided by your ISP. Apply “Testing your network” on page www.gateway.com ® NTER . The Setup page opens. . If your ISP requires a fixed IP address, Apply 111. -
Page 117: Testing Your Network
Compare the status lights on the front of the router or access point with the patterns described in the router or access point literature ■ Temporarily turn off any firewall software on your desktop computer ■ Turn off all of the devices, then power them back on ■... -
Page 118: Sharing Your Resources
To set up Internet Explorer on each computer on your Ethernet network: Make sure that the router or access point is turned on and configured as instructed by your cable or DSL provider. Click , right-click Start dialog box opens. , then click Internet Internet Properties www.gateway.com . The Internet Properties... - Page 119 Click the tab. Connections Click . The New Connection Wizard opens. Setup Click . The Network Connection Type screen opens. Next www.gateway.com...
- Page 120 Click Finish Repeat this procedure for each computer on your network. Go to Internet” on page , then click . The Getting Ready screen opens. Next , then click 115. www.gateway.com . The Internet Connection screen Next Next “Accessing the...
-
Page 121: Sharing Drives And Printers
If you share a folder, only the contents of that folder will be available to everyone on the network. “Sharing drives or folders” on page . The folder properties dialog box opens. Sharing and Security www.gateway.com 115. - Page 122 Allow network users to change my files Click tab. www.gateway.com Network Setup Wizard Share this folder box. To let other Shared name...
-
Page 123: Using The Network
Sharing and Security Share this folder on the network . The Control Panel window opens. If your Control Control Panel Printers and Other Hardware icon. The Printers and Faxes window opens. Printers and Faxes www.gateway.com check box is not selected. Sharing... - Page 124 Entire Network Map Network Drive list, then click the drive letter you want to Drive if you want to reconnect to this drive or folder each time www.gateway.com , click Entire Network entire contents “Naming the “Viewing shared drives and...
- Page 125 Browse to the file you want to copy. Click the file. Click , then click Edit Double-click the folder where you want to copy the file to. Click , then click Edit Open . The My Computer window opens. My Computer Copy Paste www.gateway.com...
-
Page 126: Connecting To Hotspots
Because hotspots typically do not enable any security measures, the data that you are sending and receiving may be vulnerable. Any of the files on your computer that are marked for sharing may be accessible to other users on the network. Print for instructions. www.gateway.com “Configuring... -
Page 127: Troubleshooting Your Ethernet Network
Ethernet (10 Mbps), Fast Ethernet (100 Mbps or 10/100 Mbps), or Gigabit Ethernet (1000 Mbps or 10/100/1000 Mbps). A mixture of Ethernet, Fast Ethernet, and Gigabit Ethernet components will result in your network running at the slowest component speed. 56. For more information about your Ethernet card, see www.gateway.com... -
Page 128: Wireless Ethernet Network
Start Control Panel is in Category View, click Network and Internet Connections window opens. Click/Double-click . The Control Panel window opens. If your Control Panel Network and Internet Connections . The Network Connections window opens. Network Connections www.gateway.com . The... - Page 129 Your wireless network is listed as a preferred network, but it has an “x” on it. ■ An x means your preferred network is not currently available or you are not currently in range to connect. , then click Status “Adding an access point” on page www.gateway.com . The Wireless Network 106.
- Page 130 www.gateway.com...
- Page 131 Appendix A Safety, Regulatory, and Legal Safety information ■ Regulatory statements ■ Notices ■ Information...
-
Page 132: Important Safety Information
Important safety information Your Gateway system is designed and tested to meet the latest standards for safety of information technology equipment. However, to ensure safe use of this product, it is important that the safety instructions marked on the product and in the documentation are followed. -
Page 133: Regulatory Compliance Statements
Replacement parts and accessories Use only replacement parts and accessories recommended by Gateway. Warning Do not use Gateway products in areas classified as hazardous locations. Such areas include patient care areas of medical and dental facilities, oxygen-laden environments, or industrial facilities. - Page 134 In some cases, the inside wiring associated with a single-line individual service may be extended by means of a certified connector assembly. The customer should be aware that compliance with the above conditions may not prevent degradation of service in some situations. www.gateway.com...
-
Page 135: Laser Safety Statement
Equivalence Numbers of all the devices does not exceed 5. Laser safety statement All Gateway systems equipped with CD and DVD drives comply with the appropriate safety standards, including IEC 825. The laser devices in these components are classified as “Class 1 Laser Products” under a US Department of Health and Human Services (DHHS) Radiation Performance Standard. - Page 136 In the interest of continued product development, Gateway reserves the right to make improvements in this manual and the products it describes at any time, without notices or obligation.
- Page 137 Appendix B Specifications...
- Page 138 0.297 mm × 0.297 mm dot pitch, 70° viewing angle 17.0-inch LCD—active matrix TFT XGA (1280 × 1024), 0.264 mm × 0.264 mm dot pitch, 70° viewing angle 19.0-inch LCD: active matrix TFT XGA (1280 × 1024), 0.294 mm × 0.294 mm dot pitch, 88° viewing angle www.gateway.com...
- Page 139 Open My Computer, right-click the drive letter, then select Properties. The drive’s capacity and available space appears. If the drive has multiple partitions (for example, C: and D:), add the capacities of each partition to determine the drive’s total capacity. www.gateway.com...
- Page 140 Microphone in Audio line in Audio line out Headphones/speakers out (front/rear) PS/2 mouse PS/2 keyboard USB 2.0 (6) DC power 12 VDC, 180 W or 200 W maximum continuous output Automatic voltage adjustment between 110 and 220 VAC 50-60 Hz www.gateway.com...
- Page 141 Operating humidity 20% to 80%, no condensation Storage humidity 15% to 98%, no condensation Many products for Gateway and its subsidiaries are custom engineered by our suppliers to Gateway specifications and may vary from similarly marketed products. ® ® Microsoft...
- Page 142 www.gateway.com...
- Page 143 CD drive identifying locating troubleshooting using cellular phone memory cards Certificate of Authenticity cleaning audio CD case computer exterior computer screen keyboard LCD panel mouse screen clicking closing computer case unresponsive program color computer display adjusting settings www.gateway.com...
- Page 144 IEEE 1394 port DIMM See memory directional keys diskette drive troubleshooting diskette drive identifying locating drive troubleshooting using display adjusting troubleshooting documentation Gateway Web site help Help and Support online help Using Your Computer domain name double-clicking dragging drivers updating drives www.gateway.com...
- Page 145 Help and Support topics specifications Firewire port folders opening sharing function keys game multi-player Gateway eSupport serial number Web address Web site Gigabit Ethernet hard drive replacing troubleshooting headphones jack help button online using...
- Page 146 Microsoft Certificate of Authenticity modem cable connecting www.gateway.com...
- Page 147 New Connection Wizard next button non-technical support Accounting Sales Warranty Norton Antivirus numeric keypad indicator online help button online search button opening computer case files files across network folders programs shortcut menu OSD controls www.gateway.com...
- Page 148 Resume mode right-clicking router configuring name safety avoiding repetitive strain caring for computer general precautions guidelines for troubleshooting posture reducing eye strain setting up computer static electricity scanner installing USB port screen cleaning www.gateway.com...
- Page 149 Technical Support tips before contacting tutorial service telephone support testing network training classroom Gateway Learning Libraries Learn With Gateway troubleshooting automated system CD drive cleaning CD cleaning DVD computer startup diskette drive display DVD drive...
- Page 150 WAN IP Address Web browser button Web site Gateway Windows file and printer sharing New Connection Wizard Product Key Code Windows key Windows Media Player Windows Update wired Ethernet equipment needed example...
- Page 152 NSK DWL PFL5/5.5 USR GDE R1 8/04...
Need help?
Do you have a question about the Profile Profile 5 and is the answer not in the manual?
Questions and answers