Gateway Computer User Manual
Hide thumbs
Also See for Computer:
- User manual (172 pages) ,
- Reference manual (126 pages) ,
- User manual (272 pages)
Table of Contents
Advertisement
Quick Links
Advertisement
Table of Contents
Troubleshooting

Subscribe to Our Youtube Channel
Related Manuals for Gateway Computer


Summary of Contents for Gateway Computer
-
Page 1: User Guide
Gateway computer User Guide... -
Page 3: Table Of Contents
Setting up your computer desk and chair ........ - Page 4 Protecting your computer from viruses ........
- Page 5 Before calling Gateway Customer Care ........
- Page 6 www.gateway.com...
-
Page 7: Getting Help
Chapter 1 Getting Help • Using the Gateway Web site • Using Help and Support • Using BigFix • Using Your Computer guide • Using Do More With Gateway • Using online help • Contacting Gateway... -
Page 8: Thank You For Purchasing Our Computer
Chapter 1: Getting Help Thank you for purchasing our computer! You have made an excellent decision choosing Gateway. We are sure that you will be pleased with the outstanding quality, reliability, and performance of your new computer. Each and every Gateway computer uses the latest technology and passes through the most stringent quality control tests to ensure that you are provided with the best product possible. -
Page 9: Gateway Web Site
Gateway Web site Gateway Web site Gateway's online support is available 24 hours per day, 7 days per week and provides the most current drivers, product specifications, tutorials, and personalized information about your computer. Visit the Gateway eSupport Web site at support.gateway.com. -
Page 10: Using Esupport
, then click to get the latest software updates for BIOS and Downloads My Downloads driver upgrades. By entering your serial number you get drivers specific to your computer. Click to walk through a step-by-step wizard to locate your drivers. All Downloads... -
Page 11: Help And Support
Help and Support Help and Support Your computer includes Help and Support, an easily accessible collection of help information, troubleshooters, and automated support. Use Help and Support to answer questions about Windows and to help you quickly discover and use the many features of your Gateway computer. -
Page 12: Searching For A Topic
Search Results BigFix BigFix monitors your computer for problems and conflicts. It automatically gathers information about the latest bugs, security alerts, and updates from BigFix sites on the Internet. Whenever BigFix detects a problem, it alerts you by flashing the blue taskbar icon. -
Page 13: Using Your Computer Guide
Using Your Computer guide Using Your Computer guide In addition to this guide, the Using Your Computer guide has been included on your hard drive. This guide includes information on using Windows, using the Internet, sending a fax, and changing power-saving settings as well as other topics. -
Page 14: Gateway Contact Information
Chapter 1: Getting Help Gateway contact information To help you locate Gateway contact information, you can find the Gateway Web site, Online Support, and technical support contact information on the label located on the front of your computer case. Online Support:... -
Page 15: Checking Out Your Gateway Computer
Chapter 2 Checking Out Your Gateway Computer • Identifying features • Locating your computer model and serial number • Locating the Microsoft Certificate of Authenticity • Locating the specifications for your computer • Purchasing accessories... -
Page 16: Desktop Pc Front
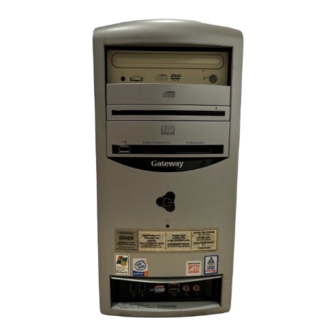
Chapter 2: Checking Out Your Gateway Computer Desktop PC Front Your computer includes the following components. Your computer hardware options and port locations may vary from Important the illustration below. DVD/CD drive DVD/CD drive (optional) Diskette drive (optional) Memory card... - Page 17 Press this button to turn the power on or off. You can also configure the Power indicator power button to operate in Standby/Resume mode or Hibernate mode. The button lights when the computer is turned on. Microphone jack Plug a microphone into this jack. This jack is color-coded red or pink.
-
Page 18: Desktop Pc Back
Chapter 2: Checking Out Your Gateway Computer Desktop PC Back Your computer includes the following components. Your computer hardware options and port locations may vary from Important the illustration below. Power connector Voltage switch PS/2 mouse port PS/2 keyboard Case cover... - Page 19 United States. In other areas of the world, such as Europe, the utility power is supplied at 230 volts at 50 Hz. If your computer is operating in an environment such as this, the voltage switch should be moved to 230.
- Page 20 DSL or cable modem for a broadband Internet connection) into this jack. For more information, see “Learning about the Internet” in Using Your Computer which has been included on your hard drive. To access this guide, click Start, All Programs, then click Gateway Documentation.
-
Page 21: Identifying Your Model
Gateway Technical Support will need this information if you call for assistance. Microsoft Certificate of Authenticity The Microsoft Certificate of Authenticity label found on the back or side of your computer includes the product key code for your operating system. www.gateway.com... -
Page 22: Finding Your Specifications
Chapter 2: Checking Out Your Gateway Computer Finding your specifications For more information about your computer, such as memory size, memory type, and hard drive size, visit Gateway’s eSupport page at support.gateway.com. The eSupport page also has links to additional Gateway documentation and detailed specifications. For more information, see “Using eSupport”... - Page 23 Accessories Printers You can attach almost any type of printer to your computer. The most common types are inkjet and laser printers, which print in color or black and white. See “Installing a printer, scanner, or other peripheral device” on page 32 for more information about attaching a printer.
- Page 24 Chapter 2: Checking Out Your Gateway Computer www.gateway.com...
-
Page 25: Getting Started
Getting Started • Using your computer safely • Protecting your computer from power source problems • Turning your computer on and off • Adjusting the volume • Using the keyboard and the mouse • Using the computer display • Installing peripheral devices... -
Page 26: Working Safely
■ Use soft, indirect lighting in your work area. Do not use your computer in a dark room. ■ Avoid focusing your eyes on your computer screen for long periods of time. Look away from your computer occasionally, and try to focus on distant objects. -
Page 27: Setting Up Your Computer And Computer Accessories
Working safely ■ Adjust the height of the computer desk so your hands and arms are positioned parallel to the floor when you use the keyboard and mouse. If the desk is not adjustable or is too tall, consider using a keyboard drawer. -
Page 28: Protecting From Power Source Problems
An uninterruptible power supply (UPS) supplies battery power to your computer during a power failure. Although you cannot run your computer for an extended period of time with a UPS, a UPS lets you run your computer long enough to save your work and shut down your computer normally. -
Page 29: Starting Your Computer
Connect the cables to your computer. See the setup poster. Turn on your computer. If you are starting your computer for the first time, follow the on-screen instructions to set up your computer. Turn on any peripheral devices, such as printers or scanners, and see the documentation that came with the device for setup instructions. -
Page 30: Waking Up Your Computer
Standby. While in Standby, the power indicator flashes. If your computer is in Standby mode, move the mouse or press the power button to “wake” it up. For more information about changing the power button mode, see Tips &... -
Page 31: Restarting (Rebooting) Your Computer
Windows Task Manager dialog box. If your computer does not respond, turn it off, wait ten seconds, then turn it on again. If your computer does not turn off, press and hold the power button Important for about five seconds, then release it. -
Page 32: Using The Keyboard
Navigation keys Press these keys to move the cursor to the beginning of a line, to the end of a line, up the page, down the page, to the beginning of a document, or to the end of a document. www.gateway.com... - Page 33 Press this key to access shortcut menus and help assistants in Windows. Directional keys Press these keys to move the cursor up, down, right, or left. Numeric keypad Press these keys to type numbers when the numeric keypad ) is turned on. www.gateway.com...
-
Page 34: Using The Mouse
Chapter 3: Getting Started Using the mouse The mouse is a device that controls the pointer movement on the computer display. This illustration shows the standard mouse. Right button Left button Scroll wheel As you move the mouse, the pointer (arrow) on the display moves in the same direction. - Page 35 “Changing the mouse or touchpad settings” in Using Your Computer which has been included on your hard drive. To access this guide, click Start, All Programs, then click Gateway Documentation.
-
Page 36: Connecting The Dial-Up Modem
Chapter 3: Getting Started Connecting the dial-up modem Your computer has a built-in 56K modem that you can use to connect to a standard telephone line. To reduce the risk of fire, use only No. 26 AWG or larger Warning telecommunications line cord. -
Page 37: Connecting To A Cable Or Dsl Modem Or To A Wired Ethernet Network
Connecting to a cable or DSL modem or to a wired Ethernet network Your computer has a network jack that you can use to connect to a cable or DSL modem or to a 10/100 wired Ethernet network. Your computer is equipped with a built-in Ethernet port. For... -
Page 38: Installing A Printer, Scanner, Or Other Peripheral Device
When you use an IEEE 1394 or USB device for the first time, your computer will prompt you to install any software the device needs. After doing this, you can disconnect and reconnect the device at any time. -
Page 39: Using Drives And Ports
Chapter 4 Using Drives and Ports • Using the diskette drive • Using the memory card reader • Using CD or DVD drives... -
Page 40: Using The Diskette Drive
Chapter 4: Using Drives and Ports Using the diskette drive The optional diskette drive uses 3.5-inch diskettes (sometimes called floppy disks). Diskettes are useful for storing files or transferring files to another computer. Diskette slot Drive activity light Eject button To use a diskette: Insert the diskette into the diskette drive with the label facing up. -
Page 41: Using The Memory Card Reader
You can use the optional memory card reader to transfer pictures from a digital camera to your computer. You can also use the memory card reader to transfer data between your computer and a device that uses memory cards, such as a PDA, MP3 player, or cellular telephone. -
Page 42: Inserting A Memory Card
Wait for the memory card reader access indicator to stop blinking, then pull the memory card out of the slot. Do not remove the memory card or turn off the computer while the Caution memory card reader access indicator is blinking. You could lose data. -
Page 43: Using The Cd Or Dvd Drive
You can use your computer to enjoy a wide variety of multimedia features. Identifying drive types Your Gateway computer may contain one of the following drive types. Look on the front of the drive for one or more of the following logos: If your drive has this logo... -
Page 44: Inserting A Cd Or Dvd
Some music CDs have copy protection software. You may not be able Important to play these CDs on your computer. To insert a CD or DVD: Press the eject button on the CD or DVD drive. Place the disc in the tray with the label facing up. -
Page 45: Playing A Cd
Documentation. Creating CDs and DVDs You can use the CD and DVD burning program on your computer to copy tracks from a music CD to your hard drive, copy or create data CDs and DVDs, create music CDs, create video DVDs, and more. - Page 46 Chapter 4: Using Drives and Ports www.gateway.com...
-
Page 47: Maintaining Your Computer
Chapter 5 Maintaining Your Computer • Caring for your computer • Updating Windows • Protecting your computer from viruses • Cleaning your computer • Restoring your system • Opening the computer case • Adding memory and replacing the battery... -
Page 48: Caring For Your Computer
When storing your computer for an extended period of time, unplug AC power. Updating Windows Windows Update is the online extension of Windows that helps you to keep your computer up-to-date. Use Windows Update to choose updates for your computer’s operating system, software, and hardware. -
Page 49: Protecting Your Computer From Viruses
Protecting your computer from viruses Protecting your computer from viruses A virus is a program that attaches itself to a file on a computer, then spreads from one computer to another. Viruses can damage data or cause your computer to malfunction. - Page 50 To remove a virus: If Norton AntiVirus finds a virus, follow all on-screen instructions to remove the virus. Turn off your computer and leave it off for at least 30 seconds. Turn on your computer and rescan for the virus.
-
Page 51: Cleaning Your Computer
Cleaning the computer display To clean a computer LCD screen or flat panel display, use a soft cloth and water to clean the LCD screen. Squirt a little water on the cloth (never directly on the screen), and wipe the screen with the cloth. -
Page 52: Cleaning The Mouse
Squirt a little cleaner on the cloth (never directly on the screen), and wipe the screen with the cloth. Cleaning the mouse If the mouse pointer begins moving erratically across the computer screen or becomes difficult to control precisely, cleaning the mouse will likely improve its accuracy. To clean your optical mouse: ■... -
Page 53: Cleaning Cds Or Dvds
If you need to restore your computer to the original configuration, you can use the backup restore discs or you can use the backup files located on the hard drive. -
Page 54: Preventing Static Electricity Discharge
The instructions for using the restore discs or hard drive backup files are included in the instruction booklet that came with your restore discs. Preventing static electricity discharge The components inside your computer are extremely sensitive to static electricity, also known as electrostatic discharge (ESD). To avoid exposure to dangerous electrical voltages and moving parts,... -
Page 55: Opening The Case
Press the power button to drain any residual power from your computer. Remove the two thumbscrews from the side panel cover, slide the side panel cover toward the back of the computer, then lift the panel away from the computer. www.gateway.com... -
Page 56: Removing The Front Bezel
To remove the front bezel: ■ Position the computer where you can grasp the top front edge of the bezel, then pull the bezel away from the case. Continue to loosen the bezel until you can remove it from the front of the case. -
Page 57: Closing The Case
Make sure that all of the internal cables are arranged inside the case so they will not be pinched when you close the case. Align the side panel, then slide the side panel toward the front of the computer to secure it into place. -
Page 58: Replacing The Front Bezel
Chapter 5: Maintaining Your Computer Replacing the front bezel To replace the front bezel: Align the latch pins with the computer latch holes. Press the bezel firmly into place. www.gateway.com... -
Page 59: Installing Memory
Installing memory Installing memory When you upgrade the computer memory, make sure that you install the correct type of memory module for your computer. Your computer uses DIMM memory. To install or replace DIMM memory: Remove the side panel by following the instructions in “Removing the side panel”... - Page 60 Click , then click (if in Category view). Start Control Panel Performance and Maintenance Click/Double-click . The amount of memory in your computer is shown at the System bottom of the System Properties dialog box in the General tab. www.gateway.com...
-
Page 61: Replacing The System Battery
Replacing the system battery Replacing the system battery If the computer clock does not keep time or the settings in the BIOS Setup utility are not saved when you turn off your computer, replace the system battery. Use a battery of the same size and voltage as the original battery that was in your computer. - Page 62 Chapter 5: Maintaining Your Computer Your computer’s battery location may vary from the illustration below. Important Make sure that the positive (+) side of the new battery is facing up, then press the battery into the socket until it snaps into place.
-
Page 63: Troubleshooting
Chapter 6 Troubleshooting • Troubleshooting typical hardware and software problems • Getting telephone support • Using automated troubleshooting systems • Getting tutoring and training... -
Page 64: Safety Guidelines
First steps If you have problems with your computer, try these things first: ■ Make sure that the AC power adapter is connected to your computer and an AC outlet and that the AC outlet is supplying power. ■ If you use a power strip or surge protector, make sure that it is turned on. -
Page 65: Troubleshooting
Clean the disc. For more information, see “Cleaning CDs or DVDs” on page ■ Restart your computer, then enter the BIOS Setup utility by pressing and holding F1 while your computer restarts. Make sure that the IDE controllers are enabled. ■... - Page 66 To be able to play a DVD, the disc’s regional code and your DVD drive’s regional code must match. The regional code on your DVD drive is determined by your computer’s delivery address. The regional code for the United States and Canada is 1. The regional code for Mexico is 4.
-
Page 67: Computer
Troubleshooting Computer The computer will not start ■ Make sure that the power cord is connected to an AC power source and your computer is turned on. Diskette drive The diskette drive is not recognized ■ Shut down and restart your computer. -
Page 68: Dvd Drives
■ Run Error checking on the diskette. For more information, see “Checking the hard drive for errors” in Using Your Computer which has been included on your hard drive. To access this guide, click , then click Start... -
Page 69: Hard Drive
This may be the result of a defective area on the hard drive. To fix hard drive problems, run the Error checking program. For instructions on fixing hard drive problems, see “Checking the hard drive for errors” in Using Your Computer which has been included on your hard drive. To access this guide, click... -
Page 70: Internet
The condition of the Internet computers to which you connect and the number of users accessing those computers ■ The complexity of graphics and multimedia on Web pages ■ Having multiple Web browsers open, performing multiple downloads, and having multiple programs open on your computer www.gateway.com... -
Page 71: Keyboard
Liquid spilled in the keyboard If you spilled liquid in the keyboard, turn off your computer and unplug the keyboard. Clean the keyboard and turn it upside down to drain it. Let the keyboard dry before using it again. -
Page 72: Memory Card Reader
Chapter 6: Troubleshooting Memory card reader Drive letters for the memory card slots do not appear in the My Computer window ■ Reboot your computer. Modem (dial-up) See also “Internet” on page Your modem does not dial or does not connect ■... - Page 73 If your computer has a v.90 modem, the speed at which you can upload (send) data is limited to 33.6K. If your computer has a v.92 modem, the speed at which you can upload data is limited to 48K.
- Page 74 (for example, someone is on the telephone, or another modem is in use). ■ Use the modem cable that came with your computer. Some telephone cables do not meet required cable standards and may cause problems with the modem connection. ■...
-
Page 75: Monitor
Change the screen resolution from the Display Properties dialog box. For more information, see “Adjusting the color depth” in Using Your Tips & Tricks Computer which has been included on your hard drive. To access this guide, click Start, All Programs, then click Gateway Documentation. - Page 76 Adjust the brightness and contrast controls. ■ Use the monitor degauss feature (see your monitor documentation) or turn off your computer and monitor, leave them off for at least a half hour, then restart your computer. ■ Change the display settings.
-
Page 77: Mouse
Try a mouse you know is working to make sure that the mouse port works. The mouse works erratically If the mouse pointer begins moving erratically across the computer display or becomes difficult to control precisely, cleaning the mouse will likely improve its accuracy. -
Page 78: Power
Make sure that your power cord is connected correctly to your computer. ■ If your computer is plugged into a surge protector, make sure that the surge protector is connected securely to an electrical outlet, turned on, and working correctly. To test the outlet, plug a working device, such as a lamp, into the outlet and turn it on. -
Page 79: Sound
If you are using external speakers, see the speaker setup poster to check your speaker connections. For more information about sound troubleshooting, click Start, then Help and Support click Help and Support. Type the keyword sound troubleshooter in the Search box , then click the arrow. www.gateway.com... -
Page 80: Telephone Support
■ Make sure that your computer is nearby at the time of your call. The technician may have you follow troubleshooting steps. www.gateway.com... -
Page 81: Telephone Numbers
Telephone support Telephone numbers Gateway offers a wide range of customer service, Customer Care, and information services. Automated troubleshooting system Service description How to reach Use an automated menu system and your telephone 800-846-2118 keypad to find answers to common problems. -
Page 82: Self-Help
Chapter 6: Troubleshooting Self-help If you have how-to questions about using your Gateway-supplied hardware or software, see the following resources: ■ The printed or online documentation that came with your hardware or software. In many cases, additional product information and online documentation for Gateway-supplied hardware can be found in our Web site's Documentation Library. -
Page 83: Networking Your Computer
Chapter 7 Networking Your Computer • Introducing networking • Creating an Ethernet network • Testing your network • Sharing your resources • Troubleshooting your Ethernet network... -
Page 84: Introduction To Networking
You will no longer waste your time transferring files by using recordable media. In addition, you can map a drive on a networked computer to another computer, and access the files as if they were located on the hard drive of the computer you are using. -
Page 85: Selecting A Network Connection
Use the following criteria as a guide when selecting a network connection. Wireless Ethernet network A wireless Ethernet network is created by using radio emitters that may be embedded into your computer or plugged into it. Create a wireless Ethernet (IEEE 802.11a, IEEE 802.11b, or IEEE 802.11g) network if: ■... - Page 86 “Safety, Regulatory, and Legal Information” in your user’s guide for general wireless regulatory and safety guidelines. To find out if your computer has an internal wireless device, check the device manager. For more information, see “Determining if wireless Ethernet is already installed on your computers”...
- Page 87 Internet. Each of the computers or Ethernet-ready devices communicate with the access point using radio waves. If your computer does not have a built-in wireless Ethernet emitter, you need to add a wireless PCI card (desktop), PC card (notebook), or USB adapter.
- Page 88 . The Device System Hardware Device Manager Manager window opens. Click the plus (+) in front of . The wireless Ethernet device installed Network adapters in your computer is listed. If one is not listed, you must install one. www.gateway.com...
- Page 89 You are creating a network in an office or business where network speed is more important than moving about with your computer ■ Your computer has an Ethernet jack for connecting to the network Using a wired Ethernet network A wired Ethernet network consists of two or more computers connected together through an Ethernet cable.
- Page 90 Chapter 7: Networking Your Computer Cable/DSL modem Router To add the ability to access a wireless Ethernet network to your wired Tips & Tricks Ethernet network, connect an access point to the router or use a router that has a built-in access point, such as the Linksys wireless access point router with 4-port switch.
-
Page 91: Creating An Ethernet Network
Click the plus (+) in front of . The wired Ethernet device installed in Network adapters your computer is listed. If one is not listed, you must install one. Creating an Ethernet network Installing Ethernet cards and drivers After you have determined the type of Ethernet you are using for your network, you need to install Ethernet cards and drivers on the computers that do not have Ethernet already installed. -
Page 92: Making Sure Your Broadband Connection Works
This name identifies the Computer name computer to other users on the network. Use a computer name of up to 15 characters with no blank spaces. Each computer name must be unique on your network. All-numeric computer names are not allowed. Names must contain some letters. -
Page 93: Configuring The Tcp/Ip Protocol
This number will be the same on all computers on a home network. Using a DHCP server In order to use the TCP/IP protocol on each computer with a router or access point router, you must set the protocol to “Obtain an IP address from a DHCP server.”... - Page 94 Chapter 7: Networking Your Computer Right-click , then click . The Local Area Connection Local Area Connection Properties Properties dialog box opens. - OR - If you do not have a LAN connection setup, click and follow Create a new connection the instructions in the New Connection Wizard.
-
Page 95: Setting Up A Wireless Ethernet Network
Local Area Connection Properties dialog box. Click to close the Network Connections window. Repeat this procedure for every computer on your network. Where to go from here If you are setting up a wireless Ethernet, go to “Setting up a wireless Ethernet network”... - Page 96 Turn on the DSL or cable modem. Press the reset button on the wireless access point router. Temporarily connect a computer to the wireless access point router using a straight-through cable and turn the computer on. From one of the computers plugged into your wireless access point router, open your Web browser.
- Page 97 , then click to save the settings. Apply Continue If you temporarily connected a computer to the access point router in Step disconnect it. Reset the power on your cable or DSL modem. Restart all of your computers on the network.
- Page 98 If you are unable to connect to the network in the list, go Choose a wireless network “Configuring computer settings for an access point” on page - OR - If your network does not appear in the list, go to “Adding...
- Page 99 WEP security. You need to configure your network settings to use the same WEP security settings as those used by the access point. To configure computer settings with WEP security for an access point wireless Ethernet network:...
- Page 100 If the WEP network key is provided automatically, then leave the check mark in check box. key is provided for me automatically Make sure that the This is a computer-to-computer (ad hoc) network; wireless access points check box is not selected. are not used Click to close the Wireless Network Properties dialog box.
- Page 101 “Configuring the access point” on page To manually add an access point wireless Ethernet network: With the Wireless Network Connection window open, click Change order of preferred . The Wireless Network Connection Properties dialog box opens. networks Click the tab. Wireless Networks www.gateway.com...
- Page 102 If the WEP network key is provided automatically, then leave the check mark in check box. key is provided for me automatically Make sure that the This is a computer-to-computer (ad hoc) network; wireless access points check box is not selected. are not used Click to close the Wireless Network Properties dialog box.
-
Page 103: Setting Up A Wired Ethernet Network
The router can assign IP addresses to the computers on the network and can provide firewall protection for your network as well. In addition to a router, you need a straight-through cable for each computer you want to connect to the network. - Page 104 Plug the other end of the cable into the network connector on the computer. As each computer is connected to the router, the corresponding green indicator should light on the front of the router, indicating a good connection.
-
Page 105: Configuring Your Router
DHCP Click the checkbox, then click Enable Apply Press the reset button on your cable or DSL modem, then restart the computer. Your network should be running. Go to “Testing your network” on page 100. www.gateway.com... -
Page 106: Testing Your Network
Compare the status lights on the front of the router or access point with the patterns described in the router or access point literature ■ Temporarily turn off any firewall software on your desktop computer ■ Turn off all of the devices, then power them back on ■... - Page 107 Sharing your resources To set up Internet Explorer on each computer on your Ethernet network: Make sure that the router or access point is turned on and configured as instructed by your cable or DSL provider. Click , right-click , then click .
- Page 108 Chapter 7: Networking Your Computer Click . The Network Connection Type screen opens. Next Click , then click . The Getting Ready screen opens. Connect to the Internet Next www.gateway.com...
- Page 109 Click the type of Internet connection you are setting up, then click Next Click Finish Repeat this procedure for each computer on your network. Go to “Accessing the Internet” on page 103. Accessing the Internet To access the Internet from your computer: Make sure that the router or access point is turned on.
-
Page 110: Sharing Drives And Printers
With a network, you can share drives (for example hard drives, diskette drives, and CD or DVD drives) and printers among the computers connected to the network. After the drives and printers on each network computer are shared, you can access them as though they were attached directly to your computer. Then you can: ■... - Page 111 To let other on the network Shared name users have full permissions to read and write to the shared drive or folder, click to select the check box Allow network users to change my files Click www.gateway.com...
-
Page 112: Using The Network
Chapter 7: Networking Your Computer Un-sharing drives, folders, and files To un-share drives or folders: In My Computer or Windows Explorer, right-click the drive or folder that you want to un-share, then click Sharing and Security Make sure that the check box is not selected. - Page 113 All shared drives and folders are listed. Mapping a network drive After a drive or folder on one computer is mapped as a drive on another computer, the contents of the drive or folder can be accessed as if the drive were attached directly to the computer.
- Page 114 Copying files across the network To copy files across the network: Click , then click . The My Computer window opens. Start My Computer Browse to the network drive that contains the file you want to copy. Browse to the file you want to copy.
-
Page 115: Connecting To Hotspots
Before you can print a file across the network, you must install the Important driver for the printer on the computer you are sending the file from. You can obtain the printer driver and installation instructions from the CD that shipped with your printer or from the manufacturer’s Web site. -
Page 116: Troubleshooting Your Ethernet Network
Wired Ethernet network You cannot see the other computers on your network ■ Make sure that your Ethernet cable is plugged into the Ethernet jack on your computer. Make sure that the other end is plugged into a router. ■... -
Page 117: Wireless Ethernet Network
. The Control Panel window opens. If your Start Control Panel Control Panel is in Category View, click . The Network and Internet Connections Network and Internet Connections window opens. Click/Double-click . The Network Connections window opens. Network Connections www.gateway.com... - Page 118 “Adding an access point” on page ■ You may want to try entering ANY as the SSID, which will make the computer try to auto-detect the network. Your wireless network is listed as a preferred network, but it has an “x” on it.
-
Page 119: Safety, Regulatory, And Legal Information
Appendix A Safety, Regulatory, and Legal Information • Safety information • Regulatory statements • Notices... -
Page 120: Important Safety Information
The product should be operated only from the type of power source indicated on the rating label. ■ If your computer has a voltage selector switch, make sure that the switch is in the proper position for your area. The voltage selector switch is set at the factory to the correct voltage. -
Page 121: Regulatory Compliance Statements
USA modems) Your modem complies with Part 68 of the Code of Federal Regulations (CFR 47) rules. On the computer or modem card is a label that contains the FCC registration number and Ringer Equivalence Number (REN) for this device. - Page 122 The United States Telephone Consumer Protection Act of 1991 makes it unlawful for any person to use a computer or other electronic device to send any message via a telephone fax machine unless such message clearly contains, in a margin at the top or bottom of each transmitted page or on the first page of the...
-
Page 123: Laser Safety Statement
External television antenna grounding If an outside antenna or cable system is to be connected to your Gateway PC, make sure that the antenna or cable system is electrically grounded to provide some protection against voltage surges and static charges. - Page 124 Contact with them could be fatal. Antenna and satellite grounding Reference Grounding component Electric service equipment Power service grounding electrode system (NEC Art 250, Part H) Ground clamps Grounding conductors (NEC Section 810-21) Antenna discharge unit (NEC Section 810-20) Ground clamp Antenna lead-in wire www.gateway.com...
-
Page 125: Macrovision Statement
In the interest of continued product development, Gateway reserves the right to make improvements in this manual and the products it describes at any time, without notices or obligation. - Page 126 Appendix A: Safety, Regulatory, and Legal Information www.gateway.com...
-
Page 127: Index
CD cellular phone See CD memory cards audio file Certificate of Authenticity streaming cleaning audio in jack case audio playback buttons computer exterior computer screen battery replacing keyboard bezel LCD panel removing mouse replacing screen broadband connection clicking connecting www.gateway.com... - Page 128 Gateway Web site microphone help modem Help and Support monitor online help mouse Using Your Computer network domain name parallel double-clicking power dragging power cord drivers printer updating PS/2 keyboard drives PS/2 mouse...
- Page 129 DVD drive replacing identifying function keys locating drive troubleshooting using game DVD/CD drive multi-player See DVD drive Gateway Dynamic Host Configuration Protocol eSupport model number serial number editing buttons Web address electrostatic discharge (ESD) Web site entering Gigabit Ethernet IP address...
- Page 130 IP address entering maintenance cleaning case cleaning component exteriors cleaning computer display cleaning computer screen jacks cleaning keyboard See connections cleaning mouse protecting from viruses mapping network drives keyboard memory...
- Page 131 MP3 file indicator streaming MP3 player memory cards online help multimedia opening adjusting volume computer case playing DVD files using DVD drive files across network using Windows Media Player folders multi-player game front bezel playing programs...
- Page 132 Hibernate mode name indicator source problems Standby/Resume safety troubleshooting avoiding repetitive strain turning off computer caring for computer turning on computer general precautions power button guidelines for troubleshooting printer posture default reducing eye strain inkjet setting up computer...
- Page 133 Learn With Gateway resources troubleshooting shortcut menus add-in cards accessing automated system shortcuts cards opening menu CD drive shutting down computer cleaning CD side panel cleaning DVD removing computer startup replacing diskette drive sound display adjusting DVD drive controls...
- Page 134 Ethernet equipment needed example uninterruptible power supply (UPS) frequency updating speed device drivers troubleshooting updating Norton AntiVirus using updating Windows workgroup naming USB port working safely video...
- Page 136 MAN GEM CONS USR GDE R1 11/04...
Need help?
Do you have a question about the Computer and is the answer not in the manual?
Questions and answers