ARRI SRH-3 User Manual
Hide thumbs
Also See for SRH-3:
- User manual (54 pages) ,
- Manual (40 pages) ,
- Troubleshooting manual (9 pages)
Table of Contents
Advertisement
Quick Links
Advertisement
Table of Contents

Subscribe to Our Youtube Channel
Related Manuals for ARRI SRH-3


Summary of Contents for ARRI SRH-3
- Page 1 ! 1 Remote Control SRH-3 USER MANUAL Date 01.04.2018 ...
- Page 2 In no event shall ARRI or its subsidiaries be liable for or have a remedy for recovery of any special, direct, indirect, incidental, or consequential damages, including, but not limited to lost profits, lost...
-
Page 3: Table Of Contents
! 3 Table of Contents Table of Contents 1 For your safety 2 Functions 3 Connectors 4 Home Screen 5 Function / Control Assignment ... -
Page 4: For Your Safety
and should not and must not be used without proper training. ARRI recommends that all users of the SRH-3 system read the manual in its entirety prior to use. All directions are given from a camera operator's point of view. For example, camera-right side refers to the right side of the camera when standing behind the camera and operating it in a normal fashion. -
Page 5: Functions
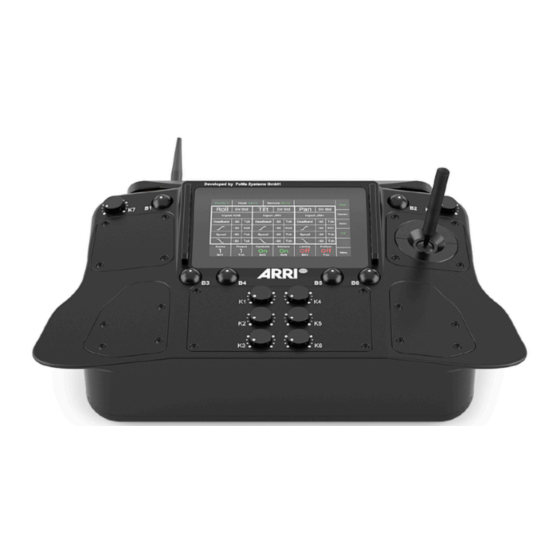
Shut OFF Can Pwr Data Switch On/Off 12V RS Antenna Pwr 12V Can Pwr 2.3 Functions on the right and left side LBUS In ARRI Mounting Rosettes... -
Page 6: Connectors
3.2 Hardwiring the SRH-3 Stabilized Remote Head The SRH-3 can be hardwired with the Remote Panel using the FS-CAN BUS connector. NOTE Maximum cable length is 250 meter / 820 feet. FS CAN ... - Page 7 Emergency Shut OFF Switch The SRH-3 Control Panel offers an Emergency Shut OFF Switch. Use the Emergency Shut OFF Switch to switch off the Remote Head anytime. Camera Power will remain on and only the motor power will be disconnected. ...
- Page 8 Connectors 3.8 LBUS In The SRH-3 Control Panel offers two LBUS In sockets. Here you can mount up to two ARRI Master Grips or other LBUS compatible products. LBUS In ...
-
Page 9: Home Screen
Shot Presets In the SRH-3 controller you can program up to 12 shot presets for up to 6 parameters including roll, tilt, pan, focus, iris and zoom. These presets can be recalled using the touchscreen SHOT PRESET button. ... - Page 10 Home Screen High Power Power Radio Status Status Dynamic Signal Head Panel On/Off Directions Selected User Profile Selected Menu Axis Indicator Assigned Camera Menu Control Device ...
-
Page 11: Function / Control Assignment
11 Function / Control Assignment Factory pre assigned control setup Button B2 = Roll Zero Button B1 = Assignable Knob K7 = Pan Offset Knob K3 = Roll Angle Rate Tilt ... -
Page 12: Main Menu
Main Menu Main Menu Overview Selecting Menu on the Home Screen will display the Main Menu page on the display. Selected Profile System Adjustments Head Adjustments Controls Service Adjustment ... -
Page 13: Head Menu
Service Selecting Service will open a new touchscreen display menu. The Service menu will allow the operator to restore the SRH-3 to Factory defaults and calibrate joystick controllers. Info Selecting Info will open a new touchscreen display menu. -
Page 14: Pid / Motor Mode / Pid Setup
Angle. 7.4 Motor Power The SRH-3 offer to adjust the motor power by adjusting the electrical power. NOTE 100% motor power is max electrical power, at 50% the head ... - Page 15 PID Menu 7.6 Proportional – Integral – Derivative controller (PID controller) = Target Position Amount of power = Position needed to move the camera = Actual Position = Target Position Low value slow = Time High value fast = Actual Position = Target Position...
- Page 16 Controls Menu Controls Selecting Controls on the Main Menu will open a new touchscreen display to allow the operator to assign the functions to each control device and set the characteristics and performance of the assigned control devices. ...
-
Page 17: Controls / Deadband
Controls / Deadband 8.2 Controls POSITION Submenu (Deadband Touchscreen Submenu) This selection will open a new touchscreen slider that allows you to change the Deadband setting on the selected axis. Deadband is defined as delay before the control device activates the selected function. ... -
Page 18: Controls / Ramp Mode
Controls Menu / Ramp Mode / Offset Ramp Mode Dynamic or Constant Selecting Ramp Mode will open a new touchscreen that allows you to change between a dynamic ramp or a constant ramp. 9.1 ... - Page 19 Controls Menu / Offset 10.2 Controls OFFSET Submenu (CONTROL Submenu Pan/Tilt/Roll) Selecting Control will open a new touchscreen display SUB Menu named Control. This sub menu allows the operator to assign specific controls to set offset rate on the controller. ...
-
Page 20: Controls / Speed & Ratio
Controls Menu / Speed & Ratio Speed & Ratio Speed Submenu Ratio Submenu 11.1 Speed Controls Menu (Speed Submenu Pan/Tilt/Roll) ... -
Page 21: Controls / Endstops
Controls Menu / Endstops Endstops Selecting Endstops will open a new touchscreen display menu. The Endstops menu will allow the operator to assign end positions for each axis and enable or disable them individually. ... -
Page 22: Follow Mode
Follow Mode Follow Mode Selecting Follow will open a new touchscreen display menu. The Follow menu will control the speed, Deadband and ramp of the optional follow mode for each axis. NOTE In normal remote head operation the follow mode will be turned off. ... -
Page 23: Shot Preset
Shot Preset Shot Preset Selecting Shot Presets will open a new touchscreen display menu. The Shot Presets menu will allow you to program up to 12 shot presets for up to 6 parameters including roll, tilt, pan, focus, iris and zoom. These presets can be recalled using the touchscreen Shot Preset button on the home screen. -
Page 24: Status
Status Status Selecting Status will open a new touchscreen display menu. The Status menu will display the status of controller expanders, wireless status, and status of individual connections. (LBUS, FS-CAN Bus, wireless connection) ... -
Page 25: Library
Library Library Selecting Library will open a new touchscreen display menu. The Library menu will store controller setup files, control assignments, motor settings and shot presets. ... -
Page 26: Settings / Remote Head
Settings / Remote & Head Settings Selecting Settings will open a new touchscreen display menu. 17.1 Selecting Rotation will open a new window. ... -
Page 27: Settings / Wireless
NOTE The SRH-3 will be delivered into your region with the required region settings. NOTE The SRH-3 offers 14 channels and will be delivered with an enabled radio connection on channel 10. CAUTION ... - Page 28 17.6 Regions Settings NOTE The SRH-3 is using the white-radio module EMIP400. This device complies with part 15 of the FCC Rules. §15.19(a) Operation is subject to the following two conditions: (1) This device may not cause harmful interference, and ...
- Page 29 Settings / Wireless CAUTION To change any radio module related settings, the remote control panel and the remote head must be connected via the FS Can Bus cable. CAUTION ...
-
Page 30: Service
Service / Remote Service Selecting Service will open a new touchscreen display menu. The Service menu will allow the operator to restore the SRH-3 to factory defaults and perform firmware updates. ... - Page 31 Service / Head 18.4 Service Head 18.5 Selecting Restore will open a new touchscreen display menu, here you can restore the head to the factory settings. ...
-
Page 32: Info
Info Info Selecting Info will open a new touchscreen display menu. Head 19.1 Info Remote Control Touching Mainboard, will show you the serial number and firmware version of the remote control. ... -
Page 33: Camera
Camera Camera Selecting Camera will open a new touchscreen display menu to control LBUS compatible motors and settings for each axis. Motors On/Off Torque Direction Mode Focus Motor ... -
Page 34: Camera Control
The FIZ submenu allows you to access all LBUS compatible Focus, Iris and Zoom controls. NOTE Only LBUS compatible products can be connected to the SRH-3 Remote Head. ... - Page 35 Camera Control 21.2 Controller Assignment Selecting Position will a new this window. In this menu you can assign if the Master Grips or the internal focus wheel and the zoom rocker will control ...
- Page 36 Camera Control In this menu you can set if or how much Deadband the controller, like zoom rocker will have. Choose Zoom Deadband NOTE As higher the value, as later the zoom motor will react. ...
-
Page 37: Pin Out
Pin Out REMOTE Connectors V1.4 FF-CAN Fischer DBP 102 A053 - 140 Lötseite Buchse 1 = GND 2 = CAN1 L 3 = CAN2 H 4 = 12V XLR Power IN 12V...
Need help?
Do you have a question about the SRH-3 and is the answer not in the manual?
Questions and answers