Table of Contents
Advertisement
Quick Links
Advertisement
Table of Contents

Related Manuals for Bretford TVSW12AC


Summary of Contents for Bretford TVSW12AC
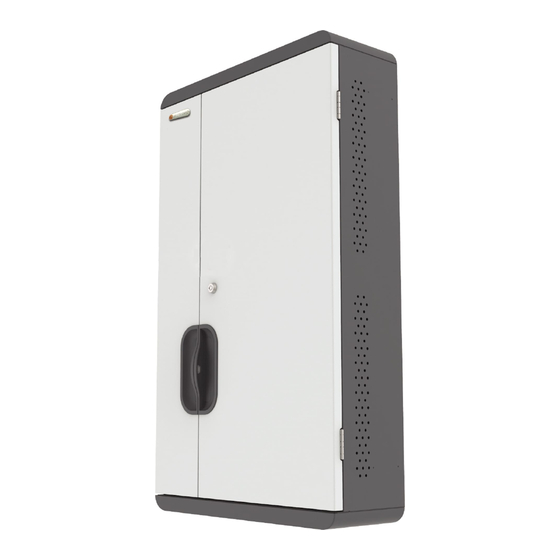
- Page 1 TVSW12AC CUBE MICRO WALL CABINET...
-
Page 2: General Use
General Use The BRETFORD CUBE MICRO WALL CABINET provides compact charging for up to 12 notebook or tablet devices (up to 13.3 inch). 1. Product specifications ............... 2. Components ..................3. Mounting Considerations ..............4. Setup ..................... P.3~6 5. Extra/Optional Solutions .............. -
Page 3: Product Specifications
890mm 890mm 35.04” 35.04” FRONT SIDE REAR Product Specifications Model Name TVSW12AC Shipping Weight 49.2 lb (22.4 kg) Input: AC 100-125V, 50/60Hz, 12A Capacity 12 Devices (up to 13.3”) AC 200-240V, 50/60Hz, 10A Power System Output: AC 100-125V, 50/60Hz, 12A W20.86 x D7.08 x H35.04”... -
Page 4: Mounting Considerations
3. Mounting Considerations Space Requirements Wooden wall needs to be at least 0.98” / 25 mm in thickness. 23.62” / 600mm (Operation Space) 20.86” / 530mm (Cabinet Space) 5.9” / 150mm 5.9” / 150mm 4.5” / 115mm 5 mounting holes Cabinet Space Operation Space 7.64”... - Page 5 4. Setup Tools Needed █ Mounting to Wooden Wall Follow the Cabinet Space Requirements Ø (min. 2 people) Metal Wall bracket T5 X L16mm x 3 pcs 1. Secure to wooden wall with T5 screwdriver. T5 X L16mm x 2 pcs 2.
- Page 6 █ Mounting to Concrete Wall (min. 2 people) Follow the Cabinet Space Requirements 1. Determine the installation points for your cabinet. 2. Drill holes in the concrete wall about 3. Insert the wall plugs into the Ø 1/4” X 1” deep at the mounting points. holes.
- Page 7 █ Install Power Cord Retention Clip 1. Tighten the retention clip on the power cord. 2. Insert the power cord into the C13 Inlet on the underside of the cabinet. C13 Inlet Front door 3. Make sure the clip is facing the wall side. As you insert the power cord, attach the clip to the small hole adjacent to the inlet.
-
Page 8: Cable Management
█ Cable Management 1.Plug the device power adapters into the outlets inside. (Customer supplies power adapters that come with the devices) 2.Route cables through the access holes and clip the cables as shown in the above pictures. █ Adapter Management If the devices come with adapters, fix the adapters to the metal hooks with the attached ties. - Page 9 5. Extra / Optional Solutions █ Movable Power Strip The power strip can be repositioned to accommodate a wider variety of power adapters. 1. Remove the four screws from the top and bottom of the power strip. 2. Move power strip to alternate position.
- Page 10 █ Daisy-Chain (Power) Min 23.62” (600mm) Setup: Connect Unit 1 to Unit 2 with attached daisy chain cable. Unit 2 Unit 1...
- Page 11 6. Safety WARNING: This product must only be used for its intended purpose in accordance with operating instructions . Failure to observe the following notices can result it fire, injury, death by electric shock or equipment damage. Always turn off the power to the product before plugging IN or OUT. ●...
- Page 12 VER.1 SEPT.2019...
Need help?
Do you have a question about the TVSW12AC and is the answer not in the manual?
Questions and answers