Table of Contents
Advertisement
Quick Links
Advertisement
Table of Contents

Related Manuals for Bretford TechGuard Connect


Summary of Contents for Bretford TechGuard Connect
- Page 1 ® TechGuard Connect ® Installation Guide 031-11116M Rev. 1...
-
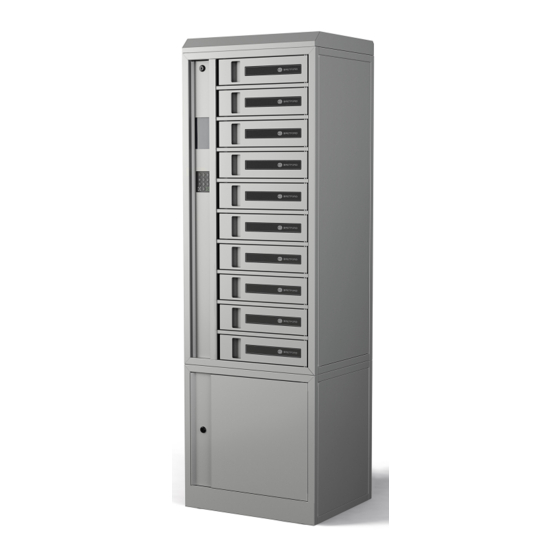
Page 2: About Your Product
About Your Product Product Overview TechGuard Connect is a smart connected charging locker, designed to store and charge your laptops, mobile devices, and other technology assets. • Individual Locker Bays provide secure storage and RFID or PIN authenticated access control. -
Page 3: Product Specifications
10 locker bays Weight 125lb / 56.7kg (empty) Rating 120V, 12A max. 50-60Hz AC Cord Certified Power Supply Input Cord with IEC plug C13 Assembly Ships fully assembled For specific warranty information, please visit bretford.com/ Warranty warranty Certifications 031-11116M Rev. 1... - Page 4 About Your Product What’s in the Box? • TechGuard Connect Locker • Power Cord • Hardware Pack ‣ Access Panel Keys (2) ‣ Wall Anchoring Bracket ‣ Ganging Bracket (2) ‣ T-25 Torx Self-Tapping Screws (10) 031-11116M Rev. 1...
-
Page 5: Getting Started
Getting Started Unboxing Your Locker The TechGuard Connect locker ships horizontally and securely strapped to a pallet. Once the locker is in the final installation location: 1. Cut and remove pallet strapping and cardboard packaging. 2. Locate and secure the red plastic hardware bag and set aside. -
Page 6: Important Safety Notice
Elevated Operating Ambient - Consideration should be given to installing the lockers in an environment compatible with the maximum Contact Bretford or a qualified electrician before attempting to make ambient temperature of 40°C. any type of electrical repair or parts replacement. - Page 7 Installing Your Locker Leveling 1. Begin by determining the final position of the locker stack. If the locker will be installed against a wall, the back panel is removable to minimize depth. 2. Once the locker is positioned in the preferred location, open the lower cabinet using the keys included in the hardware pack.
-
Page 8: Floor Anchoring
Installing Your Locker Floor Anchoring 1. Connect the power cord and CAT5/6 cable to the locker gateway and route them out of the bottom , or the back of the locker. 2. Now that the locker is leveled and aligned in its final position, locate the four holes in the locker frame for attaching the stack to the floor. - Page 9 Installing Your Locker Leveling 1. Begin by determining the final position of the locker stack. If the locker will be installed against a wall, the back panel is removable to minimize depth. 2. Once the locker is positioned in the preferred location, open the lower cabinet using the keys included in the hardware pack.
-
Page 10: Removing The Top Cover
Installing Your Locker Removing the Top Cover Before a locker stack can be wall anchored and/or ganged together with another stack, the top cover must first be removed via the following steps: 1. Using the keys included in the hardware pack, open the access panel on the upper left side of the locker stack, being careful not to sever the grounding strap connecting the panel to the locker frame. - Page 11 Installing Your Locker Wall Anchoring Before proceeding to wall anchor, the top cover should now already be removed, following steps outlined in the Removing the Top Cover section. 1. Begin by removing the back panel, which is not used in a wall anchored installation scenario.
- Page 12 Installing Your Locker Wall Anchoring (cont’d) 4. Carefully slide the locker against the wall to determine and mark the desired final location. If installing multiple lockers side-by-side and it is preferred that the lockers be attached to each other, proceed to the Ganging Lockers section to determine spacing by pre-installing the ganging bracket(s) before determining the final position.
- Page 13 Installing Your Locker Ganging Lockers The top of both locker stacks must be removed before attaching lockers together. For instructions on removing the top assembly, please refer to the previous Removing the Top Cover section. 1. Now that the top of the lockers have been removed, locate the four upward-facing screw holes that are now exposed on the top sides of the locker frame.
-
Page 14: Activate Your Account
Setting Up Bretford Connect Activate Your Account When you purchase your Bretford Connect license, a welcome email is sent to the address you provide during enrollment with instructions to activate the license using the Activate License tool located on the Bretford website. - Page 15 Ethernet cord, and check the connection status via the 3 indicator lights on the gateway Note that the TechGuard Connect lockers require a connection to a DHCP network and a global DNS configuration. If applicable, be sure to clear the ports and whitelist the IP addresses listed in the link above.
- Page 16 Setting Up Bretford Connect Set Up Your Organizational Structure When you log into Bretford Connect the first time, you will arrive at the Dashboard, which provides you with a bird's-eye view of your lockers, users and overall usage of your system. The first step in setting up your Bretford Connect system is to click on “My Organization”...
- Page 17 Admin users are responsible for management of the Bretford Connect system. They oversee the lockers, manage all locker users and are able to login to the Bretford Connect portal. To set up your admin users, go https://www.bretford.com/connect/docs/admins Locker users have access to individual bays on any given locker within the system.
- Page 18 Setting Up Bretford Connect Activate and Configure Your Lockers When you click on “Lockers,” you will be able to activate new lockers (“Add Locker”), assign locker users to individual locker bays, open bays remotely, check on the status of any locker stack and, when necessary, completely disable all access to a locker bay.
- Page 19 Setting Up Bretford Connect Add Your Assets (for Check-In/Check-Out Mode) If your lockers are configured in Check-in / Check-out (CICO) mode, the last step is to set up your assets. Assets can range from mobile devices that are charged in the locker bays, to other, non-charging items that are used by the organization.
Need help?
Do you have a question about the TechGuard Connect and is the answer not in the manual?
Questions and answers