Table of Contents
Advertisement
Available languages
Available languages
Quick Links
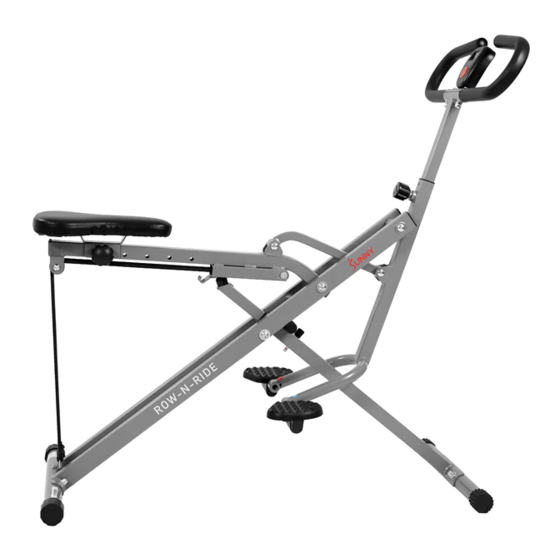
Upright Row-N-Ride Exerciser
English, Page 6~13
Español, Page 14~21
USER MANUAL
IMPORTANT! Please retain owner's manual for maintenance and adjustment instructions. Your
satisfaction is very important to us, PLEASE DO NOT RETURN UNTIL YOU HAVE
CONTACTED US: support@sunnyhealthfitness.com or 1-877-90SUNNY (877-907-8669).
¡IMPORTANTE! Conserve el manual del propietario para las instrucciones de mantenimiento y
ajuste. Su satisfacción es muy importante para nosotros, NO DEVUELVA HASTA HABERNOS
ONTACTADO: support@sunnyhealthfitness.com ó 1-877-90SUNNY (877-907-8669).
NO. 077S
Advertisement
Table of Contents

Related Manuals for Sunny Health & Fitness Row-N-Ride 077S


Summary of Contents for Sunny Health & Fitness Row-N-Ride 077S
- Page 1 Upright Row-N-Ride Exerciser NO. 077S USER MANUAL IMPORTANT! Please retain owner’s manual for maintenance and adjustment instructions. Your English, Page 6~13 satisfaction is very important to us, PLEASE DO NOT RETURN UNTIL YOU HAVE CONTACTED US: support@sunnyhealthfitness.com or 1-877-90SUNNY (877-907-8669). ¡IMPORTANTE! Conserve el manual del propietario para las instrucciones de mantenimiento y Español, Page 14~21 ajuste.
-
Page 2: Important Safety Information
IMPORTANT SAFETY INFORMATION We thank you for choosing our product. To ensure your safety and health, please use this equipment correctly. It is important to read this entire manual before assembling and using the equipment. Safe and effective use can only be achieved if the equipment is assembled, maintained, and used properly. It is your responsibility to ensure that all users of the equipment are informed of all warnings and precautions. - Page 3 INFORMACIÓN IMPORTANTE DE SEGURIDAD Gracias por haber elegido nuestro producto. Para garantizar su seguridad y salud, utilice este equipo correctamente. Es importante que lea todo el manual antes de instalar y usar el equipo. Solo se puede garantizar el uso seguro y eficaz del equipo si se instala, mantiene y utiliza correctamente. Es su responsabilidad asegurarse de que todos los usuarios de los equipos conozcan todas las advertencias y precauciones.
-
Page 4: Exploded Diagram
EXPLODED DIAGRAM 22 22 27 26 16 16 5 33 5 33 HARDWARE PACKAGE #12 M8*42 #21 47*40*M8 1PC M8*13... -
Page 5: Parts List
PARTS LIST Description Spec. Qty. Description Spec. Qty. Sponge Stopper Plug Seat Tube Ø25*1.5 Bolt M8*42 Washer OD20*ID11 Handlebar Washer OD22*ID8 Main Frame M8*13 Handlebar Tube Plug Ø19*35 Bushing Seat Connecting Tube Pedal Connecting Tube Front Connecting Tube Knob Ø38*L65*M16 M8*12 Bearing Sleeve Hexagon Screw... -
Page 6: Lista De Piezas
LISTA DE PIEZAS n. ° Descripción Espec. Cont. n. ° Descripción Espec. Cont. Esponja Tapón Conector Tubo de Conexión Ø25*1.5 Perno M8*42 Arandela OD20*ID11 Manubrio Tuerca Arandela OD22*ID8 Estructura Principal Tuerca M8*13 Pasador Tubo del Manubrio Conector Ø19*35 Tubo de Conexión del Buje Asiento Tubo de Conexión del... - Page 7 ASSEMBLY INSTRUCTIONS We value your experience using Sunny Health and Fitness products. For assistance with parts or troubleshooting, please contact us at support@sunnyhealthfitness.com or 1-877-90SUNNY (877- 907-8669). STEP 1: Open the Main Frame (No. 28) as shown in the picture on the left.
- Page 8 We value your experience using Sunny Health and Fitness products. For assistance with parts or troubleshooting, please contact us at support@sunnyhealthfitness.com or 1-877-90SUNNY (877-907- 8669). STEP 3: M8*42 M8*13 Take out the Bolt (No. 3) and Nut (No. 6) from manual bag.
- Page 9 We value your experience using Sunny Health and Fitness products. For assistance with parts or troubleshooting, please contact us at support@sunnyhealthfitness.com or 1-877-90SUNNY (877-907- 8669). STEP 6: Insert the Meter (No. 41) onto the tab on the Handlebar (No. 4). STEP 7: 2 1 Φ...
- Page 10 We value your experience using Sunny Health and Fitness products. For assistance with parts or troubleshooting, please contact us at support@sunnyhealthfitness.com or 1-877-90SUNNY (877-907- 8669). STEP 9: Unhook Exercise Bands (No. 42) from the Seat Connecting Tube (No. 31), and connect the Exercise Bands (No.
-
Page 11: Battery Installation And Replacement
BATTERY INSTALLATION & REPLACEMENT Battery Cover Battery BATTERY INSTALLATION: 1. Take out 1 AA battery from manual bag. 2. Press the buckle of battery cover on the Meter (No. 41), then remove battery cover. 3. Install 1 AA battery into the battery case on the back of the Meter (No. 41). Pay attention to the battery + and –... -
Page 12: Specifications
EXERCISE METER SPECIFICATIONS: TIME…..............00:00-99:59 MIN/SEC. COUNT(CNT) ............0-9999 STROKES CALORIES(CAL)… ..........0-9999 KCAL TOTAL COUNT(TOT.CNT)........0-9999 STROKES FUNCTIONS: TIME: Displays the workout time while exercising. COUNT(CNT): Accumulate the strokes while exercising. CALORIES(CAL): Displays calories amount burned while exercising. TOTAL COUNT(TOT.CNT): Displays the total number of strokes since batteries installed. -
Page 13: Adjustment Instructions
ADJUSTMENT INSTRUCTIONS ADJUSTING THE HANDLEBAR Loosen the Knob (No. 10) and pull. Raise or lower the Handlebar Tube (No. 7) to desired height. Tighten the Knob (No. 10). ADJUSTING THE SEAT Loosen and remove the Knob (No. 21) located under the Seat Connecting Tube (No. -
Page 14: Folding Instructions
FOLDING INSTRUCTIONS A. Adjust the Seat Tube (No. 25) to the lowest level by the Pin (No. 29). NOTE: Make sure Exercise Bands (No. 42) are not connected to Main Frame (No. 28) when folding. B. Adjust the Handlebar Tube (No. 7) to the lowest level by Knob (No. -
Page 15: Instrucciones De Armado
INSTRUCCIONES DE ARMADO Valoramos su experiencia con los productos de Sunny Health and Fitness. Para obtener ayuda con las piezas o la solución de problemas, contáctenos en support@sunnyhealthfitness.com o al 1-877- 90SUNNY (877-907-8669). PASO 1: Abra la Estructura Principal (n.° 28) como se muestra en la imagen de la izquierda. - Page 16 Valoramos su experiencia con los productos de Sunny Health and Fitness. Para obtener ayuda con las piezas o la solución de problemas, contáctenos en support@sunnyhealthfitness.com o al 1-877- 90SUNNY (877-907-8669). PASO 3: M8*42 M8*13 Saque el Perno (n.° 3) y la Tuerca (n.° 6) de la bolsa manual.
- Page 17 Valoramos su experiencia con los productos de Sunny Health and Fitness. Para obtener ayuda con las piezas o la solución de problemas, contáctenos en support@sunnyhealthfitness.com o al 1-877- 90SUNNY (877-907-8669). PASO 6: Inserte el Medidor (n.° 41) en la lengüeta del Manubrio (n.°...
- Page 18 Valoramos su experiencia con los productos de Sunny Health and Fitness. Para obtener ayuda con las piezas o la solución de problemas, contáctenos en support@sunnyhealthfitness.com o al 1-877- 90SUNNY (877-907-8669). PASO 9: Desenganche las Cuerdas Elástica (n.° 42) del Tubo de Conexión del Asiento (n.°...
-
Page 19: Instalación De Las Pilas
BINSTALACIÓN Y REEMPLAZO DE BATERÍAS Cubierta de Pila Battery Cover Battery Pila INSTALACIÓN DE LAS PILAS 1. Saque 1 pila AA de la caja del medidor. 2. Presione el broche de la cubierta de las pilas en la Medidor (n.° 41), luego, retire la cubierta de las pilas. -
Page 20: Especificaciones
COMPUTADORA DE EJERCICIOS ESPECIFICACIONES: TIME (TIEMPO)……………………....00:00-99:59 MIN/S CNT (CONTEO)…………………………..0-9999 PEDALEOS CAL (CALORÍAS)…………………..…..0-9999KCAL TOT. CNT (CONTEO TOTAL)………..….0-9999 PEDALEOS FUNCIONES TIME (TIEMPO): Muestra el tiempo de entrenamiento durante el ejercicio. CNT (CONTEO): Acumula los pedaleos durante el ejercicio. CAL (CALORÍAS): Muestra la cantidad de calorías quemadas durante el ejercicio. TOT. -
Page 21: Instrucciones De Ajuste
INSTRUCCIONES DE AJUSTE AJUSTE DEL MANUBRIO Afloje la Perilla (n.° 10) y tire. Suba o baje el Tubo del Manubrio (n.° 7) a la altura deseada. Ajuste la Perilla (n.° 10). AJUSTE DEL ASIENTO Afloje y retire la Perilla (n.° 21) ubicada debajo del Tubo de Conexión del Asiento (n.°... -
Page 22: Instrucciones De Plegado
INSTRUCCIONES DE PLEGADO A. Ajuste el Tubo de Conexión (n.° 25) al nivel más bajo con el Pasador (n.° 29). NOTA: Asegúrese de que las Cuerdas Elásticas (n.° 42) no estén conectadas al Estructura principal (n.° 28) al plegar. B. Ajuste el Tubo del Manubrio (n.° 7) al nivel más bajo con la Perilla (n.°...
Need help?
Do you have a question about the Row-N-Ride 077S and is the answer not in the manual?
Questions and answers