Advertisement
Quick Links
Advertisement

Subscribe to Our Youtube Channel
Related Manuals for Sunny Health & Fitness SF-RB4631


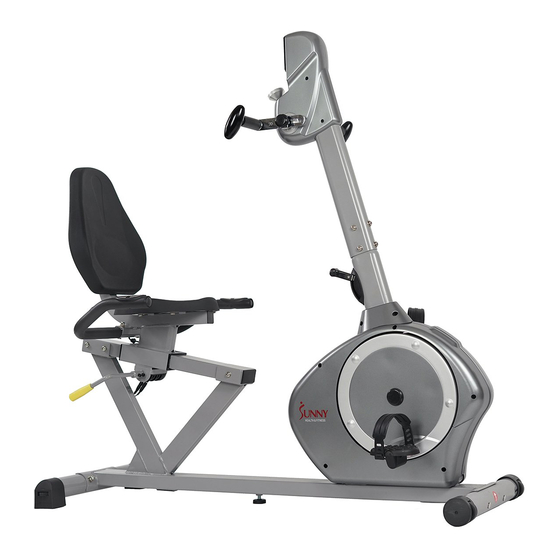
Summary of Contents for Sunny Health & Fitness SF-RB4631
- Page 1 RECUMBENT BIKE WITH ARM EXERCISER SF-RB4631 USER MANUAL IMPORTANT! Please retain owner’s manual for maintenance and adjustment instructions. Your satisfaction is very important to us, PLEASE DO NOT RETURN UNTIL YOU HAVE CONTACTED US: support@sunnyhealthfitness.com or 1-877-90SUNNY (877-907-8669).
-
Page 2: Important Safety Information
IMPORTANT SAFETY INFORMATION We thank you for choosing our product. To ensure your safety and health, please use this equipment correctly. It is important to read this entire manual before assembling and using the equipment. Safe and effective use can only be achieved if the equipment is assembled, maintained and used properly. - Page 3 EXPLODED DIAGRAM...
- Page 4 HARDWARE PACKAGE #10 M8*L45*140*□8 2PCS #9 M8*L73*120*□8 4PCS #12 Ф8.2*2*Ф19*R30 4PCS #11 M8 6PCS #15 D8*1.5*Ф16 2PCS #24 2PCS #82 S13-14-15 1PC #29 2PCS #84 S6 1PC #83 S5 1PC Ordering Replacement Parts (U.S. and Canadian Customers only) Please provide the following information in order for us to accurately identify the part(s) needed: ✓...
- Page 5 PARTS LIST DESCRIPTION SPEC. DESCRIPTION SPEC. Main Frame Sensor Wire Seat Tube Computer Handlebar Connecting Axle Slide Rail Pulse Sensor Wire 2 Handlebar Post Square Plug 60*30*1.5 Cross Pan Head ST4.2*18 Front Stabilizer Self-Drilling Screw Magnet Board Rear Stabilizer Connection Cross Pan Head ST4.2*30 Adjustment Handle...
-
Page 6: Main Frame (
ASSEMBLY INSTRUCTIONS STEP 1 Attach the Front Stabilizer (No. 6) and the Rear Stabilizer (No. 7) to the Main Frame (No. 1) with the 4 Square Neck Bolts (No. 9), 4 Arc Washers (No. 12) and 4 Ball Cap Nuts (No. 11) using Spanner (No. -
Page 7: Handlebar 1
STEP 3 First, remove the preassembled 6 Hex Pan Head Screws (No. 14), 2 Arc Washers (No. 13) and 4 Washers (No. from the Main Frame (No. 1) using Allen Wrench (No. 84). Then connect the Pulse Sensor Wire 2 (No. 46) and Sensor Wire (No. -
Page 8: Adjustment Handle 1
STEP 5 First, remove the preassembled 6 Hex Pan Head Screws (No. 14) and 6 Washers (No. 15) from the Slide Rail (No. 4) with Allen Wrench (No. 84). Then attach the Slide Rail (No. 4) to the Main Frame (No. 1) with 6 Hex Pan Head Screws (No. - Page 9 STEP 7 1. Remove the preassembled 4 Hex Pan Head Screws (No. 14) and 4 Washers (No. 15) from the Backrest (No. 37) with Allen Wrench (No. 84). Then attach the Backrest (No. 37) to the Seat Tube (No. 2) tightly with 4 Hex Pan Head Screws (No.
- Page 10 ADJUSTMENT GUIDE ADJUSTING THE TENSION To adjust the tension of the Rotating Handles (No. 23L/R), turn the Tension Knob A in front of the meter. Turn clockwise (+) to increase the tension, counterclockwise (-) to decrease the tension. To adjust the tension of the bike, move the Tension Switch B. 1 is the lowest tension.
-
Page 11: Computer
EXERCISE METER MODE: Press to select function. Press and hold for 2 seconds to reset all values except TOTAL DIST FUNCTIONS AND OPERATIONS: 1. SCAN: Press MODE button until “▼” appears at SCAN Position. Computer will rotate through all the 6 functions: Time, Speed, Distance, Calorie, Total Distance, and Pulse.
Need help?
Do you have a question about the SF-RB4631 and is the answer not in the manual?
Questions and answers