Advertisement
Quick Links
Annotator 401 • Setup Guide
500 mA
CONFIG
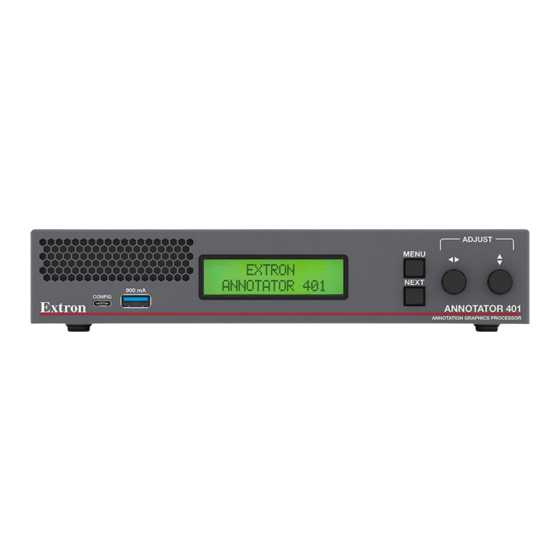
The Extron Annotator 401 Annotation Graphics Processor is a scaling product that allows a presenter to draw, point, or type on
live video or computer source content using a touchpanel, mouse, or keyboard.
A B
This setup guide allows you to easily and quickly set up and configure your Annotator 401 using step-by-step instructions. It
covers performing basic operations using the front panel controls.
NOTE:
For full installation, configuration, menus, and operation details - including using Extron Simple Instruction Set (SIS
commands and Product Configuration Software (PCS), see the Annotator 401 User Guide at
Rear Panel Features
INPUT
HDMI
100-240V
--A MAX 50-60Hz
A
B
Figure 1.
Rear Panel Features
Power and video input connections
A
AC power connector
B
HDMI input connector
Installation
Mounting and Cabling
Step 1 — Mounting (optional)
a.
Turn off or disconnect all equipment power sources.
b.
Place the Annotator 401 on top of a flat surface using the provided rubber feet, mount it under a table using an optional kit
for under desk mounting, or attach it to a rack shelf using an optional rack shelf-mounting kit (available at www.extron.com).
Step 2 — Connecting input
Connect digital video source to the HDMI input connector (see figure 1,
Step 3 — Connecting outputs
Connect suitable video displays to one or both of the two HDMI output connectors (
Step 4 — Connecting control devices
a.
For control through Ethernet, connect a LAN or WAN to the RJ-45 connector (
The default subnet mask is 255.255.255.0.
b.
For serial RS-232 control, connect a host device to the 3-pole captive screw connector (
c.
For control through USB, connect a host device to the front panel USB-C port (see figure 2,
Step 5 — Connecting user interface devices or touchpanels
Connect user interface devices (such as a mouse, keyboard, or touchpanels) to the Annotator 401 using either of the rear panel
USB ports (see figure 1,
device.
C
OUTPUTS
1
2
1
2
250 mA
HDMI
HDMI
C
D
C
HDMI output connectors (2)
D
USB-A connectors (2)
E
USB EXT RJ-45 connector
F
Pairing button and Status LED
D
). Alternatively the front panel USB port (see
MENU
NEXT
ANNOTATOR 401
ANNOTATION GRAPHICS PROCESSOR
D
DEVICES
LAN
3
PAIR
RESET
USB EXT
E
F
G
H
Outputs and control connections
B
above)
.
H
figure 2,
B
ADJUST
E
www.extron.com.
REMOTE
RS-232
Tx Rx G
I
G
Reset button and LED
H
RJ-45 LAN connector
I
RS-232 3-pole captive screw
connector
C
).
). The default IP address is 192.168.254.254.
I
). The default baud rate is 9600.
A
on the next page).
) can also be used to connect a user interface
)
TM
1
Advertisement

Subscribe to Our Youtube Channel
Related Manuals for Extron electronics Annotator 401


Summary of Contents for Extron electronics Annotator 401
- Page 1 NEXT 500 mA CONFIG ANNOTATOR 401 The Extron Annotator 401 Annotation Graphics Processor is a scaling product that allows a presenter to draw, point, or type on ANNOTATION GRAPHICS PROCESSOR live video or computer source content using a touchpanel, mouse, or keyboard.
- Page 2 Annotator 401 • Setup Guide (Continued) Step 6 — Connecting power Plug in a standard IEC power cord from a 100 to 240 VAC, 50-60 Hz power source into this power receptacle (see figure 1, the previous page). Front Panel Overview...
- Page 3 Touchpanel Calibration If a touchpanel screen is attached to the Annotator 401, the touch accuracy can be calibrated using the Calibrate Panels setting in the Advanced Configuration menu. Press NEXT to cycle to Calibrate Panels submenu. Within the Calibrate Panels menu, select Yes using the ADJUST knobs and press NEXT. Observe all connected touchpanel screens.
- Page 4 Annotation Graphics Overview The Annotator 401 output includes a graphical toolbar, which is used for annotation. The toolbar slides in from the right side, and can be accessed through a touch screen, or by using a compatible mouse attached to a USB port. To open the toolbar, click on the green arrow at the top right of the screen.
Need help?
Do you have a question about the Annotator 401 and is the answer not in the manual?
Questions and answers