
Subscribe to Our Youtube Channel
Related Manuals for Roborock AED01LRR


Summary of Contents for Roborock AED01LRR
- Page 1 Roborock Auto-Empty Dock User Manual Read this user manual carefully before using this product and store it properly for future reference.
- Page 2 English Français Español...
-
Page 3: Table Of Contents
Contents Safety Information FCC IC Statement Accessories Product Introduction Getting Started Routine Maintenance Basic Parameters FAQs & Troubleshooting Informations de sécurité... - Page 5 Safety Information English IMPORTANT SAFETY INSTRUCTIONS When using an electrical appliance, basic precautions should always be followed, including the following: READ ALL IN- STRUCTIONS BEFORE USING (THIS APPLIANCE). Failure to follow the warnings and instructions may result in electric shock, fire and/or serious injury.
-
Page 6: Safety Information
Safety Information in a polarized outlet only one way. If the plug does not fit fully in the outlet, reverse the plug. If it still does not fit, contact a qualified electrician to install the proper outlet. Do not change the plug in any way. •... -
Page 7: Fcc Ic Statement
FCC IC Statement Compliance Information Product Name Auto-Empty Dock Product Model AED01LRR, AED02LRR This device complies with part 15 of the FCC Rules. This device contains licence-exempt transmitter(s)/receiver(s) that comply with Innova- tion, Science and Economic Development Canada's licence-exempt RSS(s). Compliance Statement... - Page 8 FCC IC Statement Warning Any changes or modifications to this unit not expressly approved by the party responsible for compliance could void the user's authority to operate the equipment. This equipment has been tested and found to comply with the limits for a Class B digital device, pursuant to part 15 of the FCC Rules.
-
Page 9: Accessories
Accessories Dock Base Power Cable Screwdriver Auto-Empty Dustbin Disposable Dust Bag... -
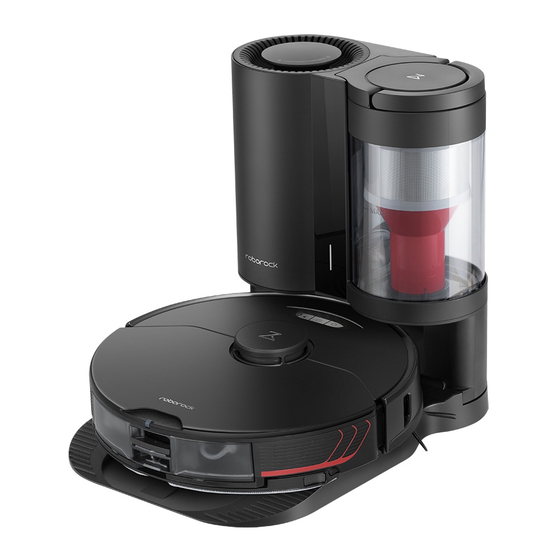
Page 10: Product Introduction
Product Introduction Auto-Empty Dock Status Indicator Light • Steady white: Standby. • Flashing white : Emptying. • Steady red: Malfunction. • Light off: Charging, not powered on, or Dock malfunction for more than 10 minutes. Dock Location Beacon Charging Contacts Base Suction Inlet Electrode Brushes... - Page 11 Product Introduction Auto-Empty Dock Base Filter Cover Base Fastening Screws (5) Rear HEPA Filter Screwdriver Front Filter Air Duct Cover Air Duct Cover Screws (7)
- Page 12 Product Introduction Dustbin Power Cable Storage Slot Dustbin Top Lid Power Cable Storage Slot Cable Outlet Dust Bag Slot Power Port Note: Power cable can be pulled out at both sides. Dust Bag Handle Disposable Dust Bag...
- Page 13 Product Introduction Auto-Empty Dustbin Filter Cover Filter Cover Latch Air Inlet Washable Filter...
-
Page 14: Getting Started
Getting Started Assembly 2. Place dock upside down on a soft, flat surface (carpet/towel/ cloth) and attach the base by screwing in five screws in the areas marked with a , as shown. 1. Take the screwdriver from its storage bin at the bottom of the base. - Page 15 Getting Started 3. Connect the power cable to the dock, and keep excess cable ≥ 1 m (3 ft) inside the storage slot. ≥ 0.5 m (1.6 ft) ≥ 0.5 m (1.6 ft) ≥ 1.5 m (5ft) Notes: • The status indicator light turns off automatically when the robot is charging. •...
- Page 16 Getting Started Robot Dustbin Replacement 2. Auto Emptying Auto emptying will begin when the robot returns to the auto- 1. Only replace with the Auto-Empty Dustbin empty dock after cleaning. 1. Remove the original robot dustbin. 2. Remove the plate covering the air inlet in the robot. 3.
-
Page 17: Routine Maintenance
Routine Maintenance Dust Bag Replacement 2. Remove the dust bag by its handle vertically as shown. * Replace as needed Notes: • Replace the dust bag regularly or when it is full. • The disposable dust bag uses a one-time seal design to effectively prevent dust from spreading outward during replacement. - Page 18 Routine Maintenance 4. Replace the dust bag with a new one. Make sure it is properly 5. Close the top lid of the dustbin and make sure it is securely installed. sealed.
- Page 19 Routine Maintenance Filter Cleaning 2. Remove the front filter and/or the rear HEPA filter as needed. * Clean as needed Notes: • Do not wash the filter in a dishwasher or washing machine, or dry using a cylinder dryer, oven, microwave, hot air or fire. •...
- Page 20 Routine Maintenance 3. Rinse with cold water until clean. 5. Reinstall the dry filter and close the cover. 4. Shake off any remaining water and leave the filter to dry for 24 hours or until completely dry.
- Page 21 Routine Maintenance Air Duct 3. Wipe the air duct and cover with a dry cloth. * Clean as needed 1. Clean the dust inlet with a cotton swab if it gets blocked. 4. Re-install the cover and screw it back in place. 2.
- Page 22 Routine Maintenance Washable Filter 3. Leave the filter to dry for at least 24 hours or until completely * Clean as needed dry. 1. Open the filter cover and remove the filter. 4. Re-install the filter and close the cover. 2.
- Page 23 Routine Maintenance Auto-Empty Dustbin Cleaning 3. Rinse the dustbin with cold water until clean. * Clean as needed 1. Open the filter cover and remove the filter. 4. Allow the dustbin and filter to dry thoroughly, then rein- stall. 2. Throw out dust and dirt.
- Page 24 Routine Maintenance Clean the dock location beacon, charging contacts, and electrode brushes with a dry cloth. * Clean as needed...
-
Page 25: Basic Parameters
Basic Parameters Auto-Empty Dock Dimensions 457×314×383 mm Name Auto-Empty Dock Model AED01LRR, AED02LRR Rated Input Voltage 100-120VAC Rated Frequency 50-60Hz Rated Power (Charge) Rated Power (Dust Collection) 1000W Rated Output 20VDC 1.2A Charging Battery 14.4V/5200mAh lithium battery... -
Page 26: Faqs & Troubleshooting
FAQs & Troubleshooting Operating conditions are indicated by the LED status indicator light on the dock. Conditions Possible Causes & Solutions 1. The robot dustbin has not been replaced with the auto-empty dustbin. Use the auto-empty dustbin. 2. The plate in the robot covering the air vent has not been removed. Remove the plate. The LED status 3. - Page 27 2. The dock is not connected to a power supply. Make sure the power cable is securely plugged in and power is cannot be charged. 3. Poor contact. Clean base and dock charging contacts. If the problem persists after using the recommendations in the table above, please email our after-sales service team: US/Non-Europe Support: support@roborock.com Europe Support: support@roborock-eu.com...
Need help?
Do you have a question about the AED01LRR and is the answer not in the manual?
Questions and answers