
Related Manuals for BLADEZ R6


Summary of Contents for BLADEZ R6
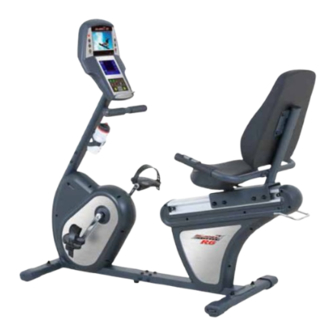
- Page 1 BLADEZ R6 RECUMBENT CYCLE OWNER’S MANUAL BLADEZ Corporation 20155 Ellipse Foothill Ranch, CA 92610 Phone: 949-206-8152 Fax: 949-206-0013 Email: fitness@ebladez.com Revised: 10/27/06...
- Page 2 R6 is designed to make your workouts more effective and enjoyable. Please read this manual carefully before using the R6. This will allow you to get a full understanding of all the features the Bladez Recumbent Cycle provides. If you have questions or concerns, please contact BLADEZ Corporation or any authorized BLADEZ FITNESS distributors in your area.
-
Page 3: Table Of Contents
R6 RECUMBENT CYCLE TABLE OF CONTENTS SECTION PAGE 1. IMPORTANT SAFETY INSTRUCTIONS ............3 2. ASSEMBLY INSTRUCTIONS ............... 5 3. PARTS LIST ....................20 4. EXPLODED VIEW..................22 5. COMPUTER CONSOLE ................23 6. COMPUTER OPERATION ................26 7. TV USER’S GUIDE ..................38 8. WARRANTY....................41... -
Page 4: Important Safety Instructions
R6 RECUMBENT CYCLE SECTION 1 IMPORTANT SAFETY INSTRUCTIONS Read all instructions before using the Recumbent Cycle. Notice: Before using this or any other exercise equipment consult your family physician or health care professional to develop a well planned exercise program to fit your health needs. - Page 5 IMPORTANT SAFETY INSTRUCTIONS CONTINUED POWER SUPPLY Your R6 Recumbent Cycle uses 2 two prong external power supplies for use on a nominal 110-120-volt circuit. Use only the power supplies provided with your R6 Recumbent Cycle. If you misplace a power supply, please contact Bladez for an original replacement. Use of the wrong power supply may cause damage to your R6 Recumbent Cycle.
-
Page 6: Assembly Instructions
R6 RECUMBENT CYCLE SECTION 2 - ASSEMBLY INSTRUCTIONS SCREWS BAG... - Page 7 R6 RECUMBENT CYCLE ASSEMBLY INSTRUCTIONS CONTINUED 1. Assembly Parts...
- Page 8 R6 RECUMBENT CYCLE ASSEMBLY INSTRUCTIONS CONTINUED STEP 1. Assembling the Front Stabilizer 彈簧華司 Spring Washer M8х2.0t—2PCS (112) 華司 Washer 20х9х2.0t—2PCS (113) M8 Acorn Nut—2PCS (110) 袋帽 Bolt M8х56—2PCS (109) 傘頭馬車螺絲 Refer to the drawing to the 如右圖所示,用螺絲(109),華司 (113)(112),袋帽(110)將前腳管 right. Attach the Front (66)組到前架上(1),用十字開口...
- Page 9 R6 RECUMBENT CYCLE ASSEMBLY INSTRUCTIONS CONTINUED STEP 2. Assembling the Rear Stabilizer 彈簧華司 Spring Washer M8х2.0t—2PCS (112) 華司 Washer 20х9х2.0t—2PCS (113) M8 Acorn Nut—2PCS (110) 袋帽 Bolt M8х56—2PCS (109) 傘頭馬車螺絲 Refer to the drawing to the right. 如右圖所示,用螺絲(109),華司 (113)(112),袋帽(110)將後腳管 Attach the Rear Stabilizer (74) to (74)組到後架上(44),用十字開口...
- Page 10 R6 RECUMBENT CYCLE ASSEMBLY INSTRUCTIONS CONTINUED STEP 3. Assembling the Front and Rear Frames 華司 Washer 18х9х2.0t—8PCS (5) Allen Bolt M8х15—4PCS (108) 傘頭內六角螺絲M8x15--4PCS(108) Allen Bolt M8х20—4PCS (129) 傘頭內六角螺絲M8x20--4PCS(129) Step A: Connect the Hand Pulse Wires (17), (50) between the Front Frame and the Rear 步驟...
- Page 11 R6 RECUMBENT CYCLE ASSEMBLY INSTRUCTIONS CONTINUED STEP 4. Assembling the Uprights 華司 Washer 18х9х2.0t—6PCS (5) Allen Bolt M8х15—6PCS (108) 傘頭內六角螺絲M8x15--6PCS(108) Step A: 1. Connect the Hand Pulse Wires 步驟 A:1.將手握心跳線前架段(17)與手握 (17), (83) between the Front Frame and 心跳線立管段(83)對接,控制線下段(105)與 the Upright, and then connect the Hand 控制線中段(122)對接;...
- Page 12 R6 RECUMBENT CYCLE ASSEMBLY INSTRUCTIONS CONTINUED STEP 5. Assembling the Computer Step A: Unfasten the Screw (100) from the Computer with Open 步驟 A:用十字開口扳手(117)將電子表 Spanner (117). 上的螺絲(100)擰下. 步驟 B:將電子表內出線如圖 B 對接,注 Step B: Connect the out wires from 意按口不可接錯,(98)與(83)對接,(99)與 (122)對接.
- Page 13 R6 RECUMBENT CYCLE ASSEMBLY INSTRUCTIONS CONTINUED STEP 6. Assembling the Computer Seat, Handrail, Seat Sliding Base, Spacers and Rear Covers 殺拉頭十字自攻螺絲ST4.0x25--4PCS(41) Self Tapping Screw ST4.0х25--4PCS (41) Allen Bolt M6х35—2PCS (91) 傘頭內六角螺絲M6x35--2PCS(91) Washer 18х9х2.0t—6PCS (5) 華司 傘頭內六角螺絲M8x15--4PCS(108) Allen Bolt M8х15—4PCS (108) 傘頭內六角螺絲M8x45--2PCS(114)
- Page 14 R6 RECUMBENT CYCLE ASSEMBLY INSTRUCTIONS CONTINUED Step B: Attach the Handrail 步驟 B:用螺絲(114),華司 (59) to the Seat Sliding Base (5)(112),袋帽(110)將扶手(59)與 with Bolts (114), Washers (5), 座墊滑動件組立,同時用十字開 (112), and Acorn Nuts (110). 口扳手(117)與 6mm 內六角扳手 Then tighten the bolts with (118)將螺絲鎖緊.
- Page 15 R6 RECUMBENT CYCLE ASSEMBLY INSTRUCTIONS CONTINUED Step E: Attach the Rear Covers 步驟 E:用十字開口扳手(117),螺絲 (48), (49) to the Rear Frame with (41)將後飾蓋左右(48)(49)組到後架 Screws (41) and Open Spanner 上. (117). STEP 7. Assembling the Backrest Washer 18х9х2.0t—6PCS (5) 華司 Allen Bolt M8х15—4PCS (108)
- Page 16 R6 RECUMBENT CYCLE ASSEMBLY INSTRUCTIONS CONTINUED 如右圖所示,用螺絲(108),華司(5)將靠 Assemble the Backrest (103) and 背(103)與座墊滑動件組立,用 6mm 內 the Seat Sliding Base with Bolts 六角扳手(118)將螺絲鎖緊. (108), Washers (5) and 6mm Allen Wrench (118). STEP 8. Assembling the Handle Washer 18х9х2.0t—2PCS (5) 華司 Bolt M8х15—2PCS (108) 傘頭內六角螺絲M8x15--2PCS(108)
- Page 17 R6 RECUMBENT CYCLE ASSEMBLY INSTRUCTIONS CONTINUED STEP 9. Assembling the Bottle Holder 步驟 A:用 5mm 內六角扳手(115)將組 Step A: Unfasten the Bolt (82) from the Upright (80) with 5mm 在立管(80)上的螺絲(82)卸下. Allen Wrench (115). 步驟 B:1.用螺絲(82)將水壺架(107)組 Step B: 1. Attach the Bottle Holder 到立管(80)上,用...
- Page 18 R6 RECUMBENT CYCLE ASSEMBLY INSTRUCTIONS CONTINUED STEP 10. Assembling the Pedals Step A:Attach the Pedal Belt to the 步驟 A:將塑膠護帶按圖 A 所示扣到腳 Pedal. 踏板上. Step B:Tighten the Pedal in the arrow’s direction in Picture B with 步驟 B:用十字開口扳手(117)按圖 B 箭...
- Page 19 R6 RECUMBENT CYCLE ASSEMBLY INSTRUCTIONS CONTINUED STEP 11. Assembling the Bookshelf 如右圖所示將書報架鐵條(104)插入 Insert the Book Shelf (104) into the 電子表(97). Computer (97). STEP 12. Attaching the Transformer 步驟 A:將 AC-AC 電源適配器(127)接 Step A: Plug one end of the AC-AC 頭如圖 A 所示插入前架(1)電源接口, Adapter (127) into the front Frame 在插入前請核對電源適配器與鐵管...
- Page 20 R6 RECUMBENT CYCLE ASSEMBLY INSTRUCTIONS CONTINUED Step B:Plug the other end of the AC-AC Adapter (127) into your home 步驟 B:將 AC-AC 電源適配器(127)接 Power Jack then the Computer 頭插入家中電源,如圖 B 所示,電子表 is ready for use. 即可起用. Note: Before plugging into the power, check carefully the specifications of 注意:在插入電源前,請仔細核對...
-
Page 21: Parts List
R6 RECUMBENT CYCLE SECTION 3 - PARTS LIST DESCRIPTION DESCRIPTION Front Frame Front Stabilizer Outer Bushing (L) Bearing 6203ZZ Plastic Wheel Power Cord Self Tapping Screw (ST4.0x15) Connecting Wires Screw (M4x15) Front Stabilizer Inner Bushing (R) Washer ∮18x∮9x2.0t Belt Wheel... - Page 22 R6 RECUMBENT CYCLE PARTS LIST CONTINUED Left Front Chain Guard Backrest Right Front Chain Guard Book Shelf Screw (M4x12) Lower Control Wires Self Tapping Screw (ST4x25) Bottle TPR Supporter Bottle Holder Screw (M6x15) Allen Bolt (M8x15) Rear Frame Screw (M8x56)
-
Page 23: Exploded View
R6 RECUMBENT CYCLE SECTION 4 – EXPLODED VIEW... -
Page 24: Computer Console
R6 RECUMBENT CYCLE SECTION 5 – COMPUTER CONSOLE... - Page 25 R6 RECUMBENT CYCLE COMPUTER CONSOLE CONTINUED Parameters Display Area Instructions for the middle display area Y-axis : LEVEL (32 levels) X-axis : Time Information Display Area Time for each level=total preset time/10 Range Setting Default value Time: 00:00~99:59 00:00~99:00 (±1 min) 20:00...
- Page 26 R6 RECUMBENT CYCLE COMPUTER CONSOLE CONTINUED Button Functions Figures of Buttons Function Instructions Quick Start KEY : None of the values need to be set. All of the values will count up from 0. Level starts with 1, execution time for program is 20min.
-
Page 27: Computer Operation
R6 RECUMBENT CYCLE SECTION 6 – COMPUTER OPERATION Power On 1. Plug in the power supply and the console will start automatically (LCD completely lighted and with two Beeps). 2. Then the Start/Ready display will be shown and it will alert the User to select the... - Page 28 R6 RECUMBENT CYCLE COMPUTER OPERATION CONTINUED Quick Start POWER ON Start display No parameters need to be set; all values will count up from 0. Levels start with 1 (press keys to adjust). The preset execution time for program is 20min.
- Page 29 R6 RECUMBENT CYCLE COMPUTER OPERATION CONTINUED Manual Program continued “CALORIES” will blink. Increase or decrease CALORIES value. ”PULSE” will blink. Increase or decrease PULSE value and parameter settings are finished. Begins to count down for 3 seconds and then the program starts.
- Page 30 R6 RECUMBENT CYCLE COMPUTER OPERATION CONTINUED User Program continued Increase or decrease TIME value. ”DISTANCE” will blink. Increase or decrease DISTANCE value. ”CALORIES” will blink. Increase or decrease CALORIES value. ”PULSE” will blink. Increase or decrease PULSE value and the parameter settings are finished.
- Page 31 R6 RECUMBENT CYCLE COMPUTER OPERATION CONTINUED Interval Program continued ”WEIGHT” will blink. Increase or decrease WEIGHT value. ”TIME” will blink. Increase or decrease TIME value. ”DISTANCE” will blink. Increase or decrease DISTANCE value. ”CALORIES” will blink. Increase or decrease CALORIES value.
- Page 32 R6 RECUMBENT CYCLE COMPUTER OPERATION CONTINUED Watt Control Program continued ”WATT” will blink. Increase or decrease WATT value. ”WEIGHT” will blink. Increase or decrease WEIGHT value. “TIME” will blink. Increase or decrease TIME value. “DISTANCE” will blink. Increase or decrease DISTANCE value.
- Page 33 R6 RECUMBENT CYCLE COMPUTER OPERATION CONTINUED HRC Program continued POWER ON Start Display Begins to count down for 3 seconds and the program starts (preset execution time for program is 20min.) Enter ”HRC” mode. “AGE” will blink. Increase or decrease AGE value.
- Page 34 R6 RECUMBENT CYCLE COMPUTER OPERATION CONTINUED Test Program In this program, only GENDER, WEIGHT and AGE can be set. When this program starts to run, it will begin to count down for 12 minutes to test the physical force of the user. When it counts down to 0, it will display F1-F6, F1 is the best and F6 is the worst.
- Page 35 R6 RECUMBENT CYCLE COMPUTER OPERATION CONTINUED BMR-FAT-BMI Program Explanation of the concept: BMR (Basal Metabolic Rate) is the energy needed to maintain the body functions, measured at rest, in a lying position, at 68" F, 12 hours after food intake.
- Page 36 R6 RECUMBENT CYCLE COMPUTER OPERATION CONTINUED Climbing Program This program starts with a slight, stepwise increase of the PEDALING RESISTANCE. After an average pedaling resistance has been reached and maintained for a short period of time, the pedaling resistance is subsequently increased again by one level that is also to be maintained for a short period of time.
- Page 37 R6 RECUMBENT CYCLE COMPUTER OPERATION CONTINUED Climbing Program continued Increase or decrease PULSE value, and the parameter settings are finished. Begins to count down for 3 seconds and the program starts. Pulse recovery This function will evaluate the health index based on the pulse change in one minute. If the pulse has no change then the index will be F6, if the pulse recovers (decreases) more, then the index will be smaller, that is to say you are healthier.
- Page 38 R6 RECUMBENT CYCLE CALCULATING YOUR TARGET HEART RATE Heart Rate (HR) training has become one of the most popular forms of monitoring your workouts. Nothing tells you how your body is feeling like your own heart. By using your heart rate to tell you how hard to train, you can maximize your workout results.
-
Page 39: Tv User's Guide
R6 RECUMBENT CYCLE SECTION 7 - TV USER’S GUIDE Key Functions:... - Page 40 R6 RECUMBENT CYCLE TV USER’S MANUAL CONTINUED BUTTON NO. FUNCTION DESCRIPTION IR RECEIVER Remote Control Receiver. VOL+ 1. In TV/AV mode, press this key to increase the volume. 2. In MENU mode, press this key to increase the system default value.
- Page 41 R6 RECUMBENT CYCLE TV USER’S MANUAL CONTINUED MENU ITEM SETTING INSTRUCTIONS 1. If you hold the key for 3 or 4 seconds, it will enter MENU display. 2. Select the desired item by using 3. Adjust the preset by using...
-
Page 42: Warranty
LABOR – 1 Year Bladez Fitness shall cover the labor cost for the repair of the device for a period of one year from the date of original purchase, as long as the device remains in the possession of the original owner.
Need help?
Do you have a question about the R6 and is the answer not in the manual?
Questions and answers