Table of Contents
Advertisement
Quick Links
Advertisement
Table of Contents

Related Manuals for Trotec IDS 30 F


Summary of Contents for Trotec IDS 30 F
- Page 1 IDS 30 F ORIGINAL INSTRUCTIONS OIL HEATER...
-
Page 2: Table Of Contents
This signal word indicates a hazard with a low risk level which, if not avoided, can result in minor or moderate injury. Note This signal word indicates important information (e.g. material damage), but does not indicate hazards. oil heater IDS 30 F... - Page 3 • Insert the mains plug into a properly fused mains socket. • Observe the device's power input, cable length and intended use when selecting extensions to the power cable. Completely unroll extension cables. Avoid electrical overload. oil heater IDS 30 F...
- Page 4 Safety chapter. • continuous orange indicates an internal error of the electronic controller For more information regarding the determination of the cause of the fault please refer to the chapter Errors and faults. oil heater IDS 30 F...
- Page 5 Improper handling entails a risk of burning and electric shock. Only use the device as intended! Warning Dangers can occur at the device when it is used by untrained people in an unprofessional or improper way! Observe the personnel qualifications! oil heater IDS 30 F...
-
Page 6: Information About The Device
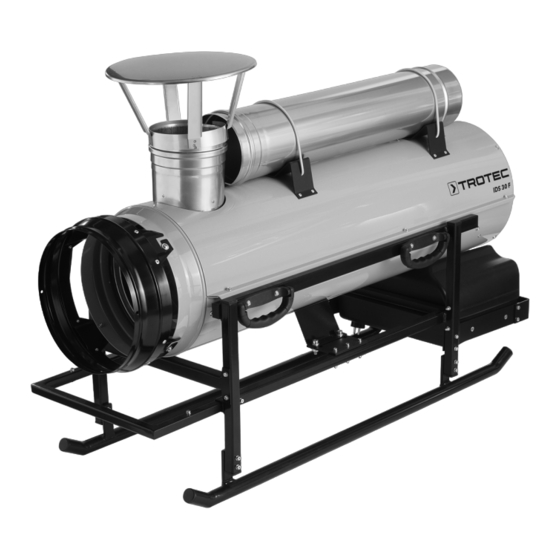
Frame Tank line connection Device depiction Filler neck retainer Control panel Air inlet Connection set for jerrycan (optional) Protective bar Air outlet Flue pipe connection for flue gas evacuation oil heater IDS 30 F... -
Page 7: Transport And Storage
3. Put the flue pipe into the holding fixture at the device. • 0 = switch the device off 4. Attach the rain cap (1) to the flue pipe connection (13). • l = ON (activate automatic operation) Thermostat socket Lamp Power cable Reset button oil heater IDS 30 F... - Page 8 • in an upright position where it is protected from dust and direct sunlight • with a cover to protect it from invasive dust, if necessary • up to 2 devices may be stacked on top of one another for storage purposes oil heater IDS 30 F...
-
Page 9: Assembly And Start-Up
• Ensure an unimpeded and sufficient combustion air supply 2. Tighten the screws on both sides. (e.g. by means of ventilation openings in doors, ceilings, windows, walls or via interconnected airways). • Have the exhaust emission of the burner checked at regular intervals. oil heater IDS 30 F... - Page 10 1. Remove the flue pipe (2) from the holding fixture. 2. Detach the rain cap (1) from the flue pipe connection (13). 5. Check the flue pipe for tight fit. 3. Connect the flue pipe (2) to the flue pipe connection (13) of the device. oil heater IDS 30 F...
- Page 11 • A: min. 1 m • C: as short as possible • B: min. 1 m • D: ≥ Ø 120 mm / 150 mm • C: as short as possible • E: min. 1 m • D: ≥ Ø 120 mm / 150 mm oil heater IDS 30 F...
- Page 12 3 m. • The inlet and outlet openings must not be covered. • There must be no walls or large objects near the device. • There must be a sufficient number of fire extinguishers available. oil heater IDS 30 F...
-
Page 13: Operation
• Check the scope of delivery of your device for The device may only be used by accordingly instructed persons. completeness. If an accessory part is missing, please contact the Trotec customer service or the specialist dealer Operating elements where you purchased the device. - Page 14 • Make sure that the device is properly connected to an external tank or a jerrycan (see chapter Assembly). • Press the reset button. To detect further causes of error, see chapter Errors and faults. oil heater IDS 30 F...
-
Page 15: Available Accessories
Only then switch the device back on. The device still does not operate correctly after these checks: Please contact the customer service. If necessary, bring the device to an authorised specialist electrical company or to Trotec for repair. oil heater IDS 30 F... - Page 16 Check whether the electrodes are clean. Have the transformer replaced by the customer service. Flame monitoring system faulty Have the flame monitoring system replaced by the customer service. Photo cell faulty Have the photo cell exchanged by the customer service. oil heater IDS 30 F...
- Page 17 • to have the nozzle replaced. Device does not Continuous green Sealing of the magnet valve Have the magnet valve replaced by the switch off indication faulty customer service. oil heater IDS 30 F...
-
Page 18: Maintenance
10. Date: ........11. Date: ........12. Date: ........Signature: ........ Signature: ......... Signature: ......... Signature: ......... 13. Date: ......... 14. Date: ........15. Date: ........16. Date: ........Signature: ........ Signature: ......... Signature: ......... Signature: ......... oil heater IDS 30 F... -
Page 19: Technical Annex
Dimensions (length x width x height) 1270 x 470 x 720 mm Minimum distance to walls and other objects A: top B: rear C: side D: front Weight 56 kg Fuels The following fuels are approved for the device: • EL fuel oil • Diesel oil heater IDS 30 F... - Page 20 Wiring diagram Abbreviation Component Abbreviation Component Control unit Photo cell Thermostat connection Condenser Indicator light Fan motor LI 1 Safety thermostat Fusing 3.15 A EV 1 Magnet valve Selector switch oil heater IDS 30 F...
- Page 21 Overview of spare parts and spare parts list IDS 30 F Info The position numbers of the spare parts differ from those describing the positions of the components mentioned in these instructions. oil heater IDS 30 F...
- Page 22 Washer Rain cap (DN 150) Rivet (Ø3.2x8 V2A) (DIN 9021 – Ø8.4xØ24x1.8 VA) Washer (DIN 9021 – Ø6.4xØ20x1.25) 11 Bungee cord (l=450 mm) IDS 30 F frame Hexagon socket countersunk screw Pipe (DN150 750 mm, (DIN 7991 – M 6 x 16 V2A) 0.6 mm sheet) oil heater IDS 30 F...
- Page 23 Lock-out switch protection Thermostat socket cover Terminal strip Retaining clip Power supply cable Air control flap Air inlet grid Lamp Baffle plate Flexible fuel oil hose Fuel oil pump Fuse Flexible fuel oil hose Solenoid valve coil oil heater IDS 30 F...
-
Page 24: Disposal
The icon with the crossed-out waste bin on waste electrical or electronic equipment stipulates that this equipment We – Trotec GmbH – declare in sole responsibility that the must not be disposed of with the household waste at the end of product designated below was developed, constructed and its life. - Page 25 Trotec GmbH Grebbener Str. 7 D-52525 Heinsberg +49 2452 962-400 +49 2452 962-200 info@trotec.com www.trotec.com...
Need help?
Do you have a question about the IDS 30 F and is the answer not in the manual?
Questions and answers