
Related Manuals for HunterLab SpectraTrend HT


Summary of Contents for HunterLab SpectraTrend HT
- Page 1 HT User’s Manual ® SpectraTrend Hunter Associates Laboratory 11491 Sunset Hills Road Reston, Virginia 20190 www.hunterlab.com A60-1014-954 Manual Version 3.2 Firmware Version 1.01.19.043A & Above...
- Page 2 EasyMatch and SpectraTrend are registered trademarks of Hunter Associates Laboratory, Inc. Safety Notes For your safety when using the SpectraTrend HT, you should pay particular attention to the following types of statements in this User’s Manual. Each description is shown in its representative typeface.
-
Page 3: Table Of Contents
SpectraTrend HT User’s Guide 3.2 TABLE OF CONTENTS INTRODUCTION TO YOUR SPECTRATREND HT ............. 7 Product Applications and Key Features ................7 System Components ......................9 System Components ......................9 Communications ....................... 11 EasyMatch® OL-ST......................11 Additional Components and Accessories ................11 The Basics of SpectraTrend Operation ................ - Page 4 SpectraTrend HT User’s Guide 3.2 Product Name Setup ......................31 Product Standards......................32 Average ..........................33 Views ..........................34 Standard Values ........................ 39 Tolerances ......................... 41 AutoSearch ........................44 Global Options ........................44 Run Configuration ......................49 Setup Parameters for EasyMatch OL-ST Software ............. 55 Product Setup ........................
- Page 5 SpectraTrend HT User’s Guide 3.2 Cleaning the Sensor ......................84 Replacing the Fuses ......................85 SPECIFICATIONS ....................87 Physical Characteristics ....................87 Environmental ......................... 87 Electrical Characteristics ....................88 Input/Output (I/O) ......................88 Conditions of Illumination and Viewing ................88 Illumination ........................
- Page 6 SpectraTrend HT User’s Guide 3.2...
-
Page 7: Introduction To Your Spectratrend Ht
The SpectraTrend HT is a continuous, online, non-contact color, and height measurement instrument. Designed for use in production environments, the SpectraTrend HT uses LED sample illumination technology to measure and monitor color on the production line. Like a bench spectrophotometer, the instrument can output both colorimetric and spectral values for the visible spectrum, along with a measurement of product height. - Page 8 SpectraTrend HT User’s Guide 3.2 Table 1: SpectraTrend HT Features and Benefits Features Description Benefits True dual beam spectrophotometer for on-line Spectrometer Solid state 256 element diode applications with optimal agreement with bench top array, concave holographic grating color instruments.
-
Page 9: System Components
Please refer to Chapter 2 for installation instructions. System Components The SpectraTrend HT sensor (Figure 1-6) head is housed in a National Electrical Manufacturers Association (NEMA) 4/Ingress Protection Rating (IP) 66 enclosure and is designed to be mounted above the product. The sensor monitors the product and sends color and height information to the fixed terminal, EasyMatch OL ST software, or other external device. - Page 10 SpectraTrend HT User’s Guide 3.2 The calibrated values for the white tile and green tile, in XYZ using D65/10°, are recorded on the front of the calibrator as shown below in Figure 1-2. These tile values are traceable to reflectance standards held at the National Physical Laboratory (England) and the National Institute of Standards and Technology [N.I.S.T.] (U.S.A.).
-
Page 11: Communications
Windows. The software allows the user to enter instructions to the sensor using the keyboard and mouse. The computer monitor then displays all results, prompts, and diagnostics messages. The EasyMatch OL ST software allows you to perform the following SpectraTrend HT functions: • Select product setups, •... - Page 12 D02-1014-745 unsuitable for the standard polycarbonate window. Automatic white tile measurement indicates sensor Sensor Window Monitor D02-1014-603 window is free of debris. Cables, extra length Call for info HunterLab, 11491 Sunset Hill Road, Reston, Virginia 20190 703-471-6870 www.hunterlab.com sales@hunterlab.com info@hunterlab.com...
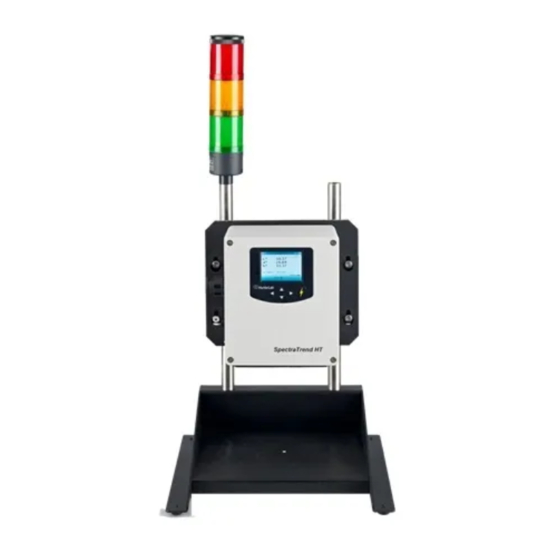
- Page 13 SpectraTrend HT User’s Guide 3.2 TriColor Stack Light Figure 4. Tricolor Stack Light The Computer A personal computer is available for those systems running the utility software. Models and configurations may vary; refer to the computer documentation for more information.
- Page 14 SpectraTrend HT User’s Guide 3.2 Table 3: Computer Requirements Component Minimum Recommended Processor 32-bit (x86) or 64-bit 32-bit (x86) or 64-bit (x64) (x64) Clock Speed 1 Gz 1GHz + 2 GB 4 GB+ Operating System Windows XP WindowsXP Professional or...
-
Page 15: The Basics Of Spectratrend Operation
Figure 6. Button Keypad for the SpectraTrend HT Menus and Prompts All SpectraTrend HT functions may be accessed through its MAIN MENU. The main menu commands lead to prompts (such as for STANDARDIZATION and READING), setup screens (for PRODUCT SETUP and GLOBAL OPTIONS), or an additional menu (such as the DIAGNOSTICS, SAVED READINGS, and SETUP MAINTENANCE choices), depending on the function requested. -
Page 16: About Your Instrument
About from the main menu. The LCD Screen displays the model, serial number, firmware version, and total flash count for your instrument. More details on SpectraTrend HT operation are given the next sections. -
Page 17: Installation
The sensor box is equipped with a mounting plate which can be used to mount the sensor in a variety of ways. The sensor must be installed in accordance with the applicable HunterLab installation drawing, which is included at the end of this chapter for reference. The following factors, as well as the details shown in the installation drawing, should be considered in making this installation. -
Page 18: The Metal Support Unit
It is left to the customer’s knowledge and discretion to properly connect the 3-meter cable to plant AC power and the support unit ground wire to system ground. Failure to properly connect plant power and ground to the SpectraTrend HT system will void all warranties and may expose you to dangerous voltages. -
Page 19: The Slide-On Calibrator
SpectraTrend HT User’s Guide 3.2 Figure 8. Support Unit Connectors The Slide-On Calibrator Install the slide-on calibrator when required for standardization by sliding it onto the track below the sensor window. The calibrator is attached from the right side of the sensor. Follow the onscreen prompts to standardize to the black tile and white tile. -
Page 20: The Easymatch Ol St Software
Open EasyMatch OL ST software by selecting the EasyMatch OL ST icon on the desktop or by selecting it from the Program Files/HunterLab using the Windows Start Menu. The default user name is ‘Admin’. The default password is ’hunterlab’. - Page 21 SpectraTrend HT User’s Guide 3.2...
- Page 22 SpectraTrend HT User’s Guide 3.2...
- Page 23 SpectraTrend HT User’s Guide 3.2...
- Page 24 SpectraTrend HT User’s Guide 3.2...
- Page 25 SpectraTrend HT User’s Guide 3.2...
- Page 26 SpectraTrend HT User’s Guide 3.2...
- Page 27 SpectraTrend HT User’s Guide 3.2...
- Page 28 SpectraTrend HT User’s Guide 3.2...
-
Page 29: Product Setup
Product setup is performed using the button pad and the LCD front panel display on the SpectraTrend HT Sensor Head or the EasyMatch OL ST software. Product setups can be created and modified only when the system is in Product Setup mode. Color measurements cannot be made while you are working on a product setup. - Page 30 SpectraTrend HT User’s Guide 3.2 Figure 11. Product Setup The PRODUCT SETUP screen appears and asks “Do you want to select the setup to configure?” You can choose from either YES to select the product setup from a list by pressing the up arrow button or NO to configure the last setup used by pressing the down arrow button.
-
Page 31: Product Name Setup
SpectraTrend HT User’s Guide 3.2 Configure each desired parameter by moving the cursor highlight to its position using the UP and DOWN ARROW buttons. When the parameter is highlighted, press the RIGHT ARROW button to scroll through the available choices for the parameter. When the desired choice is displayed, stop scrolling. -
Page 32: Product Standards
SpectraTrend HT User’s Guide 3.2 Note: there is no backspace command. In order to get rid of unwanted spaces return to the first position in the name field and re-enter the chosen name by pressing the right arrow button. To delete a character use the right arrow button to select (highlight) the desired character and then press the go (space) button. -
Page 33: Average
SpectraTrend HT User’s Guide 3.2 Choose HITCH when you wish to alter the readings made on the SpectraTrend HT to better correlate to another color measurement instrument. A specific standard with known color values from the reference instrument are read with the SpectraTrend HT. The reading is stored in the product setup with the known color values from the reference instrument. -
Page 34: Views
ONLY available when using the READ menu. When using the RUN mode, this option setting is ignored. The VIEWS setting allows you to specify the type of data to display on the SpectraTrend HT’s LCD screen after taking a measurement. - Page 35 SpectraTrend HT User’s Guide 3.2 DISPLAY Use the down arrow button to move down to the Display parameter, and then scroll through your choices using the RIGHT ARROW button. : In RUN MODE the display will only show the ABSOLUTE or DIFFERENCE.
- Page 36 SpectraTrend HT User’s Guide 3.2 DISPLAY: SPECTRAL DIFFERENCE Displays the difference between the standard and the most recent sample read in raw reflectance values for each wavelength read by the instrument. Figure 25. Spectral Difference View DISPLAY: SPECTRAL PLOT Displays the raw reflectance values for each wavelength read by the instrument to be plotted for the most recent standard or sample.
- Page 37 SpectraTrend HT User’s Guide 3.2 DISPLAY: COLOR PLOT Displays the sample’s location in color space relative to the standard, plotted in the center of the a-b and L plots. Figure 28. Color Plot View ILL/OBS. Choose the ILLUMINANT/OBSERVER combination under which color values will be calculated.
- Page 38 SpectraTrend HT User’s Guide 3.2 Choose the color scale you wish to see. Use the DOWN ARROW button to move down to the COLOR SCALE parameter, then scroll through your choices using the RIGHT ARROW button. Figure 30. Color Scale Data View The available choices are L*a*b*, L*C*h, L a b, X Y Z, Y x y, dLdCdH and [none].
-
Page 39: Standard Values
SpectraTrend HT User’s Guide 3.2 The CMC/SHADE SORT parameter applies only if the color index chosen is dEc or SSN. Use the DOWN ARROW button to move down to the CMC/SHADE SORT parameter, then press the RIGHT ARROW button to obtain the CMC/SHADE SORT screen. - Page 40 SpectraTrend HT User’s Guide 3.2 Figure 34. Standard Values Setup For a PHYSICAL standard, place the standard under the sensor window at a valid distance and press the GO button (READ) to read the standard and place its measurement values (in the selected color scale) in the product setup.
-
Page 41: Tolerances
SpectraTrend HT User’s Guide 3.2 Figure 36. Reading Standard Values For a HITCH standard, place the hitch standard (with known values from a reference instrument) at the sample port and press the GO button (READ) to read the standard and place its measurement values (in the selected color). - Page 42 SpectraTrend HT User’s Guide 3.2 Figure 38. Enter the Color Tracking Tolerances Change the highlighted digit of the selected color scale tolerance value using the UP and DOWN arrow buttons. When the desired digit is shown, press the RIGHT ARROW button (NEXT) to move to the next digit.
- Page 43 SpectraTrend HT User’s Guide 3.2 Figure 39.. Entry of Alarm Limits COLOR TOLERANCES: ALERT LIMITS. Use the DOWN ARROW button to select ALERT LIMITS and then press the RIGHT ARROW key to display the ALERT LIMITS configuration screen. The ALERT LIMIT is a color value or color difference value beyond which an alert, or caution, is given that the samples being read are close to being out of tolerance.
-
Page 44: Autosearch
SpectraTrend HT User’s Guide 3.2 Figure 40. Entry of Alert Limits AutoSearch Press the RIGHT ARROW button to toggle between YES and NO. Select YES if you wish to include this product setup when using the automatic standard searching feature, which transfers you to the most appropriate PRODUCT SETUP (based on the standard’s color values) each time a sample is read. - Page 45 SpectraTrend HT User’s Guide 3.2 Figure 42. Global Options from the Main Menu GLOBAL OPTIONS:LANGUAGE Select the LANGUAGE by using the RIGHT or LEFT ARROW. Languages include English, French, German, Italian, Japanese, Spanish and Chinese. Figure 43. Display Settings GLOBAL OPTIONS: DISPLAY SETTINGS Choose the DISPLAY SETTINGS by pressing the RIGHT ARROW.
- Page 46 SpectraTrend HT User’s Guide 3.2 Figure 44. Display Settings Menu When done, press the GO button. GLOBAL OPTIONS: ANALOG OUTPUT Choose the analog output by pressing the RIGHT ARROW. UPPER and LOWER LIMITS can be entered using the RIGHT and LEFT ARROW to select and the UP/DOWN ARROWS to change the limits.
- Page 47 SpectraTrend HT User’s Guide 3.2 GLOBAL OPTIONS: SETUPS LOCKED This parameter will toggle between YES to LOCK and NO to UNLOCK THE SETUPS. When YES is selected, the user will be unable to change the product setup. This parameter is helpful in maintaining a consistency of readings by protecting the system from product setup change.
- Page 48 SpectraTrend HT User’s Guide 3.2 GLOBAL OPTIONS: AUTOSEARCH AUTOSEARCH finds a suitable standard based on Color difference or Average. To initiate this option, press the RIGHT ARROW and then choose the method for the AUTOSEARCH. The standard will only function in READ MODE.
-
Page 49: Run Configuration
1 per second. This mode is appropriate for individually-measured products such as cookies or crackers. If TIME is selected, the SpectraTrend HT continuously measures and reports data over specific periods of time, transmitting average data, in units selected, for the selected time interval. - Page 50 (conveyor) position in the height units selected. However, since the SpectraTrend HT measures height by detecting the angle of the light reflected to the sensor, height is not measured absolutely, and all heights are relative. Therefore, the background distance cannot be determined with a ruler.
- Page 51 MIN HEIGHT distance will not be included in measurements. However, since the SpectraTrend HT measures height by detecting the angle of the light reflected to the sensor, height is not measured absolutely, and all heights are relative. Instead, perform the MIN HEIGHT determination procedure using the DISTANCE SENSOR in the DIAGNOSTIC MENU and enter the value obtained as this parameter in the setup.
- Page 52 MAX HEIGHT distance will not be included in measurements. However, since the SpectraTrend HT measures height by detecting the angle of the light reflected to the sensor, height is not measured absolutely, and all heights are relative. Instead, perform the MAX HEIGHT determination procedure using the DISTANCE SENSOR in the DIAGNOSTIC MENU and enter the value obtained as this parameter in the setup.
- Page 53 SpectraTrend HT User’s Guide 3.2 RUN CONFIGURATION: HEIGHT TRIGGER: When the HEIGHT TRIGGER is set to YES, the sensor will only flash when the sample is within in the selected range for MIN and MAX HEIGHT. If the sensor is outside this range, the sensor will not flash, and no readings are taken.
- Page 54 SpectraTrend HT User’s Guide 3.2 The value of the entered filter constant must be between zero and 100. No filtering occurs with a value of zero and maximum smoothing/filtering (and the slowest read time) occurs with a filter constant of 10. The graph below illustrates the number of readings required to reach a new value when the product changes.
-
Page 55: Setup Parameters For Easymatch Ol-St Software
SpectraTrend HT User’s Guide 3.2 Setup Parameters for EasyMatch OL-ST Software Before Beginning a PRODUCT SETUP for the first time, make sure you have selected the PREFERENCES from the SYSTEM MENU. After selecting METRIC (mm) or US (inches) press the OK button and then follow the prompts to DOWNLOAD THE SYSTEM SETUP with the new Units of Measure. - Page 56 SpectraTrend HT User’s Guide 3.2 PRODUCT SETUP, (TAB) PAGE 1: COLOR SCALE Color scales available include XYZ, Hunter Lab, CIE L*a*b*, Yxy, and L*C*H* Figure 62. Product Setup & Color Scale PRODUCT SETUP, (TAB) PAGE1: OPTIONAL INDEX An optional Index may be selected from the list to display on the front panel along with the color measurement values.
- Page 57 PIECE MODE is 1 piece per second. This mode is appropriate for individually- measured products such as cookies or crackers. If TIME UNITS are selected, the SpectraTrend HT continuously measures in the units selected and transmits average data for the selected time interval. Note that gaps are ignored by the sensor.
-
Page 58: Product Standard, Tolerances And Corrections
SpectraTrend HT User’s Guide 3.2 PRODUCT SETUP, (TAB) PAGE 1: DISPLAY MODE The available data display modes are ABSOLUTE and DIFFERENCE. ABSOLUTE provides values as measured by the sensor. These values are relative to the standard white tile supplied with the system, which in turn is traceable to measurements made by N.I.S.T. -
Page 59: Cmc Parameters
SpectraTrend HT User’s Guide 3.2 Choose HITCH when you wish to alter the readings made on the SpectraTrend HT to better correlate to another color measurement instrument. A specific standard with known color values from the other (reference) instrument will then be read with the SpectraTrend HT and that reading manually adjusted within the product setup to match the reference instrument. -
Page 60: Belt Distance, Height, Color Tracking
Since the SpectraTrend HT measures height by detecting the angle of the light reflected to the sensor, height is not measured absolutely, and all heights are relative. - Page 61 SpectraTrend HT User’s Guide 3.2 measures height by detecting the angle of the light reflected to the sensor, height is not measured absolutely, and all heights are relative. Therefore, the MAX HEIGHT distance cannot be determined with a ruler. Instead, perform the MAX HEIGHT determination procedure using the DISTANCE SENSOR in the DIAGNOSTIC MENU and enter the value obtained as this parameter in the setup.
- Page 62 SpectraTrend HT User’s Guide 3.2 Figure 69. Smoothing the Data with the Filter Function PRODUCT SETUP, (TAB) PAGE 4: HEIGHT TRIGGER When the HEIGHT TRIGGER is selected, the sensor will only flash when the sample is within in the selected range for MIN and MAX HEIGHT. If the sensor is outside this range, the sensor will not flash, and no readings are taken.
- Page 63 SpectraTrend HT User’s Guide 3.2 Figure 0-70. External Triggering PRODUCT SETUP, (TAB) PAGE 4: COLOR TRACKING Choose whether COLOR TRACKING is enabled by setting the tolerances. When all tolerance values are set to zero, the COLOR TRACKING feature is disabled. When COLOR TRACKING is enabled, the product will be registered as present if the measured color is within the preset tolerance of the target color.
- Page 64 SpectraTrend HT User’s Guide 3.2 Figure 0-71. Setting the Color Tracking Values PRODUCT SETUP, (TAB) PAGE 4: HEIGHT COLOR COMPENSATION Allow the sensor to determine the distance to the product and compensate for changing product heights. In situations where it is difficult for the height sensor to operate correctly (low Laser reflectance), you may choose to disable the auto height compensation by selecting FIXED and entering a value between 2.5 and 4.5 inches (63.5-...
-
Page 65: Operation
(including marked with fingerprints), clean them as described in “Maintaining and Testing SpectraTrend HT.” • Select Standardize from the SpectraTrend HT’s main menu by moving the cursor highlight to its position using the up and down arrow buttons and then pressing the (Go) button. - Page 66 • Replace the black glass by sliding the white tile into position, which is the second indentation on the standards box. • Press the button (GO). The SpectraTrend HT reads the white tile and sets the top of scale. • Replace the white tile by sliding the green tile into position, which is the third...
- Page 67 SpectraTrend HT User’s Guide 3.2 Figure 76. Reading the Green Tile • When it is finished, the screen indicates that the instrument has been successfully standardized. Figure 77. Results of a Successful Standardization • Press MAIN MENU (RIGHT ARROW) to return to the MAIN MENU. If any of the...
-
Page 68: Taking Readings
Taking Readings When the color or height of the product being read changes drastically, HunterLab recommends allowing time for the readings to stabilize before recording them. The length of time required for the readings to stabilize is a function of the current setting of the Read Time and Filter parameters. - Page 69 SpectraTrend HT User’s Guide 3.2 Figure 79. Ready to Read a Sample • The first Reading screen appears, asking if you want to select the setup to use. If you want to read using the last product setup that was used, press NO (DOWN ARROW).
- Page 70 SpectraTrend HT User’s Guide 3.2 • The first reading screen appears which prompts you to READ THE STANDARD (if the product setup uses a working standard) or sample. Figure 82. Initiate Standard Reading • Place the standard or sample under the viewing window of the sensor. Make sure the item is within the working range that is set in the product setup.
-
Page 71: Reading With Averaging
Note: These instructions apply when Average in the product setup is set to a value other than OFF. • Select READ from the SpectraTrend HT’s main menu. Move the cursor highlight to its position using the UP and DOWN ARROW buttons and then press the GO button. - Page 72 SpectraTrend HT User’s Guide 3.2 Figure 86. Reading a Sample or Standard for Averaging • Place the standard or sample under the viewing window of the sensor. Make sure the item is within the working range that is set in the product setup.
-
Page 73: Run Mode Operation
ARROW) to return to the MAIN MENU. Run Mode Operation Complete the following steps to take and average multiple readings using the SpectraTrend HT: Note: The Average in the product setup is not used during Run Mode. The RUN will use the last selected Product Setup in the product setup. - Page 74 • Select the PRODUCT SETUP to use, and then press the GO button to return to the MAIN MENU. Figure 93. Select the Parameters • Select RUN from the SpectraTrend HT’s main menu. Move the cursor highlight to its position using the UP and DOWN ARROW buttons and then press the GO button.
- Page 75 SpectraTrend HT User’s Guide 3.2 Figure 94. Select RUN to Measure Continuously • The SpectraTrend will then begin to measure as described by the PRODUCT SETUP that was selected. At the end of each measurement interval, the front panel will display the colorimetric data, height, and any index that was selected in the Product Setup.
- Page 76 SpectraTrend HT User’s Guide 3.2...
-
Page 77: Diagnostics
SpectraTrend HT User’s Guide 3.2 DIAGNOSTICS To initiate, select DIAGNOSTICS from the MAIN MENU and select the GO button to obtain the menu of available tests. Choose the desired function using the UP and DOWN ARROW keys and then press the RIGHT ARROW button. The various functions perform as described below: Figure 96. - Page 78 SpectraTrend HT User’s Guide 3.2 Figure 98. Standardization for White Tile Repeatability • When standardization is complete, the white tile is left at the port for a series of 20 readings. Figure 99. Initiation of Repeatability Test • Readings are taken in X, Y, Z and the dE* is reported at the end and compared to a dE* tolerance of ≤...
-
Page 79: Green Tile Check
SpectraTrend HT User’s Guide 3.2 Green Tile Check The Green Tile Check provides a way to determine if the instrument can read color. Figure 101. Green Tile Check To begin, the software prompts the user to confirm the values for the green tile stored in memory. -
Page 80: Signal Levels
To examine the spectral signal levels for a sample, select the SIGNAL LEVELS by pressing the RIGHT ARROW. Place the sample of interest at the port and press GO when ready. Normally this will be the white tile, but HunterLab’s Technical Support staff may instruct differently. Place the sample and press GO. -
Page 81: Distance Sensor
SpectraTrend HT User’s Guide 3.2 To return to the DIAGNOSTICS MENU select the LEFT ARROW. To return to the MAIN MENU select the RIGHT ARROW and continue reading, press the GO button. Distance Sensor To set the distance sensor, press the RIGHT ARROW to initiate. A sample should be available for measurement. - Page 82 SpectraTrend HT User’s Guide 3.2 Figure 107. Self Test Diagnostic The value of the checksum of the calibration data should remain constant unless the white tile’s assigned reflectance is updated or the instrument is serviced. You should keep a record of the checksum’s value.
-
Page 83: Maintenance
• Monthly Clean the standards (slide-on calibrator and sensor window monitor). • If a Hitch Standard has been used, then compare hitch standard values for the SpectraTrend HT to those of the off-line colorimeter. Rehitch the SpectraTrend HT if necessary or desired. -
Page 84: Cleaning The Black Glass And Green Tile
Significant scratches that result in a hazy appearance to the finish may cause standardization to be in error. If the black tile is scratched, call the HunterLab Order Processing Department or contact your local HunterLab representative to order a replacement. -
Page 85: Replacing The Fuses
• Open the support unit cover and locate fuse holder 1 and 2 as shown in Figure 5-1. If the fuse is blown the red light will be on. The fuse is HunterLab part number A13- 1014-833. The rating is 0.5A, SB, 5 X 20 MM, 250V •... - Page 86 SpectraTrend HT User’s Guide 3.2...
-
Page 87: Specifications
5.72cm (2-1/4in) round Note for high temperature applications: The SpectraTrend HT design has an ambient temperature limit of 122° F (50° C). Ideally, the SpectraTrend HT sensor should be mounted at a position near the oven exit where the temperature never exceeds 122°. -
Page 88: Electrical Characteristics
SpectraTrend HT User’s Guide 3.2 Electrical Characteristics 100-240 VAC, 47-63 Hz, <5 Input power*: amp typical Fuses: 1 Amp SB Spike/sag/surge protection to Power conditioning: permit stable operation Installation category: II (Over Voltage) *(See note under “Regulatory Notice.”) Input/Output (I/O) -
Page 89: Instrument Replacement, Repair, Problems And Questions
Freight or Express Notify your local carrier. Hold the damaged goods with their container and packaging for inspection by the examining agent. Do not return any goods to HunterLab prior to inspection and authorization of the carrier. -
Page 90: Parcel Post Shipment
Advise HunterLab regarding replacement. Parcel Post Shipment Notify HunterLab at once in writing, giving details of the loss or damage. This information is required for filing a claim. Hold the damaged goods with their container and packaging for possible inspection by postal authorities. - Page 91 HunterLab Technical Support for maintenance or repair instructions. Many times, this on-the- spot diagnosis is all that is required. If repair is required, HunterLab offers two means of servicing. Instrument may be returned to a HunterLab service facility for repair or a HunterLab Service Department technician can come to your location to perform on-site repair.
- Page 92 SpectraTrend HT User’s Guide 3.2...
-
Page 93: Index
SpectraTrend HT User’s Guide 3.2 INDEX 457B, 99 Difference, 35 457-nm Brightness, 99 Spectral Data, 35 A, 96 Spectral Difference, 36 Absolute Indices, 99 Spectral Plot, 36 Access to the sensor, 17 Distance Sensor, 81 Alarm Limits, 42 dL*da*db, 98... - Page 94 SpectraTrend HT User’s Guide 3.2 Keyboard, 14 SpectraTrend HT Installation Drawings, 20 L*a*b*, 96 SSN, 107 L*C*h, 97 Standard Measurement values, 94 Ad Hoc, 32 Metamerism Index, 107 Hitch, 33 MI, 107 Numeric, 32 Monitor, 14 Physical, 33 Numeric standard, 58...
-
Page 95: Appendix A: Measurement Values
SpectraTrend HT User’s Guide 3.2 APPENDIX A: MEASUREMENT VALUES Color values measured using the SpectraTrend HT are relative to the absolute value or a perfect reflecting diffuser as measured under the same geometric conditions (see ASTM E308), according to the January 1, 1969 recommendation of the International Commission on Illumination, CIE. - Page 96 SpectraTrend HT User’s Guide 3.2 where: X, Y, and Z are CIE tristimulus values , and Z are tristimulus values of the standard illuminant as listed in ASTM E308 with Y always equal to 100.00 (normalized) and K are chromaticity coefficients for the illuminant used (see ASTM E308).
- Page 97 SpectraTrend HT User’s Guide 3.2 where: if X/X > (24/116) if X/X ≤ (24/116) if Y/Y > (24/116) if Y/Y ≤ (24/116) if Z/Z > (24/116) if Z/Z ≤ (24/116) and X , and Z are tristimulus values for any illuminant.
- Page 98 SpectraTrend HT User’s Guide 3.2 Difference Color Scales (available when Display Type is Difference; Reading of Both Standard and Sample Required) dXdYdZ This scale yields the color difference between the sample and the standard via the CIE XYZ scale. dX = X...
- Page 99 SpectraTrend HT User’s Guide 3.2 dL*dC*dH* This scale yields the color difference between the sample and the standard via the CIE L*C*h scale. dL* = L* - L* sample standard dC* = C* - C* sample standard dH* = h°...
- Page 100 SpectraTrend HT User’s Guide 3.2 Whiteness is associated with a region or volume in color space in which objects are recognized as white. Degree of whiteness is measured by the degree of departure of the object from a perfect white.
- Page 101 SpectraTrend HT User’s Guide 3.2 The ASTM D1925 method was withdrawn in 1995, but this formula still provides useful information. This index is only displayed when the data view is configured for C/2°, as this is the only relevant illuminant/observer combination.
- Page 102 SpectraTrend HT User’s Guide 3.2 dYIE and dYID These indices yield the differences between the sample and the standard via the Yellowness Index E313 and Yellowness Index D1925. dYIE = YIE - YIE sample standard dYID = YID - YID...
- Page 103 SpectraTrend HT User’s Guide 3.2 Colorant Strength When SMA is selected as the index, color values are adjusted based on the wavelength of maximum absorbance (minimum reflectance) of the standard. The strength value is displayed as a percentage. SMA = (K/S) ...
- Page 104 SpectraTrend HT User’s Guide 3.2 Where, L*, C*, and H* are those of the standard unless otherwise specified. for L* > 16 SL = 0.511 for L* < 16 0.0638C * SC = + 0.638 + 0.0131C * SH = (FT + 1 - F) SC ...
- Page 105 SpectraTrend HT User’s Guide 3.2 The bottom half of each pair shows the starting color. The top half shows the color of the treated fabric. (Illustration from AATCC Evaluation Procedure 1.) Gray Change, as implemented, is based on ISO 105-A05:1996, Textiles - Tests for Colour Fastness - Part A05: Instrumental Assessment of Change in Colour for Determination of Grey Scale Rating.
- Page 106 SpectraTrend HT User’s Guide 3.2 if |h | > 180 and | < 360 | 360 if |h | > 180 and , C* = lightness, chroma, and hue of Test specimen , C* = lightness, chroma, and hue of Original...
- Page 107 SpectraTrend HT User’s Guide 3.2 Fastness - Part A03: Grey Scale for Assessing Staining, or AATCC Evaluation Procedure 2, “Gray Scale for Staining,” and is used to assess the degree of staining of adjacent fabrics in a color fastness test.
- Page 108 SpectraTrend HT User’s Guide 3.2 The illustration shown above uses the L*a*b* color scale. The middle shade block, 555, is where the standard is located. The first 5 denotes L*, the second 5 denotes a*, and the third 5 denotes b*. The tolerance values are indicated as L*, a*, and b*.
- Page 109 SpectraTrend HT User’s Guide 3.2 Baking Contrast Units Baking Contrast Units (BCU) is a custom color index used in the food industry. BCU are derived from the Y value in the XYZ color scale. Negative values, which occur when Y< 2.5, are truncated to zero.
Need help?
Do you have a question about the SpectraTrend HT and is the answer not in the manual?
Questions and answers